Advanced Custom Fields (ACF) for WordPress
Introduction:
WordPress has changed the game in terms of developing and managing websites because of its user-friendly interface and wide range of opportunities for customization. One of its most powerful features for a developer or a content creator is custom fields. While there’s some basic out-of-the-box functionality for custom fields in WordPress, the Advanced Custom Fields plugin really takes this idea to a whole different level.
In this ultimate guide, we will discuss the complete world of WordPress custom fields using the Advanced Custom Fields plugin. We shall cover setting it up, how to use it, as well as a myriad of ways it can help improve your WordPress development process.
What are WordPress custom fields?
Custom fields in WordPress refer to any extra data that a user may want to attach to posts, pages, or custom post type. They power the holding of extra information other than what is normally provided by the standard title, content & featured image. Extra data can be anything from simple text to complex structures like repeatable content blocks or even image galleries.
Brief overview of ACF plugin
Advanced Custom Fields is a very popular WordPress plugin, which extends the native desired functionality of the custom fields. It supplies an easy user interface to manage and create custom fields, along with numerous types of available fields and their display settings.
Benefits of using ACF in WordPress development
Enhance your site’s functionality and user experience with custom fields and flexible content structures.
1. Flexibility: It is on ACF that you can have a customer content structure that satisfies your needs.
2. User-friendly interface: It’s easy to add and manage custom fields without even needing a developer.
3.Time saving: It saves time since ACF makes extending complex data structures within your WordPress site easy.
4.Improved Content Management: This makes it easier to organize or display your content in meaningful ways with custom fields.
5. Improved development workflow: ACF integrates well with modern development practices & tools.
Understanding Custom Fields in WordPress
Built-in WordPress custom fields functionality
WordPress has always had the out-of-the-box basic custom fields feature. You could find that inside the “Custom Fields” meta box when editing a post or page. Although it works for simple purposes, this native implementation has many limitations to it.
Limitations of native custom fields
Understand the constraints you may face with WordPress’s built-in custom fields.
1. No user-friendly interface for content editors
2. Lack of conditional logic
3. Difficulty in creating complex data structures
4. No built-in display options for the frontend
How ACF enhances custom field management
Overcome the limitations of native custom fields with Advanced Custom Fields’ robust features.
1. It has a rich variety of field types at your disposal: text, number, date-picker, file upload, etc.
2. An intuitive interface to both the developer and content editors.
3. Conditional logic for a smart way of field visibility
4. The ability to create detailed field groups that can be reproduced in several applications
5. Easy ways to display information from custom fields on the frontend
Getting Started with Advanced Custom Fields
Installing and activating the ACF plugin
1. Go to your WordPress dashboard
2. Navigate to Plugins > Add New
3. Search for “Advanced Custom Fields”
4. Click “Install Now” & then “Activate”
ACF Free vs Pro: Features comparison
While the free version is already powerful, these features of the Pro version provide additional advantages, especially in the following areas:
Free Version:
1. Basic field types
2. Field groups
3. Location rules
4. Local JSON
Pro Version (Extra Features):
1. Advanced field types
2. Repeater
3. Flexible Content
4. Gallery
5. ACF Blocks for Gutenberg
6. Options Pages
7. Frontend forms
8. ACF to REST API integration
Creating your first field group
1. Log into your WordPress dashboard and navigate to Custom Fields > Add New
2. Give your field group a name, eg, “Author Bio”
3. Click the “Add Field” button and select a field type, eg, “Text”
4. Here you can configure your field settings, eg, the label name, and instructions
5. Now set the location rules. In this case, click “Show” to show the rules and then click “All posts”
6. Click “Publish” to publish your field group
Exploring ACF Field Types
Overview of common field types
ACF offers a wide range of field types to suit various content needs:
1. Textarea
2. Number
3. Email
4. Password
5. WYSIWYG Editor
6. Image
7. File
8. Select
9. Checkbox
10. Radio Button
11. True/False
12. Link
13. Post Object
14. Page Link
15. Relationship
16. Taxonomy
17. User
18. Google Map
19. Date Picker
20. Color Picker
21. Message
Deep dive into powerful field types
Repeater Field (Pro)
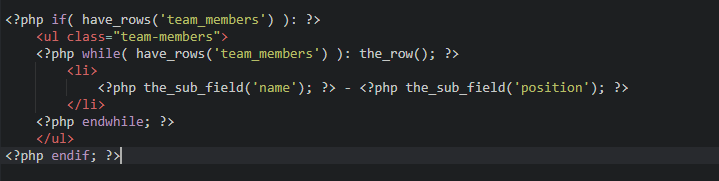
The Repeater field enables the creation of a set of subfields that can be repeated. This comes in very handy when you need to generate dynamic content, such as team member listings or feature lists.
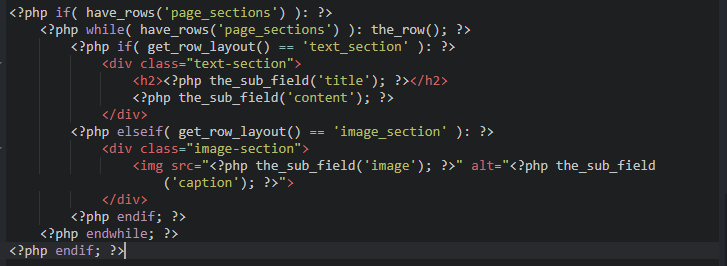
Flexible Content Field (Pro)
It will allow all layouts you’ll define in the flexible content field, so the content editor will be able to pick which ones to deploy and in what order. This is incredibly powerful for creating dynamic page layouts.
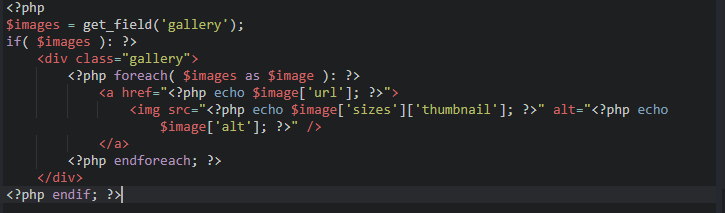
Gallery Field (Pro)
The Gallery field comes with a built-in intuitive interface for handling multiple images—perfect for image galleries or sliders.
Clone Field (Pro)
The Clone field allows you to reuse existing fields or field groups, promoting DRY (Don’t Repeat Yourself) principles in your field configurations.
Creating and Managing Field Groups
Step-by-step guide to creating a new field group
1. Go to Custom Fields > Add New in the WordPress dashboard.
2. Add a title for the field group.
3. Click “Add Field” and then set up, as usual, custom fields.
4. Make settings for each field: Type, Label, Name, Instructions, etc.
5. Adjust the Location Rules for where the field group will appear.
6. Set up the field group settings: Position, Style, etc.
7. Click “Publish” to save your field group.
Adding and configuring custom fields
When adding a new field:
1. Choose a type for the field.
2. Enter a field label (displayed to the user)
3. Enter a field name (used in code to retrieve the field value)
4. If needed, add instructions.
5. 5. Configure type-specific settings (e.g., default value, placeholder text)
6. Be able to set if a field is required or optional.
7. Control the display settings of the field.
Using conditional logic for dynamic form display
Conditional logic allows you to show or hide fields based on the values of other fields:
1. Scroll in the field settings to the area entitled, “Conditional Logic
2. Enable conditional logic
3. Setting rules (e.g., show this field if another field equals some value)
4. This will provide a simple method to create complex conditions using AND or OR logic.
Displaying Custom Fields on the Frontend
Methods for retrieving custom field data
ACF provides several functions to retrieve field data:
1. `get_field()`: Retrieves the value of a field
2. `the_field()`: Displays the value of a field
3. `get_sub_field()`: Retrieves the value of a sub-field (used with repeaters & flexible content)
4. `the_sub_field()`: Displays the value of a sub-field
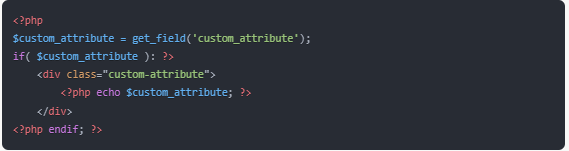
Example:
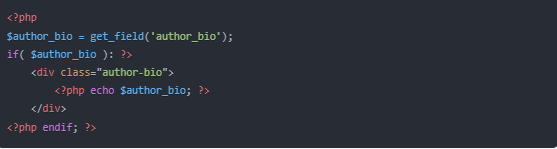
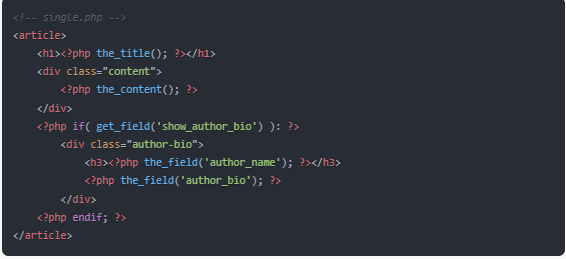
Integrating ACF with theme template files
You can use ACF functions directly in your theme template files:
Using ACF with page builders (e.g., Elementor)
ACF integrates really well with most of the top page builders, Elementor included. You can easily create custom widgets using ACF fields within them as follows:
1. Create a custom Elementor widget:
2. Utilize ACF functions to fetch and output the field into the widget.
3. Register Fields ACF as Elementor Controls to make things easy for editting
Advanced ACF Techniques
Creating ACF Blocks for the Gutenberg editor
ACF allows you to create custom Gutenberg blocks:
1. Register a block in your theme’s `functions.php`:

2. Create a template file for your block:

3. Create an ACF field group for your block
Using the Local JSON feature for version control
ACF’s Local JSON feature allows you to save field group configurations as JSON files in your theme:
1. Create an `acf-json` folder in your theme directory
2. ACF will automatically save & load field configurations from this folder
3. You can now version control your field configurations along with your wordpress theme files
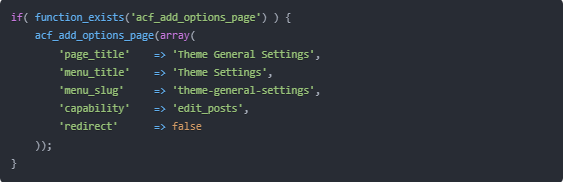
Setting up Options Pages for global fields
Options pages are useful for site-wide settings:
1. Register an options page in your `functions.php`:
2. Create fields for your options page
3. Retrieve option values using `get_field(‘field_name’, ‘option’)`
ACF &WooCommerce Integration
Seamlessly integrate Advanced Custom Fields (ACF) with WooCommerce to enhance product data management and customization in your WooCommerce development projects. Create tailored product fields and improve user experience with this powerful combination.
Adding custom fields to product pages
1. Create a new field group
2. Set the location rule to “Post Type is equal to Product”
3. Add your custom fields
4. Display the fields in your product template:
Enhancing product variations with ACF
1. Create a field group for product variations
2. Set the location rule to “Post Type is equal to Product” &”Product Type is equal to Variable”
3. Add your custom fields
4. Use hooks to display & save variation fields:

Practical Examples & Use Cases
Creating a dynamic event calendar with custom fields
1. Create a custom post type for events
2. Add custom fields for event details (date, time, location, etc.)
3. Use these fields to display events in a calendar format
Building a portfolio showcase using ACF
1. Create a custom post type for portfolio items
2. Add custom fields for project details (client, date, technologies used, etc.)
3. Use a repeater field for project images
4. Display portfolio items using a grid or masonry layout
Customizing post types with ACF fields
1. Add custom fields to existing post types (e.g., adding a subtitle to blog posts)
2. Create custom metaboxes for better organization of fields
3. Use conditional logic to show/hide fields based on post format or category
Performance Considerations
WordPress metadata storage & ACF
ACF stores its data in the WordPress `postmeta` table. For complex field types like repeaters, this can lead to many database entries per post.
Optimizing ACF for better site performance
1. Use caching plugins to reduce database queries
2. Consider using the `acf/format_value` filter to optimize data retrieval
3. Use ACF’s built-in caching for expensive operations
4. Be mindful of the number of fields & complex field types used
Extending ACF
Popular ACF add-ons and extensions
1. ACF to REST API
2. ACF Content Analysis for Yoast SEO
3. ACF Columns
4. Advanced Custom Fields: Table Field
Creating custom ACF fields
Extend ACF’s functionality by creating custom fields that tailor perfectly to your content management needs.
1. Use the `acf_register_field_type()` function to register your field type
2. Create a class that extends `acf_field` to define your field’s behavior
3. Implement the necessary methods (render_field, update_value, load_value, etc.)
Troubleshooting and Best Practices
Ensure your custom fields display and function as expected by addressing these potential problems:
1. Field not displaying: Check location rules & field visibility settings
2. Data not saving: Ensure proper nonce verification &user capabilities
3. Performance issues: Review database queries & consider caching
ACF development best practices
1. Use descriptive field names & labels
2. Organize fields into logical groups
3. Utilize conditional logic to simplify the user interface
4. Document your field usage for other developers
5. Use version control for your ACF JSON files
6. Regularly update ACF & its add-ons
Conclusion
Advanced Custom Fields is a game-changer for WordPress development, offering unparalleled flexibility & power in content management. By mastering ACF, you can create highly customized, dynamic websites that are both user-friendly for content editors & efficient for developers.
As you continue to explore ACF, remember that it’s true power lies in how you apply it to solve real-world problems. Whether you’re building a complex e-commerce site, a portfolio showcase, or a simple blog with enhanced features, ACF provides the tools you need to bring your vision to life.
Keep experimenting, stay curious, and don’t hesitate to dive into the ACF documentation and community resources. With ACF in your toolkit, you’re well-equipped to take on any WordPress development challenge that comes your way.