How to Pick the Perfect WordPress Theme

Selecting the right WordPress theme is one of the most critical decisions you can make when building your website. A WordPress theme determines the design, layout, and even the functionality of your website. Choosing the perfect theme sets the tone for your brand, enhances user experience, and can significantly impact your website’s performance and SEO ranking.

In this comprehensive guide, we’ll walk you through everything you need to know about how to pick the best WordPress theme for your website. From key factors to consider to common mistakes and expert tips, this blog will ensure you make an informed decision that aligns with your goals.

Introduction

A WordPress theme is essentially a template that dictates how your website will look and function. It controls the visual elements like colors, fonts, layouts, headers, and footers while determining the user experience on your site. Themes are vital because they not only influence aesthetics but also functionality, performance, and user engagement.

Choosing the right theme for your WordPress website is about more than just looks. The right choice ensures that your website runs smoothly, supports the features you need, and provides a seamless experience for visitors.

In this blog, we’ll guide you through the entire process of selecting a WordPress theme. By the end, you’ll understand how to prioritize design, performance, compatibility, and SEO features to ensure your WordPress website stands out.

Key Factors to Consider When Choosing a WordPress Theme

Factors to Consider When Choosing a WordPress Theme

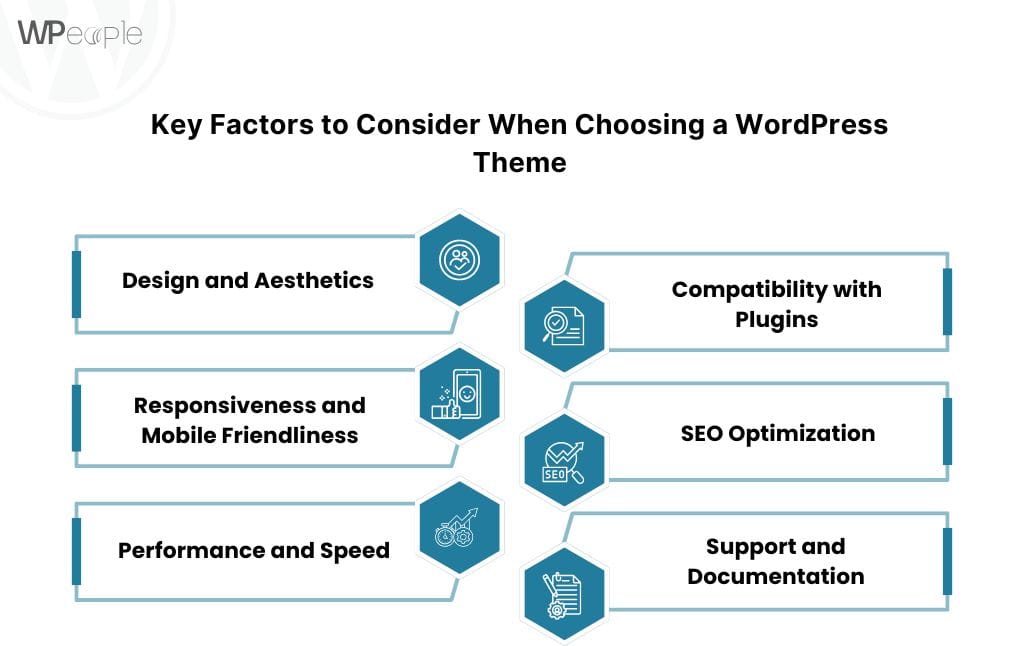
When choosing a WordPress theme, several critical factors should guide your decision. These will help you select a theme that aligns with your brand’s vision, supports essential features, and is easy to maintain in the long term.

Design and Aesthetics

Your WordPress theme should reflect your brand identity and resonate with your target audience. A visually appealing design creates trust and credibility with visitors.

Here are a few tips when evaluating the design:

  • Prioritize Simplicity vs. Customization: Simplicity can be a better choice if you want clean, professional visuals with minimal distractions. However, if your brand requires unique branding elements, go for themes with high customization options.
  • Ensure Brand Alignment: Your theme’s colors, fonts, and overall style should align with your brand’s voice.

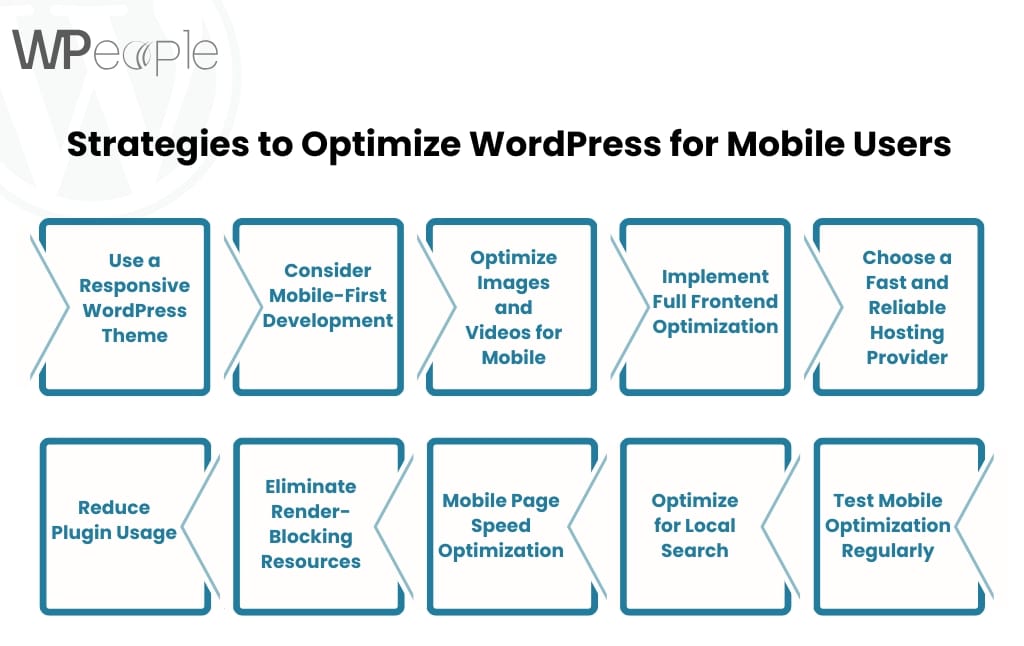
Responsiveness and Mobile Friendliness

A responsive WordPress theme is crucial in today’s mobile-first world. Mobile devices account for a majority of web traffic globally, so ensure your website looks great on smartphones, tablets, and desktops.

When evaluating responsiveness, ask:

  • Does the design adjust seamlessly to different screen sizes?
  • Are all buttons, menus, and content easily accessible on mobile devices?

You can test responsiveness using online tools like Google’s Mobile-Friendly Test or by resizing your browser window during testing.

Performance and Speed

Website performance directly impacts user experience and SEO rankings. A well-coded, optimized WordPress theme ensures your website loads quickly. Websites with slow load times risk losing visitors and search rankings.

Here’s how you can ensure great performance:

  1. Opt for lightweight themes with minimal bloat.
  2. Use tools like Google PageSpeed Insights or GTmetrix to assess website speed.
  3. Avoid themes overloaded with unnecessary features and widgets.

Compatibility with Plugins

WordPress relies on plugins for added functionality, whether you’re adding contact forms, e-commerce capabilities, SEO tools, or other features. Your WordPress theme must be compatible with the plugins you plan to use.

Before choosing a theme:

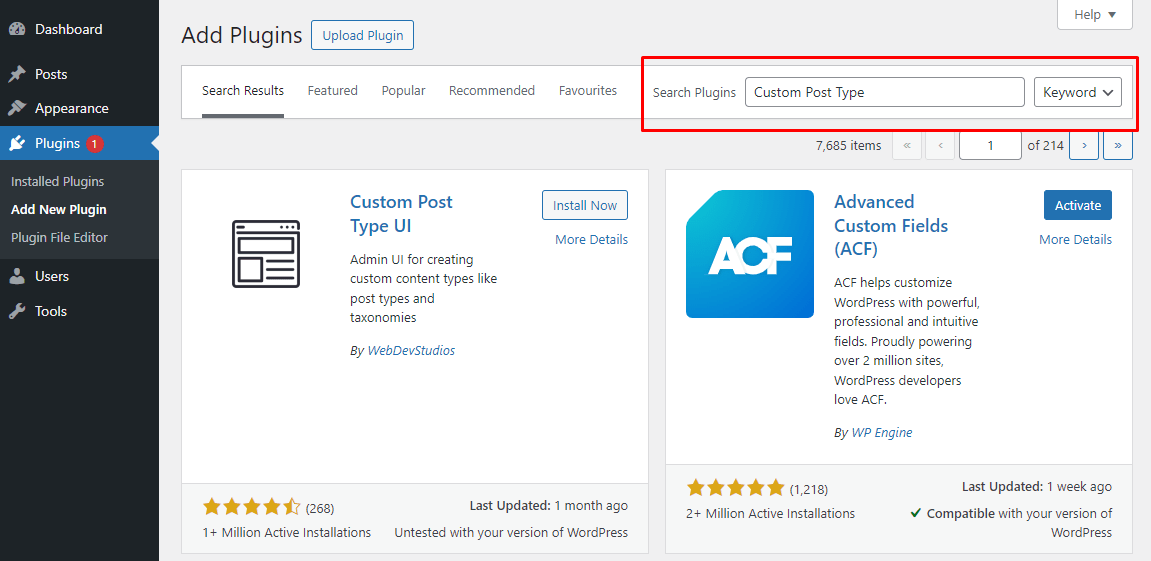
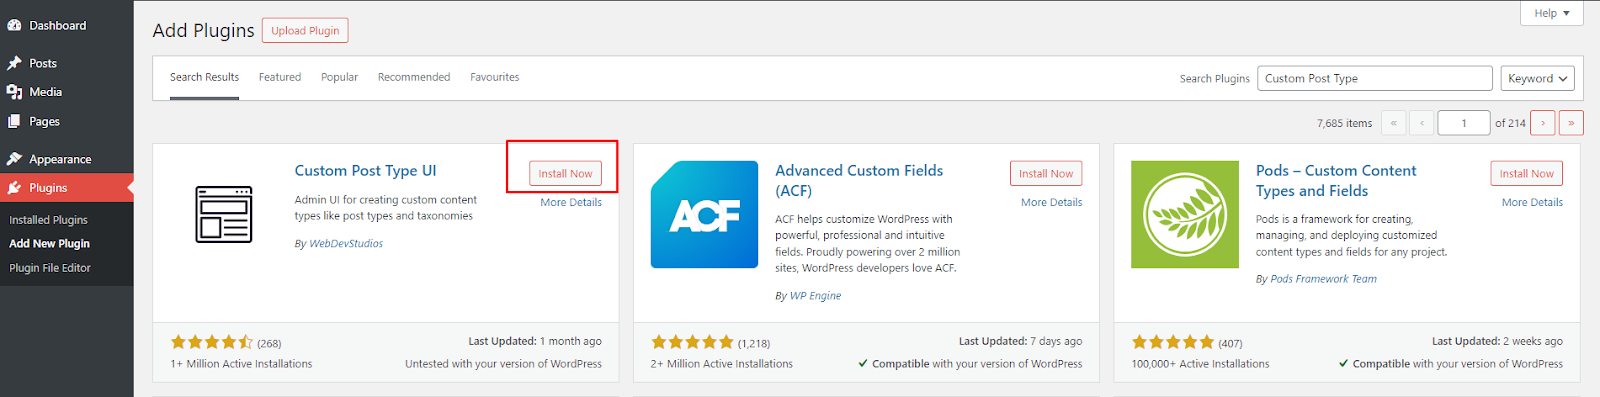
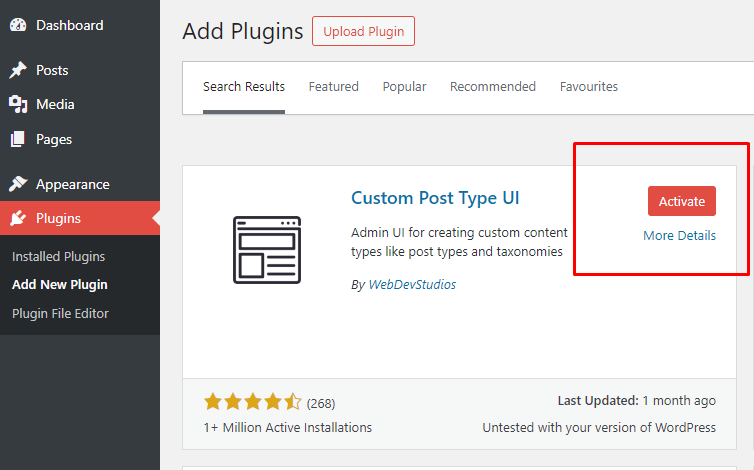
  • Check if it supports popular plugins like WooCommerce, Yoast SEO, Elementor, or Contact Form 7.
  • Read user reviews to confirm compatibility and ease of integration.

SEO Optimization

Search Engine Optimization (SEO) determines how well your site ranks in search engine results. A good WordPress theme should be SEO-friendly and adhere to coding best practices.

Look for these features in a WordPress theme:

  • Fast load times.
  • Schema markup support.
  • Clean and optimized code.

If you’re unsure, many SEO plugins can help boost your site’s SEO, but a good theme will give you a head start.

Support and Documentation

Support and documentation are crucial for navigating technical challenges. A theme with detailed documentation and active support makes it easier to troubleshoot problems or make adjustments.

Here’s how you can check this:

  • Look for reviews and ratings to ensure the theme provider offers excellent customer service.
  • Examine whether the theme comes with comprehensive guides, tutorials, or user forums.

Types of WordPress Themes: Which One is Right for You?

WordPress themes come in different styles, functionalities, and marketplaces. Understanding the types will help you narrow down your search and choose one that fits your needs.

Free vs. Premium WordPress Themes

  1. Free WordPress Themes: Available directly in the WordPress repository, these themes are a great option for small websites or those on a budget.
    • Pros: Free, quick to set up, and accessible.
    • Cons: Limited features, fewer design options, and sometimes less reliable support.
  2. Premium WordPress Themes: These are paid themes that offer advanced design options, features, and customer support.
    • Pros: More customization, advanced features, and dedicated support.
    • Cons: Costly for small projects.

When to Invest in Premium Themes: If your website requires unique features, advanced design, or robust e-commerce capabilities, premium themes are often worth the investment.

Specialized Themes vs. Multipurpose Themes

  1. Specialized Themes: Designed for specific niches like blogs, e-commerce stores, portfolios, or non-profits. They cater to very specific website needs.
  2. Multipurpose Themes: These are versatile, all-in-one themes that can adapt to different purposes. They’re great if you plan to change your website’s direction in the future.

Theme Marketplaces to Explore

Several online marketplaces are trusted sources for premium and specialized WordPress themes:

  1. ThemeForest: A vast marketplace with thousands of themes suitable for all niches.
  2. Elegant Themes: Known for its Divi Builder and well-designed themes.
  3. StudioPress: Home to the Genesis Framework, perfect for advanced users.

Explore these marketplaces for inspiration and find a theme that suits your goals.

How to Assess a WordPress Theme Before Installing It

Before installing a WordPress theme, take the time to evaluate it to ensure it meets your needs.

Examine the Theme Demo

Theme demos showcase how a theme looks and works in real-time. Always test out demo sites to determine if the theme will meet your expectations.

Read Customer Reviews

Customer reviews provide insights into real user experiences. Look for consistent positive or negative feedback about a theme’s reliability, speed, and support.

Test the Theme’s Features with a Demo Site

Many theme providers allow you to use demo installations to explore features. These are invaluable for testing the user experience without fully committing.

Check for Compatibility with Your WordPress Version

Always check if the theme is updated and compatible with your current WordPress version to avoid conflicts or bugs.

Common Mistakes When Choosing a WordPress Theme & How to Avoid Them

Avoid these common pitfalls to save time and ensure you choose the right WordPress theme:

  1. Choosing a Theme Just for Its Look, Without Considering Functionality.
  2. Ignoring Mobile Responsiveness.
  3. Not Checking for SEO Best Practices.
  4. Overloading the Theme with Features You Don’t Need.
  5. Skipping Reviews or Not Testing the Theme in Action.

Avoiding these mistakes ensures a smoother website-building journey.

How to Set Up & Customize Your WordPress Theme

After choosing a theme, the next step is installation and customization. WordPress offers easy-to-use tools like Theme Customizer or page builders (Elementor, WPBakery) to make tweaks.

Follow these steps:

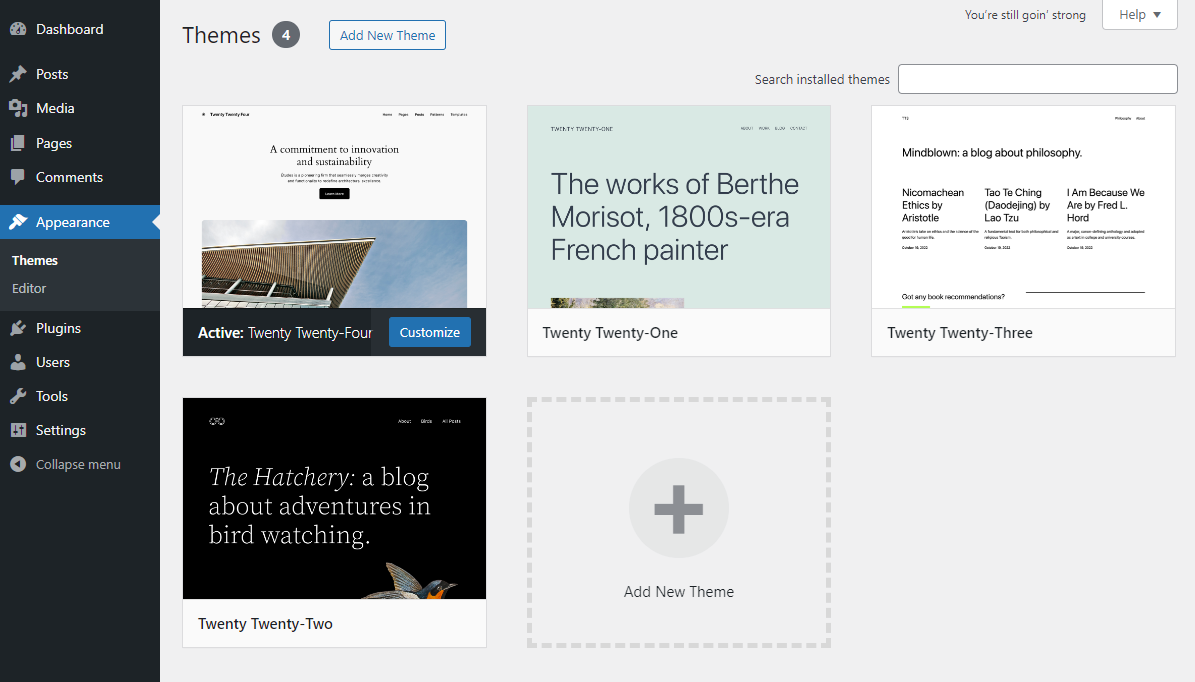
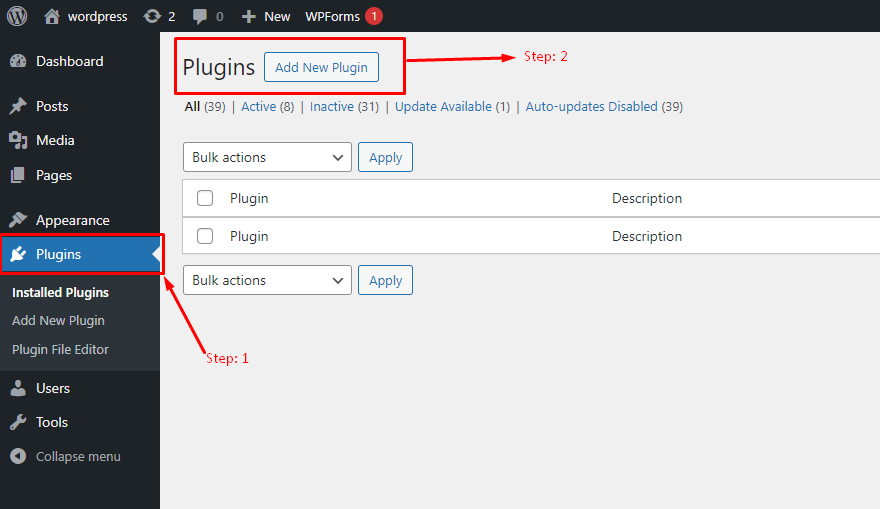
  1. Install the theme via Appearance > Themes.
  2. Customize it using Appearance > Customize.
  3. Add content and configure widgets.

For advanced customizations, consider hiring a developer.

When Should You Hire a Developer to Help with Your WordPress Theme?

Signs you need professional help include:

  • Complex e-commerce or design needs.
  • Customization requirements beyond your skill level.
  • Performance or speed issues.

A developer can save time and ensure everything works perfectly.

Conclusion

Selecting the right WordPress theme is a combination of aesthetics, functionality, and SEO performance & compatibility. Taking the time to research, demo-test, and choose carefully can save you technical headaches in the future.

Explore themes carefully or contact a professional for expert guidance if needed. Your website’s success depends on the foundation you lay today!

FAQs

What is the difference between a free and premium WordPress theme?

Free WordPress Themes:
Free themes are available in the WordPress Theme Repository and are generally easy to install and use. They’re great for simple websites and small businesses on a budget.

Pros of Free Themes:

  • They are free of charge.
  • Quick to set up and install.
  • Good for basic websites or personal projects.

Cons of Free Themes:

  • Limited design and customization options.
  • Often lack advanced features.
  • May not have dedicated customer support.

Premium WordPress Themes:
Premium themes are paid and typically offer advanced design features, better performance, and dedicated support.

Pros of Premium Themes:

  • Advanced design and customization options.
  • Dedicated customer support and updates.
  • Built with additional features like SEO optimization and integration with popular plugins.

Cons of Premium Themes:

  • They cost money (usually a one-time or annual fee).

When to Choose Premium Themes:
If you want advanced functionality, better customization options, or require dedicated support, investing in a premium theme is worth it.

How can I tell if a WordPress theme is mobile-friendly?

A mobile-friendly theme ensures that your website looks and functions well on all devices, including smartphones, tablets, and desktops. Here’s how to check if a WordPress theme is mobile-friendly:

  1. Use Google’s Mobile-Friendly Test Tool:
    Input the theme demo URL into Google’s Mobile-Friendly Test. This will indicate if the site is optimized for mobile viewing.
  2. Test it Manually:
    Resize your browser window to simulate mobile devices, or open the demo on different mobile devices.
  3. Check Responsiveness Features:
    A responsive theme will adjust menus, text, and layouts automatically as per screen size.
  4. Look at Theme Descriptions:
    Most WordPress themes explicitly mention responsiveness as a feature if they are mobile-friendly.

How much customization do WordPress themes allow?

The amount of customization varies depending on the WordPress theme you choose:

  1. Free Themes:
    Generally allow basic adjustments like logo uploads, color changes, and simple widget placements.
  2. Premium Themes:
    Premium themes come with advanced customization options, including options via the WordPress Customizer, built-in page builders (Elementor, WPBakery, etc.), or custom settings.
  3. Theme Builders & Plugins:
    Tools like Elementor or the WordPress Theme Customizer allow you to tweak design elements like font styles, colors, layout, and more.

For advanced changes like custom CSS, hiring a developer may be necessary unless you have coding knowledge.

Can I change my WordPress theme after my website has gone live?

Yes, you can change your WordPress theme at any time, even after your website has gone live. However, there are a few things to keep in mind:

  • Content and Formatting: Changing a theme may affect how your content is displayed, as themes have different templates. Double-check everything after switching themes.
  • Backup Your Website: Always backup your website before switching themes to ensure you can revert changes if something goes wrong.
  • Test on a Staging Site: If possible, test the new theme on a staging environment before applying changes to your live website.

What are the best WordPress theme marketplaces?

There are several popular marketplaces where you can find both free and premium WordPress themes. Here are some trusted options:

  1. ThemeForest: One of the largest marketplaces for premium WordPress themes. You’ll find thousands of options for every niche here.
  2. Elegant Themes: Known for the Divi Builder and well-crafted themes. Ideal for multipurpose sites.
  3. StudioPress: Home of the Genesis Framework, great for developers and minimalistic designs.
  4. TemplateMonster: Offers a wide range of premium themes and pre-built website templates.
  5. MOJO Marketplace: A great choice for beginners and small businesses.

These marketplaces are excellent resources to find professional, well-coded WordPress themes suited for different purposes.

How do I know if a WordPress theme is SEO optimized?

An SEO-optimized WordP ress theme improves your chances of ranking higher in search engine results. Look for the following signs to determine if a theme is SEO-optimized:

  1. Speed and Performance:
    Fast-loading themes are better optimized for SEO. Use tools like Google PageSpeed Insights to test performance.
  2. Schema Markup Support:
    Schema markup allows search engines to better understand your content. Most SEO-optimized themes integrate schema markup.
  3. Clean, Lightweight Code:
    Well-coded themes load faster and are easier for search engines to index.
  4. Responsive Design:
    Mobile-friendly and responsive themes rank higher in mobile search results.
  5. Compatibility with SEO Plugins:
    Look for themes that integrate seamlessly with SEO plugins like Yoast SEO or Rank Math.

Do I need technical skills to change or customize a WordPress theme?

You do not necessarily need advanced technical skills to customize a WordPress theme.

  1. Beginner-Friendly Customizations:
    • Changing colors and logos using the WordPress Customizer.
    • Adjusting basic layout options or widgets.
  2. Intermediate Skills:
    • Using page builders like Elementor or WPBakery.
  3. Advanced Customization:
    • Editing CSS or creating custom templates requires coding knowledge.
    • Hiring a developer is recommended if you lack these skills.

WordPress offers a balance of intuitive tools and advanced customization options, catering to users of all technical levels.

Why is theme performance important for my WordPress website?

Theme performance plays a key role in user experience and SEO rankings. A poorly coded or heavy WordPress theme can lead to slow load times, which can frustrate users and increase bounce rates.

Why Theme Performance Matters:

  1. Improved User Experience: Faster websites are easier for users to navigate and engage with.
  2. Better SEO Rankings: Google prioritizes speed as a ranking factor.
  3. Reduced Bounce Rates: Users are more likely to leave if a site takes too long to load.

How to Improve Theme Performance:

  • Choose lightweight themes.
  • Optimize images and media.
  • Use caching plugins.
  • Avoid feature overload and unnecessary widgets.

By ensuring your theme is optimized for speed, you’re giving your visitors and search engines a better experience.

How To Create WordPress Custom Widgets (Complete Guide)

Understanding WordPress Widgets

What Are WordPress Widgets?

WordPress widgets are small, flexible tools that add functionality or content to areas like sidebars, footers, or headers. They enhance a site’s layout and features without requiring extensive coding. Widgets display dynamic content such as recent posts, calendars, or search bars, making them valuable for both developers and non-technical users.

Why Use Custom Widgets?

Custom widgets let developers create functionalities tailored to specific needs, such as fetching external data, displaying user-specific content, or adding unique branding. Unlike pre-installed widgets, custom widgets enable personalized experiences and improved user engagement.

Pre-installed vs. Custom Widgets

Pre-installed widgets, bundled with WordPress or plugins, suit general needs like displaying categories or archives but lack flexibility. Custom widgets, built from scratch or modified, allow developers to fine-tune features to align with a website’s specific goals and audience.

Key Benefits of WordPress Custom Widgets

Enhancing Functionality

Custom widgets extend website functionality by integrating features like live chat, user-specific content, or external API data. They transform standard sites into dynamic platforms tailored to unique business or user needs.

Personalizing User Experience

Custom widgets enable features that connect with your audience. A travel blog might include a weather widget for featured destinations, while an e-commerce site can display personalized product recommendations, boosting engagement and return visits.

Streamlining Site Management

Custom widgets offer user-friendly interfaces, allowing admins to manage complex features directly from the WordPress dashboard without coding. This saves time, reduces errors, and simplifies site management for non-technical users.

Prerequisites for Creating a Custom Widget

Required Knowledge: PHP, HTML, and WordPress Basics
To develop custom widgets, you’ll need:

  • PHP: Understanding syntax, functions, and logic is essential since WordPress is PHP-based.
  • HTML and CSS: For structuring and styling the widget to match your site’s design.
  • WordPress Basics: Familiarity with themes, the WordPress Codex, and functions like add_action and add_filter.

Necessary Tools and Software
Ensure you have:

  • Code Editor: Tools like Visual Studio Code, Sublime Text, or PHPStorm for efficient coding.
  • Local Development Environment: Use XAMPP, MAMP, or Local by Flywheel for safe testing.
  • FTP Client: FileZilla or similar tools to manage files on your WordPress server.

Preparing Your Development Environment

  • Backup Your Website: Use tools like UpdraftPlus to secure your data before making changes.
  • Create a Child Theme: Prevent overwriting customizations by working in a child theme.
  • Enable Debugging: Edit the wp-config.php file to catch and resolve errors during development.

Core Components of a WordPress Widget

Widget Classes and Methods

At the heart of every WordPress widget is the WP_Widget class. This class provides a framework for defining a widget’s structure and functionality. To create a custom widget, you need to extend this class and override its core methods:

  1. __construct(): Initializes the widget with a name, description, and unique ID.
  2. widget(): Defines how the widget’s content is displayed on the front end.
  3. form(): Creates a user-friendly interface in the WordPress admin panel, allowing administrators to configure the widget’s settings.
  4. update(): Saves changes made to the widget’s settings.

By utilizing these methods, developers can ensure that their widgets are both functional and easy to manage.

Frontend vs. Backend Rendering

Widgets have two primary environments:

  • Frontend Rendering: Handles how the widget appears to users on the live site. This includes the HTML, CSS, and any dynamic content displayed. The widget() method manages this.
  • Backend Rendering: Controls the configuration settings displayed in the WordPress admin dashboard. The form() method is responsible for this functionality, making it easy for admins to customize the widget.

Setting Up Widget Controls

Adding intuitive controls is essential for user-friendly widgets. Common control options include:

  • Text Inputs: For entering titles, URLs, or other custom text.
  • Dropdowns: To select options such as categories or layouts.
  • Checkboxes: For enabling or disabling specific features.

The form() method is where you’ll code these controls using standard HTML and save the settings with the update() method. By implementing these components thoughtfully, you ensure your widget is both functional and accessible.

Planning Your Custom Widget

Defining the Widget’s Purpose

Before writing a single line of code, it’s vital to clarify what your widget will achieve. Ask yourself:

  • What functionality should it provide? For example, will it display recent posts, integrate an external service, or offer a unique feature like a countdown timer?
  • What value will it add to the website? A well-planned widget should enhance the user experience or streamline site management.

Having a clear purpose helps you focus on the widget’s essential features, avoiding unnecessary complexity.

Analyzing Your Audience’s Needs

Understanding your target audience ensures that your widget aligns with their expectations. Consider:

  • Who will use the widget? If it’s for end-users, prioritize simplicity and aesthetics. If it’s for administrators, focus on ease of configuration and functionality.
  • What are their pain points? For instance, an e-commerce site might need a widget to showcase related products, while a blogger might want a widget that highlights trending articles.

Gathering feedback or reviewing analytics can provide insights into what your audience needs most.

Outlining Features and Functions

Once you’ve defined the purpose and audience, outline the specific features your widget will include. For example:

  • Frontend Features: What content or interactivity will the widget display to users?
  • Backend Controls: What options will administrators have to customize the widget?
  • Styling Requirements: Will the widget require responsive design or advanced animations?

Documenting these details provides a roadmap for development and ensures that you don’t overlook critical functionality.

Step-by-Step Guide to Creating a Custom Widget

Registering Your Widget

The first step in creating a wordpress custom widget is registering it with WordPress using the widgets_init action hook. This ensures that WordPress knows about your widget and can display it in the widget areas. Here’s an example of how to register a widget:

php

function register_my_custom_widget() {

    register_widget(‘My_Custom_Widget’);

}

add_action(‘widgets_init’, ‘register_my_custom_widget’);

In this example, the function register_my_custom_widget registers the custom widget class My_Custom_Widget, which you will define later.

Creating the Widget Class

The next step is creating the widget class itself by extending the WP_Widget class. Here’s how you can begin building your custom widget class:

php

This class contains the necessary methods:

  • __construct(): Initializes the widget with a unique ID, a name, and a description.
  • widget(): Defines how the widget will display its content on the front end.
  • form(): Creates the form that appears in the WordPress admin for customizing the widget.
  • update(): Handles saving any changes made in the widget settings form.

Adding Functionality

Now that the basic structure of the widget is in place, it’s time to add functionality. The widget() method is where you define what your widget will display to users. For example, if you’re building a widget that shows recent posts, you might fetch the posts like this:

php

In this code, wp_get_recent_posts() fetches the most recent posts, and the widget displays them in an unordered list.

Styling the Widget

Styling your widget is important to ensure it matches the design of your website. You can add CSS in your theme’s stylesheet or load it dynamically from within the widget. For example:

php

You can then add styles in your theme’s CSS file or enqueue custom CSS for your widget.

Adding Options to Your Custom Widget

Using the form() Method

The form() method is responsible for creating the form in the WordPress admin area, where site administrators can configure the widget’s settings. This is where you define the options available for the widget, such as text fields, checkboxes, or dropdown menus. For example, to add a text field where the user can input a title for the widget, you would write the following:

php

In this example, the form() method creates an input field for the widget’s title. The get_field_id() and get_field_name() functions ensure that the correct IDs and names are assigned to the form fields, allowing WordPress to process and save the data correctly.

Saving Data with the update() Method

Once the user updates the widget settings, the update() method is called to save the new values. This method compares the old and new values and stores them. Here’s an example of how to save the title set in the form:

php

public function update($new_instance, $old_instance) {

    $instance = $old_instance;

    $instance[‘title’] = (!empty($new_instance[‘title’])) ? strip_tags($new_instance[‘title’]) : ”;

    return $instance;

}

In this example, the update() method checks the new value for the title field, strips any tags for security, and then saves it into the widget instance.

Displaying Data with the widget() Method

The widget() method is responsible for rendering the widget content on the front end. It outputs the content stored in the widget’s settings, as configured in the form() method. For example, to display the title set by the user, you would access the saved title using $instance[‘title’] and display it like this:

php

public function widget($args, $instance) {

    echo $args[‘before_widget’];

    if (!empty($instance[‘title’])) {

        echo $args[‘before_title’] . apply_filters(‘widget_title’, $instance[‘title’]) . $args[‘after_title’];

    }

    echo $args[‘after_widget’];

}

In this example, the title input by the user is displayed as the widget’s title on the front end. The apply_filters(‘widget_title’, $instance[‘title’]) function allows other plugins to modify the title, if necessary.

Integrating Your Widget into WordPress

Registering Widgets in functions.php

After creating your custom widget class, you need to register it within WordPress so that it appears in the widget areas of your site. This is done by adding a function to the functions.php file of your theme (or child theme). Here’s how to register your widget:

php

function register_my_custom_widget() {

    register_widget(‘My_Custom_Widget’);

}

add_action(‘widgets_init’, ‘register_my_custom_widget’);

This code hooks into the widgets_init action, ensuring that your widget is available in the WordPress widget settings area. When users go to the “Widgets” section in the WordPress dashboard, they’ll see your custom widget listed among the available options.

Testing on the WordPress Dashboard

Once you’ve registered your widget, go to the WordPress Dashboard and navigate to Appearance > Widgets. You should see your custom widget listed. To test it, simply drag it into a widget area (such as the sidebar or footer) and configure any settings through the widget’s options form.

Check the front end of your site to ensure the widget displays correctly. Verify that any dynamic content (like recent posts or custom messages) is shown as expected.

Debugging Common Errors

During development, you may encounter issues such as missing widget content, display problems, or incorrect settings saving. Here are some common debugging steps:

  • Check for Errors: Enable WordPress debugging in the wp-config.php file by setting define(‘WP_DEBUG’, true);. This will display errors on your site or in your error log.
  • Verify Widget Registration: Ensure that the widget is properly registered by double-checking your functions.php file for syntax errors.
  • Clear Cache: Sometimes, caching can prevent new widgets from appearing or updating. Clear your site’s cache or disable caching temporarily to test changes.
  • Test with Default Theme: If your widget doesn’t display correctly, switch to a default theme like Twenty Twenty-One to see if the issue is theme-related.

By following these steps, you can integrate your widget into WordPress and ensure it works seamlessly within your site’s layout.

Styling and Customizing Your Widget

Applying CSS for Visual Appeal

Styling your wordpress custom widget ensures that it integrates seamlessly with your site’s overall design. You can either add custom styles directly to your widget’s HTML output or enqueue an external stylesheet for more complex styling. Here’s a simple example of applying CSS to your widget:

php

public function widget($args, $instance) {

    echo $args[‘before_widget’];

    echo ‘<div class=”my-custom-widget”>’; // Add custom class for styling

    // Display widget content here

    echo ‘</div>’;

    echo $args[‘after_widget’];

}

Then, in your theme’s style.css file, you can add:

css

.my-custom-widget {

    background-color: #f4f4f4;

    padding: 20px;

    border-radius: 5px;

}

.my-custom-widget h2 {

    font-size: 18px;

    color: #333;

}

This will apply a background color, padding, and border-radius to your widget, giving it a more polished look.

Responsive Design Best Practices

A good custom widget should be responsive, meaning it adjusts appropriately for mobile and tablet users. You can use media queries in your CSS to ensure your widget adapts to different screen sizes. For example:

css

@media (max-width: 600px) {

    .my-custom-widget {

        padding: 10px;

    }

    .my-custom-widget h2 {

        font-size: 16px;

    }

}

This example reduces the padding and font size of the widget on smaller screens. Ensuring your widget is mobile-friendly will improve the user experience for visitors on all devices.

Enhancing Accessibility

Accessibility is key to making your widget usable by a wide range of users, including those with disabilities. To enhance accessibility, consider the following:

  • Use Semantic HTML: Ensure that your widget uses proper HTML tags (like <h2> for titles, <ul> for lists) to improve screen reader compatibility.
  • Provide Alt Text: If your widget contains images or icons, make sure to include descriptive alt attributes.
  • Keyboard Navigation: Ensure that users can interact with your widget using a keyboard alone. This might involve adding tabindex attributes or ensuring that form fields are focusable.

For example:

php

<img src=”widget-image.jpg” alt=”Description of widget content” />

This approach not only makes your widget visually appealing but also ensures that it meets accessibility standards and functions across all devices.

Best Practices for Widget Development

Code Efficiency and Cleanliness

Writing efficient and clean code is essential for creating maintainable and high-performance widgets. Here are a few best practices to ensure your code is both effective and scalable:

  • Avoid Redundancy: Reuse code where possible. For example, if you’re querying the database multiple times, try to minimize the number of database calls.
  • Use WordPress Functions: Whenever possible, rely on built-in WordPress functions (e.g., wp_get_recent_posts(), get_option()) instead of reinventing the wheel. This helps improve performance and ensures compatibility with future WordPress updates.
  • Keep Code Well-Organized: Break your code into smaller, manageable functions. For example, separate the logic for displaying the widget, handling form inputs, and saving settings into distinct functions.

Here’s a simple example of modularizing widget code:

php

function my_widget_display_content($args) {

    $posts = wp_get_recent_posts();

    foreach ($posts as $post) {

        echo ‘<li>’ . esc_html($post[‘post_title’]) . ‘</li>’;

    }

}

Security Considerations

Security should always be a top priority when developing custom widgets, as poorly written widgets can open your site to vulnerabilities. Some key security practices include:

Sanitize and Escape Data: Always sanitize and escape user inputs to prevent attacks like Cross-Site Scripting (XSS) or SQL injection.
For example, when displaying data entered in the widget form:
php

$title = sanitize_text_field($instance[‘title’]);

echo esc_html($title);

  • Use Nonces: Nonces are security tokens that protect your forms from CSRF (Cross-Site Request Forgery) attacks. Ensure that all forms within your widget use WordPress nonces for validation.

php

wp_nonce_field(‘widget_nonce_action’, ‘widget_nonce’);

Performance Optimization

A well-optimized widget ensures a fast, responsive website. Here are some ways to optimize the performance of your widget:

Limit Database Queries: Avoid excessive database queries, as they can slow down the site. For example, instead of fetching all posts, limit the query to only the necessary number of posts:
php

$recent_posts = wp_get_recent_posts(array(‘numberposts’ => 5)); // Limit to 5 posts

Cache Widget Output: If your widget is displaying data that doesn’t change frequently (e.g., recent posts or a static message), consider caching its output. This can be done using WordPress’s built-in transients API:
php

$widget_content = get_transient(‘my_widget_content’);

if (!$widget_content) {

    $widget_content = wp_get_recent_posts();

    set_transient(‘my_widget_content’, $widget_content, 12 * HOUR_IN_SECONDS);

}

Defer or Async Load for Scripts: If your widget uses external JavaScript, make sure to load scripts asynchronously or defer them to improve page load time.

By adhering to these best practices, you can ensure that your custom widget performs well, remains secure, and is easy to maintain.

Advanced Widget Functionalities

Adding JavaScript Interactivity

While widgets in WordPress are primarily used to display static content, adding JavaScript can significantly enhance user interaction and engagement. For example, you can make your widget interactive by adding features like sliders, dynamic content updates, or animations.

To add JavaScript functionality to your widget, you can enqueue the necessary scripts. Here’s an example of how to include JavaScript for your widget:

php

function my_custom_widget_scripts() {

    wp_enqueue_script(‘my-widget-js’, plugin_dir_url(__FILE__) . ‘js/my-widget.js’, array(‘jquery’), null, true);

}

add_action(‘wp_enqueue_scripts’, ‘my_custom_widget_scripts’);

In your JavaScript file (my-widget.js), you could add an interactive element, like a click event that displays hidden content:

javascript

jQuery(document).ready(function($) {

    $(‘.widget-toggle’).click(function() {

        $(this).next(‘.widget-content’).slideToggle();

    });

});

This simple interaction allows users to toggle content within the widget, making it more dynamic and user-friendly.

Connecting to External APIs

To extend the functionality of your custom widget, you can connect it to external APIs. This is useful if you want to display dynamic data from external sources, such as weather information, social media feeds, or stock prices.

Here’s an example of how you could pull data from an external API and display it in your widget:

php

In this example, the widget fetches data from an external API and displays it on the front end. Always ensure that API requests are made asynchronously, to avoid blocking the main page load.

Enabling Multi-language Support

If you’re building a widget for a multilingual website, it’s essential to ensure that your widget supports multiple languages. You can easily integrate your widget with WordPress’s localization functions to translate the widget’s text strings.

For example, to make the widget title translatable, use the __() function for localization:

php

In this example, the title label and placeholder text are wrapped with the __() function, allowing them to be translated into different languages. You can use WordPress translation plugins (like WPML or Polylang) to handle the translations, ensuring your widget is fully multilingual.

Troubleshooting and Debugging

Identifying Common Issues

When creating a wordpress custom widget, developers often encounter a variety of issues. Identifying the root cause of problems can be tricky, but here are some common issues and tips on how to troubleshoot them:

  1. Widget Not Appearing in Dashboard
    • Cause: The widget isn’t registered correctly in the functions.php file.

Solution: Double-check that you’ve registered the widget with the correct class name and hooked it into widgets_init properly. For example:
php

function register_my_custom_widget() {

    register_widget(‘My_Custom_Widget’);

}

add_action(‘widgets_init’, ‘register_my_custom_widget’);

  1. Widget Output Is Empty or Not Displaying Properly
    • Cause: The widget() method may not be rendering content as expected.
    • Solution: Ensure the widget class’s widget() method contains the correct logic to display content. Use debugging functions like var_dump() to inspect variables and check if data is being passed and processed correctly.
  2. Widget Settings Are Not Saving
    • Cause: The update() method may not be saving settings as intended.
    • Solution: Verify that the update() method is correctly handling form inputs and saving data to the widget instance. Use var_dump() or error_log() to check the values being processed.
  3. Widget Does Not Display on the Frontend
    • Cause: The widget may not be registered to display in the selected widget area.
    • Solution: Ensure that you’ve added your widget to the correct widget area (e.g., sidebar or footer) in the WordPress admin dashboard. Also, check your theme’s template files (e.g., sidebar.php) to confirm that the widget area is included.

Debugging Techniques for Developers

Here are some debugging techniques you can use when developing custom widgets in WordPress:

Enable WordPress Debugging
WordPress has a built-in debugging feature that helps identify issues by displaying error messages. To enable it, add the following to your wp-config.php file:
php

define(‘WP_DEBUG’, true);

define(‘WP_DEBUG_LOG’, true);  // Log errors to wp-content/debug.log

define(‘WP_DEBUG_DISPLAY’, false);  // Hide errors from displaying on the front end

  1. This will log errors to a debug log file (wp-content/debug.log) that you can review for any issues.

Use error_log() for Logging
To track variables or errors, you can use the error_log() function. For example:
php

error_log(‘Widget title: ‘ . print_r($instance[‘title’], true));

  1. This will log the output to the debug.log file, helping you track issues.
  2. Testing with Default Theme
    If your widget isn’t displaying or functioning properly, try switching to a default WordPress theme (e.g., Twenty Twenty-One) to rule out theme-related conflicts. This helps isolate whether the issue is with your widget or your theme.
  3. Deactivating Plugins
    Sometimes other plugins may conflict with your widget. Try deactivating all plugins and reactivating them one by one to identify any conflicts.

Tools for Debugging WordPress Widgets

There are several tools and plugins that can help with debugging WordPress widgets:

  • Query Monitor: This powerful plugin helps monitor database queries, HTTP requests, and PHP errors, providing insight into what’s going wrong.
  • Log Deprecated Notices: This plugin logs any deprecated functions used by your code, ensuring you’re not relying on outdated WordPress functions that may cause issues.
  • Developer Tools in Browser: Using the browser’s Developer Tools (F12) can help identify issues with CSS, JavaScript, or HTML that might affect how the widget displays on the front end.

By following these debugging strategies, you can resolve most issues and ensure that your custom widget functions smoothly.

Popular Plugins for Enhancing Widgets

WordPress plugins are a great way to extend the functionality of your widgets. Many plugins offer additional widget options or enhance the widgets you create. Below are some popular plugins that can help you enhance your custom widgets and improve your site’s performance and features.

Widgets in Elementor

Elementor is a popular page builder plugin for WordPress, and it provides a range of customizable widgets that can be used in any part of your site. It comes with a drag-and-drop editor that simplifies the process of adding and customizing widgets without needing to write code.

  • What It Does: Elementor provides numerous built-in widgets such as image galleries, testimonial carousels, and pricing tables. You can also create custom widgets for Elementor using their API to enhance functionality.
  • Why Use It: Elementor’s intuitive interface allows developers and non-developers alike to create stunning widgets and custom layouts without writing PHP code. Additionally, Elementor’s Theme Builder lets you apply custom widgets across the entire website.

Widgets with Jetpack

Jetpack is a powerful plugin by Automattic, the creators of WordPress. It adds several features to your website, including security tools, performance enhancements, and custom widgets.

  • What It Does: Jetpack includes widgets such as Recent Posts, Social Media Icons, and an Image Gallery widget. These widgets are easy to set up and use, even if you’re not a developer.
  • Why Use It: Jetpack is an all-in-one solution that provides a suite of powerful features for WordPress websites. Its widgets are highly customizable, and you can easily integrate them into your theme to improve your site’s design and functionality.

Using Custom Widget Areas

WordPress also allows you to create custom widget areas or sidebars for your theme. This can be done either through a plugin or manually by modifying your theme files.

  • What It Does: Plugins like Custom Sidebars allow you to create custom widget areas, giving you the flexibility to display different widgets on different pages or posts. For example, you can have one sidebar for blog posts and another for product pages.
  • Why Use It: Custom widget areas make it easier to target specific pages or post types with unique widgets, improving the user experience. This is particularly useful for themes with a variety of layouts, as it allows you to create tailored content in different sections of your site.

Other Notable Plugins for Enhancing Widgets

  1. SiteOrigin Widgets Bundle: This plugin adds a collection of customizable widgets to your site, including Google Maps, testimonial sliders, and accordion lists. It’s great for users who need more advanced widgets but don’t want to code them from scratch.
  2. WP Custom Widgets: WP Custom Widgets enables you to add custom widgets to your WordPress site easily. It provides a simple interface for creating and managing custom widgets without the need for coding skills.
  3. Custom Post Type UI: While primarily for creating custom post types, this plugin also integrates well with custom widgets, allowing you to display content from custom post types in your widgets.

These plugins can save you time and effort while enhancing the functionality and customization options of your widgets. Whether you’re looking to integrate advanced features like social media feeds, create custom layouts, or enhance your site’s performance, these tools can make it easier.

Conclusion

Creating wordpress custom widgets opens up a world of possibilities for developers, site owners, and designers alike. Widgets are an essential part of WordPress, enabling users to add content and functionality to their websites without requiring advanced technical skills. Whether you are enhancing user experience, streamlining site management, or adding a personalized touch, custom widgets can truly elevate the functionality of your WordPress site.

How to Change Your WordPress Header Logo

For website owners leveraging WordPress, implementing a distinctive header logo not only strengthens your brand identity but also enhances user experience, especially when supported by essential WordPress plugins for customization. Our comprehensive WordPress support and maintenance services ensure your logo and branding elements remain consistently displayed across all pages while adhering to WordPress security best practices to prevent unauthorized modifications. 

In this detailed guide, we’ll explore various methods for updating your WordPress header logo – from utilizing default WordPress theme options and security-verified plugins to implementing custom code solutions. Whether you’re a beginner requiring ongoing WordPress support or an experienced developer managing website maintenance, follow these detailed steps to efficiently add, replace, or resize your logo while maintaining the integrity of your WordPress security protocols.

Understanding the Importance of the Header Logo

Your header logo is often the first thing visitors notice on your site. A clear, well-positioned logo helps establish your brand and contributes to a cohesive web design. Whether you’re refreshing your brand or setting up your website for the first time, placing your logo correctly on your WordPress site is essential.

Step-by-Step Guide to Changing Your WordPress Header Logo

WordPress Header Logo

 1. Changing the Header Logo via WordPress Customizer

Most WordPress themes include a built-in tool called the WordPress Customizer, which allows you to modify your site’s appearance in real time. Follow these steps to change your header logo through the Customizer:

1. Log in to Your WordPress Dashboard: Access the back end of your website by logging in with your admin credentials.

2. Navigate to Appearance > Customize: In the left-hand menu of your dashboard, go to Appearance and then click on Customize. This will open the WordPress Customizer.

3. Locate the Site Identity Section: In the Customizer menu, look for the Site Identity or Header section. This is where you can add or change your logo and site title.

4. Upload Your Logo: Click on Select Logo to upload a new image or choose an existing image from your media library. WordPress allows you to upload files in formats like .jpg, .png, and .svg (if enabled).

5. Adjust the Logo Display Options: After uploading, you may have options to adjust the logo size and positioning. This varies by theme, but most themes allow resizing or cropping.

6. Publish Your Changes: After finalizing the adjustments, click Publish to apply your new header logo to the site.

 2. Changing the Header Logo with Page Builders (Elementor, WPBakery, etc.)

If you’re using a page builder like Elementor or WPBakery, the process may differ slightly. These tools offer a drag-and-drop experience and give you more control over design elements.

For Elementor:

1. Open Elementor Editor: Navigate to the page where you want to add or change the header logo. Open the page with Elementor.

2. Locate the Header Section: In Elementor, headers are typically located in Global Settings or Theme Builder sections.

3. Select the Logo Widget: Use the Site Logo widget to add your logo image. This widget is available under Elementor’s Theme Elements if you have Elementor Pro.

4. Upload and Adjust: Click on Choose Image to upload a new logo or select one from the media library. Use the widget settings to adjust the logo’s size, alignment, and other display options.

5. Save and Publish: Once satisfied, click Update to save the changes.

For WPBakery:

1. Edit Header Using WPBakery: Open WPBakery on the page with your header or go to Theme Options if your theme includes it.

2. Select the Image Block or Logo Module: Locate the block where your logo is placed, usually labeled as an Image or Logo element.

3. Upload a New Logo: Replace the existing logo image by selecting Upload. Adjust the image size, alignment, and padding as needed.

4. Save Changes: Publish or update your page to save your new header logo.

3. Adding or Changing the Header Logo with Theme Options

Some themes come with their own theme options panel where you can control the logo placement without using the WordPress Customizer or a page builder.

1. Go to Theme Options Panel: Check if your theme has a Theme Options or Settings panel by navigating to Appearance and looking for your theme’s specific settings.

2. Find the Logo Section: Look for a section titled Logo, Header Logo, or Branding.

3. Upload and Configure: Use the upload tool to add your logo. Depending on your theme, you may also have options to adjust size, padding, and alignment.

4. Save Settings: After making the changes, click Save or Publish to apply the new header logo.

4. Changing the Logo with Custom Code

If you’re comfortable with coding, you can directly edit your theme files or use CSS to add or replace the header logo.

 Method 1: Editing the Header PHP File

1. Access Theme Files: In the WordPress dashboard, go to Appearance > Theme File Editor. Locate the header.php file.

2. Locate Logo Code: Look for a code snippet similar to `<img src=”logo.png”>` or `<div class=”site-logo”>`. 

3. Replace the Logo URL: Change the image source to the URL of your new logo.

4. Save and Test: After saving the changes, refresh your site to confirm the new logo appears correctly.

 Method 2: Adding CSS for Logo Customization

1. Open the Additional CSS Panel: In Appearance > Customize > Additional CSS, add CSS to control logo placement.

2. Write CSS for Logo Styling: For instance, to adjust size and padding:

    “`css

    .site-logo img {

        width: 150px;

        padding: 10px;

    }

    “`

3. Publish CSS Changes: Click Publish to apply the changes to your logo display.

5. Changing the Header Logo on a Mobile Site

Ensuring your logo is optimized for mobile is critical for user experience. If your theme or page builder doesn’t automatically scale the logo, follow these steps:

1. Use Responsive Settings: In your theme’s logo settings or page builder, look for responsive options that allow you to customize the logo size specifically for mobile devices.

2. Add Custom CSS for Mobile: If needed, use CSS targeting mobile screen sizes. Here’s an example:

    “`css

    @media (max-width: 768px) {

        .site-logo img {

            width: 100px;

        }

    }

    “`

3. Preview on Mobile: Use the preview option in WordPress Customizer to view the logo on different screen sizes before publishing.

6. Troubleshooting Common Logo Issues

Changing your WordPress header logo can sometimes lead to unexpected issues. Here are solutions to common problems:

1. Logo Doesn’t Update: Clear your browser cache or use a private browsing window to see recent changes. Check any caching plugins and clear their cache if necessary.

2. Blurry Logo on High-Resolution Screens: For a sharper logo on devices with high DPI, upload a logo twice the display size and set dimensions in CSS.

3. Logo Off-Center or Misaligned: Use custom CSS to adjust padding or margins for accurate alignment.

WordPress development goes far beyond just changing visual elements like logos – it requires a comprehensive understanding of wordpress plugins, ongoing wordpress support and maintenance, and robust wordpress security measures to ensure your site runs smoothly. While updating your header logo might seem like a simple task, it’s important to consider how different plugins might interact with your theme’s header section, whether your regular maintenance routine includes backing up your customizations, and if your security protocols protect your branded assets from unauthorized changes. 

Many site owners find that working with qualified developers who can handle both the technical aspects of logo implementation and the broader ecosystem of WordPress development helps ensure their branding stays consistent while maintaining the integrity of their site’s functionality and security.

Final Thoughts

Your WordPress header logo is a powerful branding element. By following the steps in this guide, you can easily change or update your header logo using different methods that suit your theme, page builder, or coding skills. A well-placed and optimized logo enhances your website’s visual appeal and reinforces your brand identity.

WordPress vs Other Cms: Why WordPress is better than other CMS !

Choosing a content management system (CMS) is a critical decision for anyone building a website. With so many options available, each offering unique features and benefits, it’s essential to make an informed choice.Among the most popular platforms, WordPress continues to dominate, but how does it… In this comprehensive guide, we’ll explore WordPress vs other CMS options like Drupal, Squarespace, Wix, Joomla, and more to help you decide why WordPress is the best choice for your website in 2025.

When it comes to building a website, the choice of a Content Management System (CMS) can significantly impact the success of your online presence. From flexibility and ease of use to SEO performance and customization, each CMS offers unique features. Among the most popular platforms, WordPress continues to dominate, but how does it compare to other CMS platforms in 2025?

In this comprehensive guide, we’ll explore WordPress vs other CMS options like Drupal, Squarespace, Wix, Joomla, and more to help you decide why WordPress is the best choice for your website in 2025.

WordPress vs Other Cms: Why WordPress is better than other CMS !

1. WordPress.com vs WordPress.org vs Other CMS

Before diving into comparisons with other CMS platforms, it’s essential to understand the differences between WordPress.com and WordPress.org, which serve different user needs within the WordPress ecosystem.

WordPress.com: A Hosted Solution for Beginners

WordPress.com offers a fully hosted service, meaning that hosting, updates, security, and backups are all handled for you. This version is ideal for beginners or casual users who want a hands-off approach to website creation. However, the ease of use comes with trade-offs:

  • Limited Control: While convenient, WordPress.com restricts access to core files, meaning users can’t modify the code or add custom features beyond what is provided in premium plans.
  • Fewer Plugins: Unlike WordPress.org, where users can install any plugin they choose, WordPress.com only allows a limited set of pre-approved plugins, reducing flexibility.
  • Subscription-Based: While WordPress.com has a free version, to unlock more professional features, users must pay for premium plans.

Pros:

  • Everything is managed for you (updates, hosting, backups).
  • Easy to set up and use, ideal for non-technical users.
  • Security and performance are handled by WordPress itself.

Cons:

  • Limited flexibility and customization.
  • Premium features require ongoing subscriptions.
  • Limited plugin access compared to WordPress.org.

WordPress.org: Full Control and Customization

WordPress.org is the self-hosted version, meaning you are responsible for setting up hosting, managing updates, and handling security. In return, you get complete control over your site, with unlimited customization options. It’s a robust platform that can grow with your needs.

  • Unlimited Customization: With access to over 58,000 plugins and thousands of themes, WordPress.org allows you to add nearly any functionality you need. Whether you’re building a blog, portfolio, eCommerce site, or business website, the platform is fully customizable.
  • Full Ownership: Unlike WordPress.com and other hosted platforms like Wix, WordPress.org allows you to fully own your content and data. This is a significant advantage if you need to move hosts or scale your site.
  • Monetization Freedom: WordPress.org provides the freedom to monetize your website however you like, including running ads, selling products, or creating subscription-based content.

Pros:

  • Complete control over your website’s design, hosting, and content.
  • Thousands of plugins and themes for unlimited functionality and customization.
  • Free to use, with costs only for hosting and domain names.

Cons:

  • Requires more technical knowledge for setup and maintenance.
  • You’re responsible for handling updates, backups, and security.

Why WordPress.org Outshines Other CMS Platforms

When compared to other popular CMS platforms like Blogger, Wix, and Weebly, WordPress.org stands out for several key reasons:

  • Full Control: Other CMS platforms often limit how much control you have over your site’s design and functionality. For example, Blogger and Weebly offer limited customization options, whereas WordPress.org allows you to modify everything from the theme to the back-end code.
  • Unlimited Customization: WordPress’s extensive plugin and theme library far outpaces what other platforms offer. Platforms like Wix or Squarespace may offer drag-and-drop simplicity, but they can’t match the flexibility and extensibility of WordPress.
  • Community Support: WordPress has a massive global community of developers, designers, and users who contribute to its ecosystem. With countless online tutorials, forums, and resources, you’ll never be short of support, making WordPress an excellent choice for beginners and advanced users alike.
WordPress vs Other Cms comparison

2. WordPress vs Blogger: Best CMS for Blogging

Blogger, a simple platform owned by Google, has been a go-to solution for hobby bloggers for years. However, while it’s free and easy to use, it pales in comparison to WordPress in terms of functionality and control.

Why WordPress is better for blogging:

  • Flexibility: While Blogger is limited to basic blog functions, WordPress offers a full-fledged CMS that can handle everything from simple blogs to advanced eCommerce sites.
  • SEO Capabilities: With Yoast SEO and Rank Math plugins, WordPress provides extensive tools for optimizing your content for search engines. Blogger’s SEO features are basic in comparison.

3. WordPress vs Drupal: Best CMS for Developers

Drupal is known for its powerful, flexible, and highly secure structure, making it a popular choice for developers building complex sites. However, its steep learning curve makes it less appealing to non-technical users.

Why WordPress is better for most users:

  • User-Friendly Interface: While Drupal is great for developers, it’s not ideal for beginners or small businesses without technical expertise. WordPress is much easier to use, with an intuitive dashboard and minimal coding required.
  • Customization Without Code: WordPress offers thousands of plugins that make it easy to add functionality without touching a line of code. Drupal’s module system requires more technical knowledge.

4. WordPress vs Ghost: Best CMS for Content Creators

Ghost CMS is a minimalist, open-source platform designed specifically for content creators who want a fast and focused blogging experience. While it’s lightweight and fast, it lacks the versatility of WordPress.

Why WordPress is better for content creators:

  • Full Website Capabilities: While Ghost is excellent for blogging, WordPress can handle much more. Whether you need an online store, portfolio, or a membership site, WordPress offers endless possibilities.
  • Community and Support: With a massive global community, WordPress provides extensive support, tutorials, and a vast library of plugins, whereas Ghost has a smaller user base and fewer resources.

5. WordPress vs GoDaddy Website Builder: Best CMS for Small Businesses

GoDaddy Website Builder is a fast and easy solution for users who want to get online quickly. However, its features are limited compared to WordPress, especially when it comes to customization and scalability.

Why WordPress is better for small businesses:

  • Scalability: WordPress can grow with your business, allowing you to start with a simple site and later add complex features like eCommerce, membership areas, or booking systems. GoDaddy’s builder is limited in comparison.
  • Flexibility in Hosting: With WordPress.org, you can choose your hosting provider, allowing for greater control over performance and cost. GoDaddy’s builder ties you to their hosting service.

6. WordPress vs Google Sites: Best CMS for Personal Websites

Google Sites is a free, simple-to-use platform for creating basic websites. However, it doesn’t offer the professional features or flexibility that WordPress provides.

Why WordPress is better for professional websites:

  • Advanced Features: While Google Sites works well for personal projects or intranet sites, WordPress offers professional themes, SEO plugins, and tools to build a fully-fledged business website.
  • SEO Tools: WordPress provides robust SEO plugins like Yoast SEO and All in One SEO, giving you more control over your site’s search engine rankings.

7. WordPress vs Joomla: Best CMS for Non-Developers

Joomla is another open-source CMS that offers flexibility, but like Drupal, it has a steeper learning curve compared to WordPress.

Why WordPress is better for non-developers:

  • Ease of Use: WordPress is much easier to navigate for beginners and small businesses that don’t have access to development resources. Joomla can be overwhelming with its complexity.
  • Vast Plugin Library: With over 58,000 plugins, WordPress offers far more customization options compared to Joomla’s more limited extension library.

8. WordPress vs Squarespace: Best CMS for Designers

Squarespace is known for its beautiful, design-focused templates and all-in-one solution, but it comes with limitations in customization and functionality.

Why WordPress is better for designers and businesses:

  • Greater Flexibility: While Squarespace offers great design templates, it restricts customization. With WordPress, you have complete freedom to modify themes or even build a custom design from scratch.
  • More Affordable in the Long Run: WordPress is open-source, meaning you only pay for hosting and any premium plugins or themes you choose. Squarespace, on the other hand, comes with fixed subscription costs.

9. WordPress vs Wix: Best CMS for SEO

Wix is a popular drag-and-drop website builder that is user-friendly, but it lacks the deep customization and advanced SEO capabilities of WordPress.

Why WordPress is better for SEO:

  • Advanced SEO Tools: WordPress provides a range of powerful SEO plugins like Yoast SEO and Rank Math, which offer greater control over your site’s optimization compared to Wix.
  • Ownership and Portability: With WordPress.org, you own your site and can move it to any host. Wix hosts your site on its platform, which can make migration difficult if you want to switch providers.

10. WordPress vs Weebly: Best CMS for Customization

Weebly is another drag-and-drop website builder, similar to Wix, but it’s limited in terms of customization and advanced features.

Why WordPress is Better for Customization:

  • Customization Options: WordPress offers far more themes, plugins, and custom coding options, making it ideal for users who want complete control over their site’s look and functionality.
  • Advanced Features: While Weebly is great for simple websites, WordPress can handle everything from eCommerce to membership sites, offering a more comprehensive solution.

Conclusion: Why WordPress is the Best CMS in 2025

When comparing WordPress to other CMS platforms, WordPress remains the clear leader for customization, scalability, and SEO performance. Its ease of use, combined with the vast ecosystem of plugins, themes, and support, makes it the best choice for beginners and experienced developers alike.

In 2025, WordPress continues to outshine competitors like Squarespace, Wix, Drupal, and Joomla by offering greater flexibility, better SEO tools, and a more affordable, scalable solution.

Whether you’re building a personal blog, a business website, or an eCommerce store, WordPress provides the power and flexibility to create any type of website you need. Its global community, extensive support resources, and thousands of plugins make it the top CMS for anyone looking to succeed online in 2025.

How to Optimize Your WordPress Site for Mobile in 2025

Optimizing your WordPress site for mobile is no longer just a recommendation—it’s a necessity. With over 60% of global internet traffic coming from mobile devices, ensuring your website delivers a seamless, fast, and user-friendly experience on mobile is crucial for retaining visitors and ranking well on search engines. Moreover, Google’s mobile-first indexing makes mobile optimization an essential part of any website’s SEO strategy.

This comprehensive guide will walk you through detailed strategies and best practices to optimize WordPress for mobile. Whether you’re new to website management or an experienced wordpress developer, these steps will help you improve your mobile performance and overall user experience.

Why Should You Optimize WordPress for Mobile?

Before diving into the technical details of WordPress mobile optimization, it’s important to understand the impact mobile users have on your website’s performance and growth. Today, mobile optimization isn’t just about aesthetics; it directly influences user retention, conversions, and search rankings.

Here are some key reasons why optimizing your WordPress site for mobile should be a top priority:

key reasons why optimizing your WordPress site for mobile
  1. Google’s Mobile-First Indexing: Google predominantly uses the mobile version of your site for indexing and ranking. A site that isn’t mobile-friendly will likely rank lower in search results.
  2. Better User Experience (UX): Mobile users expect fast, intuitive websites. Poor performance leads to high bounce rates, meaning users leave your site before interacting with your content.
  3. Increased Conversions: Optimizing for mobile improves not only user engagement but also conversion rates. E-commerce sites, for example, benefit from faster load times and easier navigation, leading to higher sales.
  4. Competitive Advantage: Many businesses still struggle to fully optimize for mobile. By staying ahead of the curve, you ensure your WordPress site is accessible to mobile users, giving you a competitive edge.

Common Reasons for Slow Mobile Performance

Slow loading times are the main culprit behind high bounce rates and poor user experiences on mobile. Several factors contribute to sluggish mobile performance:

Common Reasons for Slow Mobile Performance
  • Large, unoptimized images and videos: High-resolution images, uncompressed videos, and other media files are often the leading cause of slow loading times.
  • Heavy CSS and JavaScript: Excessive use of custom CSS and JavaScript can lead to render-blocking issues, where the browser must fully load these files before displaying the content.
  • Too many plugins: Running numerous or poorly optimized plugins adds unnecessary load time, affecting both desktop and mobile performance.
  • Inadequate hosting: A slow hosting provider can’t handle spikes in traffic and results in slower performance, especially for mobile users in different geographic locations.

How to Check if Your WordPress Site is Mobile-friendly

Before starting the optimization process, you need to determine your current site’s mobile-friendliness and identify areas for improvement. There are several tools available to test your website’s mobile performance:

  1. Google’s Mobile-Friendly Test: This tool evaluates whether your site meets mobile usability standards. It identifies issues like small text, unclickable buttons, and content that exceeds screen width.
  2. PageSpeed Insights (by Google): Provides a detailed report on your mobile page speed. It highlights specific issues such as slow server response time, unoptimized images, and large CSS files.
  3. Browser Developer Tools: Use Chrome’s built-in developer tools to test how your website appears and functions on various screen sizes. You can simulate mobile devices to see how responsive your design is and where performance bottlenecks might lie.

Strategies to Optimize WordPress for Mobile Users

Once you’ve identified potential issues, you can start optimizing your WordPress site for mobile. Below are the most effective strategies to ensure your mobile visitors have a fast and smooth experience.

Strategies to Optimize WordPress for Mobile Users

1. Use a Responsive WordPress Theme

The foundation of any mobile-friendly WordPress site starts with a responsive theme. A responsive theme adjusts the layout of your website dynamically, depending on the screen size and resolution. Here’s why it matters:

  • Fluid grids: Responsive themes use fluid grids that allow page elements to resize automatically based on the device’s screen size.
  • Flexible images: Images and media files resize themselves to fit smaller screens, preventing overflow or awkward cropping.
  • Mobile-friendly menus: Menus adjust to mobile screens using hamburger icons or collapsible dropdowns, ensuring easy navigation on mobile devices.

When choosing a theme, ensure it’s optimized for mobile performance. WordPress themes like Astra, GeneratePress, and OceanWP are popular choices due to their lightweight code and mobile responsiveness.

2. Consider Mobile-First Development

A mobile-first design approach means building your website for mobile devices first and scaling up to accommodate larger screens. This ensures that the core user experience is seamless on mobile, which is essential for Google’s mobile-first indexing. Some mobile-first development strategies include:

  • Prioritize essential content: On mobile, space is limited. Present the most important content first, such as your call-to-action (CTA), key images, or headlines.
  • Simple navigation: Mobile users prefer simplicity. Use minimalistic, intuitive navigation that avoids clutter.
  • Clickable elements: Make sure buttons, links, and forms are touch-friendly, with enough space between them to avoid accidental clicks.

3. Optimize Images and Videos for Mobile

Media files are one of the largest contributors to slow load times on mobile. To optimize WordPress for mobile, it’s crucial to compress and optimize your images and videos without sacrificing quality:

  • Image compression: Use plugins like Smush, ShortPixel, or Imagify to automatically compress images before uploading them to your site. This reduces file sizes without affecting image quality.
  • Use WebP format: WebP images are much smaller than PNG or JPEG formats but maintain high quality. You can use plugins like WebP Express to convert images to this format.
  • Lazy loading: Implement lazy loading for images and videos so they only load when the user scrolls down to them. This improves initial page load time, especially on image-heavy pages.

4. Implement Full Frontend Optimization

Frontend optimization is key to ensuring fast load times on mobile devices. Here are some techniques to streamline your site’s performance:

  • Minify CSS, JavaScript, and HTML: Minification reduces the size of these files by removing unnecessary characters (like spaces and line breaks). Tools like Autoptimize or WP Rocket can handle this for you.
  • Defer JavaScript loading: Prevent JavaScript files from blocking the rendering of your page. Use the “defer” or “async” attribute to load these files after the page content has loaded.
  • Enable Gzip compression: Compress your site’s files using Gzip to reduce page size and improve load times.

5. Choose a Fast and Reliable Hosting Provider

Your hosting provider directly impacts the speed and reliability of your site, especially for mobile users. Look for hosting providers that specialize in WordPress and offer the following features:

  • Content Delivery Network (CDN): A CDN distributes your website’s content across multiple servers worldwide, allowing mobile users to load your site from the server closest to them. Cloudflare is a popular choice for CDN services.
  • SSD storage: Solid State Drives (SSDs) load data faster than traditional hard drives, speeding up site performance.
  • PHP 8 support: Ensure your hosting provider supports the latest version of PHP, as it offers significant performance improvements over older versions.

6. Reduce Plugin Usage

Too many plugins can slow down your website, and some plugins may not be optimized for mobile performance. Here’s how to handle plugins efficiently:

  • Audit your plugins: Regularly check the performance of your active plugins using tools like P3 Plugin Performance Profiler. Deactivate or uninstall any plugins that are unnecessary or slow down your site.
  • Use lightweight plugins: Opt for lightweight, well-coded plugins that won’t bog down your site. WordPress plugins like WP Rocket for caching and Imagify for image optimization are both fast and efficient.

7. Eliminate Render-Blocking Resources

Render-blocking JavaScript and CSS files delay the browser from displaying the content of your site. To avoid this:

  • Inline critical CSS: Move the essential CSS that’s required for above-the-fold content directly into the HTML to prevent delays.
  • Defer non-essential JavaScript: Use tools like Autoptimize to defer the loading of non-essential JavaScript files until after the page content has loaded.

8. Mobile Page Speed Optimization

Page speed is crucial for mobile users, as they’re more likely to leave a site that takes longer than three seconds to load. Here are some specific steps to optimize WordPress mobile page speed:

  • Browser caching: Use caching plugins like W3 Total Cache or WP Rocket to store a static version of your site, speeding up load times for repeat visitors.
  • Reduce server response time: Aim for a Time to First Byte (TTFB) of under 200ms. You can improve this by choosing a high-performance hosting provider and enabling caching.
  • Optimize font delivery: Avoid loading too many font variations. Use system fonts or Google Fonts and only load the styles you need.

9. Optimize for Local Search

If you run a local business, it’s crucial to optimize WordPress for mobile with local SEO in mind. Mobile users often search for businesses “near me” or other location-based queries. Here’s how to optimize:

  • Add location-based keywords: Ensure that your meta descriptions, titles, and content include local keywords.
  • Use structured data: Implement schema markup for your business location to enhance visibility in local search results.
  • Get listed in local directories: Ensure your business is listed on Google My Business and other relevant local directories.

10. Test Mobile Optimization Regularly

Mobile optimization isn’t a one-time task. Regularly testing your site’s mobile performance ensures you stay ahead of any issues that might arise. Here’s how:

  • GTmetrix and Google Search Console: These tools help you regularly monitor your site’s performance on mobile and track any issues or improvements.
  • A/B testing: Run A/B tests on different mobile layouts, features, and elements to see what works best for your audience.

Final Thoughts

Mobile optimization is an ongoing process, but the benefits are well worth the effort. By following these strategies, from choosing a responsive theme to optimizing your media and implementing caching, you’ll see improvements in mobile speed, user engagement, and search engine rankings.

Keep testing and iterating on your optimizations to ensure your site remains mobile-friendly and competitive in 2024 and beyond.

WordPress Localization:The Ultimate Guide to How to Make Your Site Global-Ready

As the world becomes more interconnected,having a worldwide presence is no longer non-compulsory but essential for companies and content creators. WordPress, powering over 40% of all websites, has made it simpler than ever to localize your website online, allowing organizations to cater to audiences in different areas, languages, and cultures. However, localization isn’t just about translation—it’s about making your site feel local to every user, regardless of in which they’re.

This guide covers everything you need to know about WordPress localization, from the basics to advanced strategies, to help you create a multilingual website that ranks high in search engines and provides a seamless experience for your global audience.

What is WordPress Localization?

WordPress localization refers to the process of customizing your WordPress site to fit different languages and local customs. This goes beyond just changing words. It also means adjusting how dates, money, time zones, and even pictures look to match what people in each area except. It’s more than basic translation. Localization aims to make your website feel like it was made just for the people in each place you want to reach.

Key Aspects of Localization

  • Text Translation: Translating content into various languages.
  • Cultural Adaptation: Adjusting content and design to resonate with the target culture.
  • Formatting Adjustments: Converting date, time, and currency formats to local standards.

The Benefits of WordPress Localization

Localizing your WordPress website opens up several key benefits, including:

1. Expanding Your Reach

By offering content in multiple languages, you make your site accessible to a wider audience, breaking through language barriers and catering to users worldwide.

2. Boosting SEO Performance

Localization improves your SEO strategy by allowing you to target location-based keywords and search queries. This increases visibility in local search engine results, driving more organic traffic.

3. Enhancing User Experience

A localized site provides a more seamless user experience. Users feel more comfortable browsing a website that speaks their language and aligns with their cultural norms, which in turn leads to higher engagement and conversions.

4. Strengthening Brand Loyalty

Localization fosters trust and loyalty by showing that you care about the specific needs of each audience. This helps establish a deeper connection with international customers.

How to Get Started with WordPress Localization

Implementing localization on your WordPress site is straightforward with the right tools and strategies. Here’s a step-by-step guide:

1. Select a Multilingual Plugin

The easiest way to localize a WordPress site is by using a multilingual plugin. Popular options include:

  • WPML (WordPress Multilingual Plugin): WPML is a premium plugin offering extensive features for translating content, managing multilingual SEO, and translating custom post types, widgets, and menus. It supports over 40 languages and allows automatic and manual translation.
  • Polylang: A free and user-friendly plugin that allows you to create a multilingual WordPress site by translating posts, pages, and media. Polylang also integrates with popular SEO plugins to help you optimize your multilingual content.
  • Weglot: A fully automated translation plugin that instantly translates your website into multiple languages. Weglot also offers manual editing options for fine-tuning translations and supports multilingual SEO.

2. Translate Content Effectively

Once your multilingual plugin is installed, it’s time to translate your site’s content. Focus on translating:

  • Key Pages: Prioritize translating high-traffic and essential pages like the homepage, product pages, and contact information.
  • Widgets and Menus: Ensure that navigation elements, such as menus, sidebars, and footer widgets, are also localized to provide a cohesive experience.
  • Custom Post Types and Taxonomies: Translate custom post types (like portfolios or product categories) to maintain consistency across your site.

3. Localize Themes and Plugins

Your WordPress theme and plugins need to be translation-ready. Most premium themes come with built-in translation support using .po and .mo files. For themes that aren’t translation-ready, you can use a plugin like Loco Translate to translate strings directly from the WordPress dashboard.

4. Adjust Regional Settings

Localization isn’t just about text. You need to adjust:

  • Time Zones: Align the time zone with your target audience’s location.
  • Currency: For eCommerce sites, display prices in the local currency using plugins like WooCommerce Multilingual.
  • Date and Time Formats: Set date and time formats that match regional conventions.

5. Customize Regional Imagery and Content

For some regions, you might want to go beyond translation and customize images, videos, and even the tone of your messaging to align with cultural preferences. For example, you might change the color scheme, replace product images, or use localized testimonials to better resonate with the audience.

8 Essential Tips to Localize WordPress Effectively

1. Optimize for Local SEO

Use hreflang tags to tell search engines which version of the page to serve for different languages. Each translated version of your site should also have its own unique URL structure, such as /fr for French and /de for German.

2. Use Professional Translators

While automatic translation tools are convenient, using professional translators ensures your content is accurate and culturally appropriate.

3. Prioritize RTL Support

If you plan to cater to audiences using right-to-left (RTL) languages like Arabic or Hebrew, ensure your theme supports RTL layouts.

4. Test Your Site’s Compatibility

After localizing, test how your site performs across different languages and regions. Check for any display issues, broken links, or performance slowdowns.

5. Don’t Overlook Multilingual SEO

Make sure your translated content is optimized with localized keywords, meta descriptions, and alt tags for images. Submit sitemaps for each language to ensure proper indexing.

6. Implement Regional Analytics

Set up Google Analytics or a similar tool to track visitor behavior in different languages and regions. This helps in optimizing content for local preferences.

7. Consider Regional Payment Methods

For eCommerce sites, using WooCommerce with a multilingual extension like WooCommerce Multilingual allows you to support multiple currencies and localized payment gateways.

8. Provide Ongoing Support

Localization doesn’t end after the initial launch. You’ll need to keep content up to date with regular translations for new content, plugin updates, and region-specific changes.

Wrapping Up

WordPress localization is a powerful manner to enhance your website’s worldwide enchantment and attain. Whether you’re strolling an eCommerce web page or a private weblog, localization enables you to wreck down language limitations, enhance search engine marketing, and offer a better user experience for global visitors.

By following the steps outlined above and being attentive to the nuances of local adaptation, your WordPress website might be well-geared up to serve a numerous, global target market. With the proper multilingual plugin and ongoing aid, localizing your WordPress website is an investment that can pay off in phrases of attain, engagement, and enterprise boom.

The Ultimate Guide to WordPress Speed Optimization in 2024

These days, users expect more than ever, and how fast a website loads plays a key role in its success.

When a WordPress site takes too long to load, it can make visitors unhappy, cause more people to leave , hurt search engine rankings, and lead to less revenue and fewer conversions.

It’s crucial to make your WordPress site faster than ever before. This complete guide on speeding up WordPress will show you the best ways and tools to make your WordPress site super fast.

Why Speed Optimization is Essential: 

Speed optimization isn’t just about tech stuff; it has a direct impact on how people use and interact with your website:

User Retention: People want sites to load fast. Slow websites make visitors leave sooner and interact less with your content.

SEO Benefits: Google and other search engines consider how fast a page loads when deciding its rank. Websites that tend to load fast show up higher in search results.

Conversion Rates: When pages load faster more people are likely to buy things, sign up, or do whatever they want.

Key Strategies for how to speed up WordPress?

1. Choose the Right Hosting Provider: 

1. Choose the Right Hosting Provider:

Your hosting provider forms the base of your Website’s speed.

Managed WordPress Hosting: Companies like WP Engine, Kinsta, or Flywheel give you optimized setups just for WordPress.

Speed-Focused Hosting: Find hosting providers that put speed and uptime first, with things like SSD storage and support for PHP 8 and above.

2. Use Lightweight & Modern Theme: 

The Theme you choose can greatly impact load times.

For optimal performance:

Select a Lightweight Theme: Themes like Hello Theme, Astra, GeneratePress, or the default WordPress themes are designed for speed.

Avoid Bloated Themes: Steer clear of themes with excessive built-in features or heavy scripts.

3. Integrate Advanced Caching Techniques: 

Caching remains a cornerstone of speed optimization:

Full-Page Caching: Use plugins like WP Rocket, W3 Total Cache or W3 Super Cache, Light Speed Cache to cache entire pages, reducing server load.

Object Caching: Consider solutions like Redis or Mem cached for caching database queries and objects.

4. Image Optimization With Modern Format: 

Image optimization is one of the most crucial parts of optimizing a WordPress site

Use Next-Gen Formats: Implement formats like WebP for smaller file sizes and faster loading.

Automate Optimization: Use plugins like ShortPixel Imagify or Smush to automatically compress and optimize images. 

5. Minify and Combine CSS and JavaScript

Reducing file sizes and HTTP requests is key to WordPress speed optimization.

Minify Files: Use plugins like Autoptimize or WP Rocket to minify CSS and JavaScript.

Combine Files: Reduce the number of requests by combining multiple files into one.

6. Utilize a Content Delivery Network (CDN): 

Reduce bloat by managing plugins & Scripts:

Audit Plugins: Regularly review and deactivate plugins that are not essential. If Plugin is not in use then remove that plugin if possible.

Use Lightweight Alternatives: Where possible, replace heavy plugins with more efficient options.

7. WordPress Database Optimization: 

A clean and efficient database supports better WordPress Performance:

Regular Cleanups: Use plugins like WP-Optimize or Advanced Database Cleaner to remove unnecessary data & Extra Revisions of pages or posts.

Optimize Tables: Regularly optimize the database tables to enhance performance.

8. Remove Unnecessary Plugins & Scripts: 

Reduce bloat by managing plugins:

Audit Plugins: Regularly review and deactivate plugins that are not essential. If Plugin is not in use then remove that plugin if possible.

Use Lightweight Alternatives: Where possible, replace heavy plugins with more efficient options.

9. Enable GZip Compression & Add Expiration Header:

GZIP compression helps reduce file sizes:

Configure Compression: Enable GZIP through your caching plugin or by adding directives to your .htaccess file.

Server Configuration (Apache):

  • Enable mod_deflate module in Apache configuration.
  • Add the following lines to .htaccess or Apache configuration file

Server Configuration (Nginx):

  •  Add gzip settings in nginx.conf or site configuration:

Add Expiration Header : 

An expiration header, also known as a cache-control header, is an HTTP header used to specify the amount of time that a web resource (such as an image, CSS file, or JavaScript file) should be considered valid and stored in the browser’s cache. This helps to reduce the need to re-fetch the resource from the server, thereby improving website load times and reducing server load.

10. Monitor Performance and Stay Updated: 

Continuous monitoring ensures sustained performance:

Use Performance Tools: Tools like Google PageSpeed Insights, GTmetrix, and Pingdom provide valuable insights.

Stay Up to date: Keep WordPress, WordPress themes, and WordPress plugins up-to-date to leverage performance improvements and security patches.

Conclusion: 

Making your WordPress site faster is key to keeping it successful. By implementing those strategies, you can make your website work better, give visitors a better time, and get higher rank in search results. Keep in mind that making things better never stops so always be on the lookout and take steps to keep your site running as fast as possible.

How to Fix the HTTP Error 503 Service Unavailable

The HTTP Error 503 also called “Service Unavailable” Status code points towards the fact that the server is currently unable to process the request. This is usually brought by server issues such as congestion, downtimes, or a peculiar problem with the server temporarily. Here are detailed steps to troubleshoot and fix this error.

1. Check Server Resource Usage

CPU and Memory: High CPU or memory usage can cause the server to become unresponsive.

1. cPanel: Go to “Metrics” or “Statistics” and look at CPU and Memory usage.

2. SSH: Use monitoring tools like top, htop, or server dashboards (e.g., CloudWatch for AWS) to check resource usage.

Disk Space: Ensure there is enough disk space.

1. Use df -h to check disk usage.

Network Bandwidth: Ensure the server is not exceeding bandwidth limits.

2. Restart Server Services

Sometimes, simply restarting the web server and database services can resolve the issue.

Apache: sudo systemctl restart apache2

Nginx: sudo systemctl restart nginx

Database: sudo systemctl restart mysql (or the respective database service)

3. Check Server Logs

Examine server logs to identify any specific errors or issues.

Apache Logs: /var/log/apache2/error.log

Nginx Logs: /var/log/nginx/error.log

System Logs: /var/log/syslog or /var/log/messages

Application Logs: Check application-specific logs (e.g., WordPress logs)


4. Check for Ongoing Maintenance

If the server is undergoing maintenance, this can cause a 503 error. Check with your hosting provider or internal IT team.

5. Check Server Configuration

Ensure the server configuration files are correct and haven’t been corrupted.

Apache Configuration: /etc/apache2/apache2.conf

Nginx Configuration: /etc/nginx/nginx.conf

6. Check and Update DNS Settings

Ensure that DNS settings are correct and that the domain points to the correct server. Sometimes, DNS propagation delays can cause temporary 503 errors.

7. Check for Server Overload

Traffic Spike: A sudden spike in traffic can overload the server. Consider scaling your infrastructure (e.g., adding more servers or using a Content Delivery Network (CDN)).

DDoS Attack: A Distributed Denial of Service attack can cause a 503 error. Use security tools and services to mitigate DDoS attacks.

8. Update Software and Plugins

Outdated software, plugins, or scripts can cause conflicts and lead to a 503 error.

Web Server: Ensure Apache, Nginx, or other web servers are up to date.

CMS/Plugins: Update your CMS (e.g., WordPress) and all plugins and themes to the latest versions. 

9. Check Firewall and Security Settings

Ensure that firewalls and security software are not blocking legitimate traffic or server resources.

10. Optimize Application Performance

Database Optimization: Optimize database queries and ensure indexes are used correctly.

Caching: Use caching mechanisms like Varnish, Memcached, or Redis to reduce server load.

Code Optimization: Optimize application code to ensure it runs efficiently. 

11. Disable Plugins and Themes

Plugin or theme conflicts can often cause a 503 error.

Disable All Plugins:

1. Access your website’s files via FTP or your hosting control panel’s File Manager.

2. Navigate to wp-content/plugins and rename the plugins folder to something like plugins_old.

3. Check if the site is back online. If it is, rename the folder back to plugins and rename each plugin folder inside it one by one to identify the culprit.

Switch to a Default Theme:

1. Navigate to wp-content/themes.

2. Rename your active theme’s folder to something like theme_old.

3. WordPress will automatically switch to a default theme like Twenty Twenty-One. Check if the site is back online. 

12. Check .htaccess File

Corrupt .htaccess: A corrupt or improperly configured .htaccess file can cause a 503 error. Rename the .htaccess file to something like .htaccess_old and try accessing your site.

Regenerate .htaccess: If the site loads, go to Settings > Permalinks in your WordPress dashboard and click “Save Changes” to regenerate the .htaccess file.

13. Check for Maintenance Mode

Sometimes, a failed update can leave your site in maintenance mode.

1. Access your website’s files via FTP or File Manager.

2. Look for a file named .maintenance in the root directory of your WordPress installation.

3. Delete this file if it exists.

14. Increase PHP Memory Limit

A low PHP memory limit can cause a 503 error.

1. Edit your wp-config.php file located in the root directory of your WordPress installation.

2. Add or modify the following line:

            define(‘WP_MEMORY_LIMIT’, ‘256M’); 

15. Restart Your Server

If you have access to restart your server, this can sometimes resolve the issue.

cPanel: Use the “Restart” option under the “Server Management” section.

SSH: Use the command sudo reboot.

16. Consult Hosting Provider

If you’re on a shared hosting plan, the issue might be on the provider’s end. Contact your hosting provider for support.

17. Check for Scheduled Tasks or Crons

Sometimes, scheduled tasks or cron jobs can cause a high server load. Check and optimize these tasks.

18. Revert Recent Changes

If it has occurred after the change, then one should try to undo them and see if the 503 error still occurs.

Additional Tips:

Update WordPress, Themes, and Plugins: Check all parts to confirm they are not of the older model to avoid compatibility problems.

Optimize Database: Currently, you can use WP-Optimize which acts as a plugin to clean and optimize the database.

Use a Caching Plugin: Some of the instances that can be of help in reducing server load include plugins such as W3 Total Cache or WP Super Cache.

Following the above-mentioned steps, you should be in a position to troubleshoot this HTTP Error 503 &quot; Service Unavailable” in WordPress. If you want to know more about anything, do not hesitate to contact us!

Conclusion

Most of the time, dealing with the HTTP Error 503 or “Service Unavailable” message can be quite irritating; however, applying systematically the above-outlined measures should help solve the problem. If for some reason the problem was in high server resource usage, a misconfiguration, outdated server software, or temporary server overload, the methodical elimination of each of these factors will help bring your website to work again. This error must be addressed to ensure that it does not occur again in the future and it has to involve maintenance, monitoring, and timely update. If the above steps fail to work do not hesitate to contact your host provider or seek professional services to help keep your website online.

Comprehensive Guide to Detecting, Removing, and Preventing WordPress Malware

Introduction

Being one of the most widespread CMS, WordPress is one of the most exposed to cyber threats and malware. WordPress security is very important to prevent unauthorized access of your data and or site manipulation by third parties. This guide will assist you in identifying malware, eradicating it and learning how to avoid it in the first place in the WordPress environment so that you can protect your website. 

1. Detecting Malware

Identify Unusual Behavior

  • Performance Issues: If your site becomes slow or unresponsive, it may indicate malware.
  • Unauthorized Redirects: Sudden redirects to unknown websites can be a sign of a compromised site.
  • Suspicious Pop-Ups: Unexpected pop-ups or ads could be due to malware insertion.

Using Security Plugins

  • Wordfence: Provides a robust firewall, malware scanning, and real-time threat defense.
    • Features:
      • Scans core files, themes, and plugins.
      • Monitors live traffic for suspicious activity.
      • Provides a firewall to block malicious traffic.
WordPress Malware
  • Sucuri Security: Offers a complete suite of security tools for malware detection & removal.
    • Features:
      • Security activity auditing.
      • File integrity monitoring.
      • Remote malware scanning.
      • Blacklist monitoring.
WordPress Security
  • MalCare: Lightweight wordpress plugin that provides deep scanning without slowing down your site.
    • Features:
      • Automated daily scans.
      • One-click malware removal.
      • Real-time firewall protection.

Utilizing Online Scanners

  • Sucuri SiteCheck: An external scanner that checks your site for malware, blacklisting, and other security issues.
WordPress Security Checker
  • VirusTotal: Analyzes URLs and files to detect viruses, worms, trojans, and other types of malware.
WordPress Security

Conducting Manual Inspections

  • Core File Check: Compare your WordPress core files with a clean version from the official repository. Use tools like diff to spot differences.
  • Themes and Plugins: Inspect custom code manually. Look for unfamiliar code or changes in your PHP files, especially in the functions.php file.

2. Removing Malware

Backing Up Your Site

  • Before making any changes, ensure you have a complete backup of your website, including the database and files. Use plugins like All-in-One WP Migration or BackupBuddy.
WordPress Backup

Updating Everything

  • Core WordPress: Always run the latest version of WordPress.
  • Themes and Plugins: Ensure all themes and plugins are updated to their latest versions to patch known vulnerabilities.

Restoring from Backup

  • If you have a clean backup and restore your site to a previous, uncompromised state. Verify that the wordpress backup is clean before restoring.

Manually Removing Malware

  • Identify Infected Files: Use security plugins scan reports to locate infected files.
  • Clean Infected Files: Manually remove malicious code. Replace infected files with clean versions from the official sources.
    • Steps:
      • Download fresh copies of WordPress themes, and plugins.
      • Replace existing files with these clean versions.
      • Be cautious with wp-config.php and .htaccess as these contain configuration settings.

Reinstalling Core Files

  • Replace all core WordPress files with fresh copies from the official WordPress repository to ensure no malicious code remains.

Changing Passwords

  • Change all passwords for WordPress accounts, hosting control panel, FTP/SFTP, and database.
    • Use strong & unique passwords for admin account

3. Preventing Malware

Keeping Everything Updated

  • WordPress Core: Always keep WordPress updated.
  • Themes and Plugins: Regularly update all themes and plugins.

Using Strong Passwords

  • Use complex & unique passwords for all accounts. Implement a policy for regular password changes.

Limiting Login Attempts

  • Use plugins like Login LockDown or Wordfence to limit the number of login attempts and block IPs with multiple failed attempts.

Implementing Two-Factor Authentication (2FA)

  • Implement 2FA for all user accounts using plugins like Google Authenticator or Authy to add an extra layer of security.

Installing Security Plugins

  • Install and configure comprehensive security plugins:
    • Wordfence: Set up a firewall, enable malware scanning, and monitor live traffic.
    • Sucuri: Configure security activity auditing, file integrity monitoring, and remote malware scanning.
    • iThemes Security: Harden WordPress by changing default settings &  monitoring for suspicious activity.

Scheduling Regular Backups

  • Schedule regular backups using plugins like All-in-One WP Migration or BackupBuddy. Store backups in a secure, off-site location.
WordPress Malware

Choosing Secure Hosting

  • Choose a reputable hosting provider that offers strong security features andincluding regular backups, DDoS protection, and malware scanning.

Using HTTPS

  • Secure your site with an SSL certificate to ensure encrypted data transmission between your site and its users. Many hosting providers offer free SSL certificates through Let’s Encrypt.

Disabling File Editing

Prevent unauthorized code changes by disabling the file editor in the WordPress dashboard:


define(‘DISALLOW_FILE_EDIT’, true);

Monitoring and Auditing

  • Regularly monitor your site for unusual activity. Perform security audits to ensure no vulnerabilities are present.

Conclusion

WordPress must be protected from malware to ensure that the site is not compromised on aspects of its performance or functionality. Preventive measures can help to minimize the risk of cyber threats; therefore, by identifying the possible threats, getting rid of any malware that may exist, and putting up strong barriers, the risk of cyber threats can be minimized. It is very important to update frequently your WordPress installation, choose a good password for your login, limit the number of tries someone can make to log in, and install a good security wordpress development plugin. Also, selecting a secure host, enabling the HTTPS, and backing up the site frequently will further enhance security. To sum up, the presented guidelines will help you to strengthen your WordPress site against malware attacks and keep it secure.

How to Create Custom Post Types in WordPress?

Different businesses, different use cases. WordPress is used by businesses functioning in various industrial verticals. And all of them might have different needs when it comes to WordPress post creation. However, WordPress has a solution to satisfy the diversified needs of WordPress users. It provides users with a WordPress custom post type that allows users to manage posts in the way they want. In this article, we will discuss in-depth WordPress custom posts, and how to create custom post type using plugins and codes respectively. This article will show you how to integrate creating a new custom post easily.


What Is WordPress Custom Post Type?

A WordPress Custom Post Type (CPT) is a type of content that may be created and managed separately from the regular posts and pages. Creating new custom post types is necessary to develop custom WordPress sites.

Custom Post Types help you to organize and display a variety of information on your WordPress site, including portfolios, testimonials, goods, and any other content that meets your exact requirements. You can create as many custom posts as you want and there is no limit to it. For example, if you wish to create “Portfolio” post types, you can create a dedicated section and create posts under the name,

Custom Post Typess allow you to extend the functionality of your website and personalize it to your specific content needs.

You may wonder how the custom post type is different from the default post type, well let’s know more about the differences. 

Custom Post TypesDefault Post Types
Purpose and UsageIt is suitable for niche content development. For example, news, portfolios, etc.It is suitable for general content development.
Fields and StructureGives maximum flexibility to arrange content in whichever way you wantIt comes with some pre-built fields like tags, categories, content and title
TaxonomiesYou can have your own taxonomies You need to make use of built-in taxonomies.
AvailabilityAvailable upon InstallationIt comes with some pre-built fields like tags, categories, content, and title


That being said, custom post type in WordPress offers several benefits, such as:

  • Helps in creating structured content, especially useful when multiple users are working on it;
  • You can customize each post to add features like review scores, 
  • Helps in search engine ranking;
  • Gives a better visualization of websites, as everything seems to be in place.
  • Custom post types improve content management and retrieval by enabling organized content organization suited to particular requirements.

How to create a custom post type in WordPress?

You can create custom post type in WordPress in multiple ways given below.

  1. Utilizing a Plugin
  2. Adding Code in functions.php
  3. Developing a Custom Plugin
  4. Employing the WordPress REST API
  5. Using Theme or Plugin Builders

Let’s discuss custom post type using plugins step by step.

Creating Custom Post Types Using Plugin

Several plugins are available for creating custom post types in WordPress. Here are some of the popular  custom post type plugins that you can use to quickly generate and manage custom post types

1 Custom Post Type UI Plugin

This plugin offers an easy-to-use interface for creating and managing custom post types and taxonomies. It simplifies the procedure without the need to write any code.
custom post types


Plugin URL: https://wordpress.org/plugins/custom-post-type-ui

2 Pods – Custom Content Types and Fields Plugin

Custom post types, taxonomies, and custom fields can all be created using pods. It’s a versatile and powerful tool that can handle a wide range of content management tasks.

custom post types

Plugin URL: https://wordpress.org/plugins/pods/

3 Advanced Custom Fields (ACF) PLugin

Registering post types and taxonomies is now possible directly in the ACF UI, which speeds up the content modeling workflow and eliminates the need to touch code or utilize another plugin.


Plugin URL: https://wordpress.org/plugins/advanced-custom-fields/


How to Install and Activate the Plugin?

The initial step involves installing and enabling the plugin on your WordPress site. I’ll walk you through the procedure using the Advanced Custom Fields (ACF) plugin.


Step 1: Install and Activate the Plugin

  1. Navigate to your WordPress Dashboard.
  2. Click on Plugins, then select Add New.
  1. In the search bar, type ‘Custom Post Type’.
  1. Find the plugin in the search results, then click Install Now.
  2. Once the installation is complete, click Activate to enable the plugin.


Step 2: Set up and Configure the Plugin

Once enabled, Advanced Custom Fields (ACF) will appear as a new menu option in the dashboard.

With this Screenshot, creating a custom CPT is made simple.


Creating Custom Post Types Using Code


Creating a custom post type in WordPress using code involves adding some PHP to your theme’s functions.php. 

The register_post_type() function will accept the arguments for creating custom post types, and the hook in add_action() must utilize init.

Open your theme’s functions.php file and add the following code to register a custom post type

Explanation:

$labels: An array defining the various labels for the post type.

$args: An array of arguments to define the behavior of the post type.

register_post_type: Registers the post type with the provided labels and arguments.

After adding the code, you may need to refresh your permalinks to prevent 404 errors. Go to Settings > Permalinks in your WordPress dashboard and click Save Changes without making any changes.

Extending Custom Post Types with Taxonomies


In WordPress, taxonomies are used to group and categorize content. The default taxonomies are “Categories” and “Tags”. However, sometimes these default taxonomies are not enough for the specific needs of your website. This is where custom taxonomies come in. Custom taxonomies allow you to create your groupings and classifications for your custom post types, providing more flexibility in organizing your content.

Use the register_taxonomy function to create a custom taxonomy. Here’s an example of how to create a custom taxonomy called “Categories” for a custom post type named ‘movies”.

Why Use Custom Taxonomies?

  • Enhanced Organization: Custom taxonomies help in organizing content more effectively by grouping related posts.
  • Improved Navigation: They improve site navigation by allowing users to find related content easily.
  • Better SEO: Custom taxonomies can help in creating keyword-rich URLs, improving your site’s SEO.

Enhancing Functionality with Custom Meta Boxes

Custom Meta Boxes are a feature in WordPress that allows developers to add custom fields to the post or page edit screens. These fields can be used to store additional metadata about the post or page, such as a summary, keywords, or other custom data.

Creating custom meta boxes involves using WordPress hooks and functions to add them to the post-editing screens. Here’s a basic example of how to create a custom meta box:

Use the add_meta_box function to add a custom meta box. This function should be hooked into the add_meta_boxes action

Step 1 Add the Meta Box

Step 2: Save the Meta Box Data

Note that the above code is just an example and you should adjust it to fit your specific needs.

Optimizing Custom Post Types for SEO

To create a custom post type, use the register_post_type function. Include SEO-friendly labels and rewrite rules to improve URL structures. Ensure the permalinks are optimized for SEO by using descriptive, keyword-rich slugs.

Ensure the permalinks are SEO-friendly by using descriptive and keyword-rich slugs.

‘rewrite’ => array( ‘slug’ => ‘book’)


Additionally, leverage SEO plugins like Yoast SEO or All in One SEO Pack to optimize your custom post types. These plugins offer tools to set meta titles, descriptions, and other SEO settings specific to your custom post types.

Conclusion: 

Now that you know the advantages of using a custom post type, why wait? You can reach out to our WordPress experts who can help you install one. Try custom post types in WordPress and have a faster and more efficient website for your business.