SCSS WP Editor Plugin: The Smartest Way To Write And Compile SCSS In WordPress

Imagine spending hours tweaking your website’s design, only to find your styles are intricate, scattered, and slowing your site down. Sounds frustrating, right? Let me tell you that you’re not alone. Styling with CSS in WordPress can often feel like patchwork, especially when you want flexibility, speed, and structure.

Now, what if there was a tool that could simplify all of that?

A plugin that allows you to write SCSS directly inside WordPress, compiles it into clean CSS instantly and helps your website load faster. No extra setup. No unnecessary back-and-forth. 

Sounds like a dream? Well, fortunately, this is the reality. The answer lies in the SCSS WP Editor plugin. This blog will discuss what it is, how it works, and why it is a wise choice for modern WordPress sites. You’ll also learn how it solves real-life problems and why it might become your new favorite plugin.

Whether you’re a WordPress developer, designer, or website owner who wants more control over styling without losing time or performance, get ready to obtain valuable insights.

Let’s get started with something that could change your workflow completely. 

What Is SCSS WP Editor Plugin?

The SCSS WP Editor plugin is a WordPress tool designed to make your styling workflow smoother, smarter, and quicker. Instead of relying on external compilers or third-party tools, this plugin brings the power of SCSS right inside your WordPress dashboard.

You simply write your SCSS code in a built-in editor, click save, and the plugin takes care of the rest. It compiles your SCSS into optimized CSS instantly using SCSSPHP. The plugin also minifies the resulting CSS to bolster your website’s performance without needing extra setup or effort.

One of its standout features is how seamlessly it fits into any WordPress environment. Whether you’re managing a single website or running a Multisite network, SCSS WP Editor is compatible and ready to use. It works with all WordPress themes and supports essential CSS and more advanced SCSS structures.

In short, it’s a clean, systematic way to manage styles with more control and fewer complications.

Central Idea: SCSS WP Editor compiles SCSS to CSS automatically inside WordPress. It removes the need for external tools and boosts performance with built-in minification and a user-friendly interface. 

How Is SCSS WP Editor Plugin Different From Regular CSS Tools?

Traditional CSS tools often require manual compilation, switching between external code editors, and using build tools like Gulp or Webpack. While those setups work, they can be time-intensive and troublesome for many WordPress users.

SCSS WP Editor plugin changes that experience entirely. Here’s how it stacks up with conventional tools: 

FeatureRegular CSS ToolsSCSS WP Editor Plugin
SCSS CompilationRequires external build tools like Gulp or WebpackBuilt-in compiler within WordPress admin
Editor AccessCode written outside WordPress in third-party toolsSCSS written directly in the WordPress dashboard
MinificationOften done manually or with third-party pluginsAutomatically minifies compiled CSS
Error HandlingCan break styling without warningsBuilt-in error alerts and safe handling
Ease of UseTechnical setup requiredSimple and beginner-friendly
Workflow IntegrationExternal to WordPressFully integrated with WordPress
Theme CompatibilityMay require manual integrationWorks with any WordPress theme

This plugin eliminates the friction and complexity found in traditional setups by offering a native, seamless experience personalized for WordPress users.

What You Should Know: SCSS WP Editor streamlines styling by replacing technical setups with a built-in WordPress solution that compiles, minifies, and protects your styles in real-time. 

Who Should Use The SCSS WP Editor Plugin?

The SCSS WP Editor plugin is built for anyone who wants significant authority over website styling without technical complexity. Whether you manage a personal blog, develop client websites, or design custom themes, the SCSS WP Editor plugin simplifies your website styling process. 

Here’s a breakdown of who benefits most from using it: 

User TypeWhy It’s a Perfect Fit
WordPress DevelopersAvoid external tools, write modular SCSS, and compile CSS directly in WordPress
Front-End DesignersOrganize design logic using SCSS variables and nesting, all from the WP dashboard
Agencies & FreelancersSpeed up project delivery with a consistent and efficient styling workflow
DIY Site OwnersEasily improve styling skills with a user-friendly editor that handles SCSS for you

This wordpress plugin supports a wide range of users by offering flexibility, speed, and a more effortless way to style WordPress websites.

In a Nutshell: From developers to beginners, SCSS WP Editor provides a simple, growth-friendly styling experience that helps users build and manage cleaner, quicker WordPress websites without technical hurdles. 

Why SCSS WP Editor Is A Valuable Addition To Your WordPress Toolkit

Every WordPress website owner, developer, or designer faces the same challenge: how to manage their website styles quickly, efficiently, and without breaking anything. That’s where the SCSS WP Editor plugin becomes a true asset.

Instead of relying on multiple tools and a complicated setup, this plugin centralizes everything you need to write and compile SCSS directly within your WordPress admin panel. It brings speed, structure, and simplicity into your workflow.

Here’s why this plugin earns a place in every WordPress toolkit:

✅ Fully Integrated Workflow

You don’t need to install separate compilers, write build scripts, or leave your WordPress dashboard. Everything happens in one place, saving time and reducing complexity.

✅ Cleaner, More Maintainable Code

With SCSS, you can use variables, mixins, and nested rules to keep your styles modular and easy to update. It makes your CSS easier to manage, especially on large or evolving websites.

✅ Automatic Compilation And Minification

Once you save your SCSS code, the plugin automatically compiles it to CSS and compresses it, helping your website load more rapidly without any manual steps.

✅ Consistency Across Projects

Whether you’re handling one website or twenty, the plugin offers a consistent, reusable styling approach that scales with your workload.

✅ Saves Time, Reduces Errors

By catching syntax errors and offering real-time updates, the plugin helps you avoid design mistakes that could affect the look and feel of your website.

So, whether you’re building a custom theme, updating client websites, or tweaking your own blog, this plugin supports a better, swifter way to handle styling from inside WordPress.

Knowledge Drop: SCSS WP Editor combines real-time compiling, code organization, and performance optimization. This makes it a practical, powerful plugin that streamlines styling for all types of WordPress users. 

Features That Make SCSS WP Editor Stand Out

SCSS WP Editor isn’t just another ordinary plugin; it’s a productivity booster that simplifies styling for WordPress users at every level. What makes it highly effective is how thoughtfully each feature is built to save time, avoid errors, and enhance flexibility.

Let’s explore the features that truly distinguish this plugin:

Easy To Use

The plugin is designed for accessibility. You don’t need to be a coding expert to use it. Just paste your SCSS code into the editor, click save, and your styles are compiled automatically.

Code Editor With Syntax Highlighting

The built-in code editor isn’t just a plain text box. It highlights SCSS syntax as you type, helping you write organized, more readable code while avoiding mistakes.

Compile SCSS To CSS Instantly

No more switching tabs or running build tools. Once you save your SCSS code, the plugin compiles it into CSS behind the scenes, making the updated styles live instantly.

Supports Simple CSS

If you don’t want to use SCSS immediately, no problem. You can also add basic CSS directly into the same editor. It’s a flexible option for every user.

Automatically Minifies SCSS/CSS

Your compiled styles are automatically minified for performance. It reduces file size and helps improve your website’s load speed without extra configuration.

Error Handling

Mistakes in code happen, but they shouldn’t break your website. SCSS WP Editor detects errors and prevents broken styles by displaying helpful messages inside the dashboard.

Multisite Support

Working on a multisite network? This plugin supports multisite installations, letting you manage SCSS individually on each site. It makes it perfect for agencies or developers handling multiple client projects.

Compatible With Any Theme

You won’t need to worry about compatibility. Whether you’re using a custom-built theme or a popular one from the WordPress library, SCSS WP Editor works flawlessly across all setups.

Each feature of this plugin is crafted to offer more authority, efficiency, and confidence while styling your WordPress website.

Quick Recap: From live SCSS compiling to built-in error handling and theme compatibility, SCSS WP Editor is loaded with features that facilitate styling and improve workflow inside WordPress. 

SCSS WP Editor Plugin

How To Use The SCSS WP Editor Plugin: Steps Involved

You don’t need advanced technical knowledge to use the SCSS WP Editor plugin. Whether you’re a beginner or a developer, the setup will be a walk in the park for you. It is quite smooth, and the process is easy to follow.

Here’s how to get started in a few quick steps:

Step 1: Install The Plugin

Log in to your WordPress dashboard, go to Plugins > Add New, and search for “SCSS WP Editor.” Click Install Now, then Activate the plugin once it’s installed.

Step 2: Access The SCSS Editor

After activation, hover over the WordPress sidebar and look for the plugin under Appearance > SCSS WP Editor. This is where you’ll be adding your SCSS code.

Step 3: Add Your SCSS Code

Begin writing your SCSS in the editor window just like you would in any SCSS file. You can use variables, mixins, nesting, and all SCSS features comfortably inside the editor.

Step 4: Save Your Code

Click Save Settings. The plugin will instantly compile your SCSS into CSS and minify it for performance. No manual compiling, no extra tools, just write and save.

Step 5: View Live Changes

Your compiled CSS is now active. Visit the front end of your site to see the updated styles in action. If something doesn’t look right, return to the editor to adjust your SCSS.

Step 6: Debug If Needed

If your SCSS has any syntax errors, the plugin will alert you right inside the dashboard. Correct it, save it again, and continue working confidently.

With these few steps, you’ll be in complete control of your WordPress styling without leaving your website.

The Bottom Line: SCSS WP Editor makes styling in WordPress fast, smooth, and beginner-friendly with just a few simple steps and zero external tools. You need to install, write, and save. That’s it! 

Challenges Overcome By SCSS WP Editor Plugin

Styling a WordPress website can become frustrating, especially when you have to deal with scattered code, external tools, and the constant risk of breaking your design. SCSS WP Editor steps in to remove these roadblocks.

Let’s look at the common challenges it solves:

❌ Switching Between Tools

Most users depend on third-party SCSS compilers or local development environments to write and test code. This plugin removes that hassle by giving you a built-in SCSS workspace inside WordPress.

❌ Manual Compilation

Without automation, you’re stuck manually converting SCSS to CSS every time you make changes. SCSS WP Editor compiles your code automatically the moment you hit the save button. It eliminates unnecessary repetition and saves considerable time. 

❌ Performance Issues From Uncompressed CSS

Unminified CSS can slow down your website. This plugin not only compiles but minifies your code instantly, keeping your site lightweight and optimized with no extra effort.

❌ Risky Code Errors

A small error in SCSS can easily break your layout. SCSS WP Editor includes built-in error handling that notifies you of issues and prevents faulty styles from being applied.

❌ Theme Compatibility Concerns

Some plugins only work with specific themes. SCSS WP Editor is fully theme-independent. Hence, it integrates smoothly with custom and child themes and popular theme frameworks.

❌ Multisite Limitations

Managing styles across a network of WordPress sites is often a nightmare. Thanks to multisite support, you can now work individually on each website with profound authority over its styles.

In short, SCSS WP Editor removes the guesswork and gives you back control, speed, and confidence when styling your WordPress projects.

Smart Summary: From eliminating external dependencies to minimizing errors and boosting speed, SCSS WP Editor resolves common styling challenges and creates a smoother workflow inside WordPress.

What Are The Practical Uses Of SCSS WP Editor: Real Use Cases

The real power of SCSS WP Editor lies in how effortlessly it fits into different workflows and project types. Whether you’re a solo blogger or a web agency, the plugin offers practical value in day-to-day development and design.

Let’s explore some real-world use cases where SCSS WP Editor becomes a go-to solution:

Custom Theme Styling

You can write structured SCSS directly in the dashboard while building or editing custom themes. Use variables and nesting to create cleaner, easier-to-maintain style rules for headers, footers, and components.

Rapid Client Updates

Agencies and freelancers often need to make swift design changes across multiple websites. With SCSS WP Editor, you can quickly update colors, spacing, and layout rules without touching core theme files.

Prototyping Design Ideas

Want to test a new layout idea or UI tweak? You can safely add experimental SCSS, preview it on the website, and remove or refine it based on feedback without affecting the live theme.

Teaching & Learning SCSS

This plugin creates a perfect environment for beginners and educators to learn SCSS within WordPress. There’s no need to install external tools. Just open the plugin and start experimenting in real-time.

Maintaining Multisite Projects

Developers managing multiple websites under one network can use SCSS WP Editor to control styling individually on each site. It streamlines maintenance while preserving design flexibility.

Reducing CSS File Bloat

Use SCSS logic, like variables and mixins, to reduce repetition in code. This results in lighter, clutter-free CSS that performs better and is more uncomplicated to update as the website grows.

These practical use cases show how SCSS WP Editor is a performance enhancer, an educator, and a time-saver – all rolled into one.

Key Takeaway: SCSS WP Editor fits flawlessly into real projects, thereby speeding up development, simplifying design updates, and offering a user-friendly space to test, learn, and manage styles efficiently.

What Distinguishes SCSS WP Editor From Its Counterparts

SCSS WP Editor offers simplicity, speed, and smooth integration that most alternatives miss. Let’s take a closer look at how it stacks up against other typical options: 

Feature/CapabilitySCSS WP EditorOther SCSS Tools / Plugins
LocationWorks inside the WordPress dashboardRequires switching between external tools or code editors
Installation & SetupNo additional setup. Just install and use straightaway.Often needs Node.js, Gulp, or build environments
CompilationInstant SCSS to CSS compilation on saveRequires manual compilation or CLI commands
MinificationAutomatically minifies compiled CSSNeeds separate minification tools or steps
Ease of UseBeginner-friendly with simple UI and syntax highlightingTypically built for developers, less intuitive for casual users
Error HandlingDisplays error messages within WordPress to avoid code breaksSome tools fail silently or require digging through logs
Multisite SupportFully supports multisite networks for managing styles on multiple sitesLimited or no multisite compatibility
Theme CompatibilityWorks with any WordPress theme, including custom and child themesMay conflict with certain themes or require adjustments
Learning CurveMinimal learning curve makes it perfect for developers, designers, and even beginnersSteep learning curve, especially with external compilers
Focus & FlexibilityFocused purely on SCSS/CSS editing and optimization inside WordPressOften bloated with extra features that distract from core styling tasks

This table highlights how SCSS WP Editor fills the usability and workflow gaps left by more complex or detached solutions. It brings all the necessary styling power right where you work inside WordPress.

The Crux: Unlike traditional styling tools, SCSS WP Editor delivers instant, intuitive, and WordPress-native styling power. This makes it a crystal-clear pick for web creators of all skill levels. 

SCSS WP Editor Plugin

Conclusion

Styling your WordPress website doesn’t have to be complicated, from juggling tools to writing repetitive code and hindering site performance. The SCSS WP Editor plugin simplifies everything by offering a clutter-free, built-in space to write SCSS, compile it instantly, and keep your CSS minified and optimized.

Throughout this blog, we’ve explored how it enhances workflow, auto-compiles SCSS, minifies your code, and works flawlessly with any theme or multisite setup. Unlike traditional tools that demand extra steps or come with steep learning curves, this plugin keeps things effortless and focused.

If you’re managing design in WordPress and still switching between tools or manually compiling CSS, it’s time to rethink your process. Start small by using SCSS WP Editor on a staging website to explore variables, mixins, and nesting. After that, confidently apply your refined styles to live projects.

Download SCSS WP Editor today and experience WordPress styling made plain sailing, powerful, and intuitive right from your dashboard.

FAQ

Does SCSS WP Editor Support Media Queries And Responsive Styling?

Yes, it fully supports media queries. You can write responsive SCSS code inside the editor, and it will compile correctly into responsive CSS, ensuring your website looks spectacular on all devices.

Can I Back Up Or Export My SCSS Code From The Plugin?

Currently, the plugin doesn’t offer a direct export feature. However, you can manually copy and paste your SCSS code from the editor into a local file for backup or version control purposes.

Is SCSS WP Editor Safe To Use On A Live Website?

Yes, but it’s recommended to test your SCSS changes on a staging website first. The plugin includes error handling to prevent broken styles, but previewing ensures you maintain complete control over design updates.

Does SCSS WP Editor Work With Page Builders Like Elementor Or WPBakery?

Yes, it works independently with page builders. It compiles SCSS into global CSS that applies across your theme, ensuring your custom styles enhance or override builder-generated designs effectively.

Can I Use SCSS WP Editor With A Child Theme?

Absolutely. SCSS WP Editor is compatible with child themes. You can safely add your SCSS code without modifying the parent theme files, helping you maintain customization during theme updates.

Ultimate Sticky Popup & Widgets: Customize, Display, And Convert Effortlessly

Did you know that websites with well-placed, eye-catching pop-ups can increase user engagement by up to 70 percent? Yet, many WordPress website owners face a common frustration of pop-ups interrupting visitors or going unnoticed entirely. 

If you face the same challenge and want to capture your audience’s attention without disrupting their browsing experience, this blog is for you. We will talk about the Ultimate Sticky Popup & Widgets plugin. It is a powerful, easy-to-use tool that lets you add fixed-position pop-ups anywhere on your WordPress website. 

You can add striking, responsive sticky pop-ups that stay visible, gentle yet effective. Whether you want to display a contact form, highlight a limited-time offer, or social sharing buttons, this plugin makes it effortless and compelling. 

If you’re a WordPress site owner, marketer, or developer looking to boost conversions and engagement or simply provide better user interaction, keep reading. 

Get ready to explore a game-changing plugin that makes styling sticky pop-ups effortless and impactful without writing a single line of code. 

What Is Ultimate Sticky Popup & Widgets?

Ultimate Sticky Popup & Widgets is a WordPress plugin designed to help you add fixed-position pop-ups and widgets to your website. 

Unlike traditional pop-ups that can hamper the user experience, this plugin allows you to place sticky pop-ups in strategic positions such as bottom left, bottom right, top left, top right, or along the sides of your website. These pop-ups remain prominent as visitors scroll, ensuring your message is always in sight without interfering.

What makes this plugin stand out is its simplicity and flexibility. You can showcase any content inside the pop-up, whether it’s a contact form, feedback form, HTML code, images, or even social sharing buttons. 

It offers a user-friendly settings panel where you can customize the title, background, border, text color, and even add icon images to match your website’s design.

Additionally, this plugin is fully responsive, meaning your pop-ups look stunning and function flawlessly on all devices. It is a valuable tool for anyone aiming to increase user engagement, promote offers, or guide visitors toward desired actions without complicated setups or coding.

Quick Recap: Ultimate Sticky Popup & Widgets simplifies adding customizable, fixed-position pop-ups that stay visible without annoying visitors, making it a must-have for engaging WordPress sites. 

Importance Of Responsive Sticky Pop-ups For WordPress Websites

In today’s fast-paced digital world, grabbing visitors’ attention quickly is crucial. Responsive sticky pop-ups offer an outstanding way to do this by remaining fixed in visible areas of the screen as users scroll, no matter what device they use. 

The following are vital reasons that make them significant:

  • They stay constantly apparent without interrupting or annoying visitors.
  • They work seamlessly on desktops, tablets, and smartphones, ensuring an exceptional user experience.
  • They boost conversion rates by showcasing contact forms, CTAs, or tempting offers around the clock.
  • Unlike traditional pop-ups, they are less likely to be blocked by browsers or dismissed quickly.

It means you can engage visitors more effectively, increase leads, and encourage actions like social sharing or newsletter sign-ups. The pivotal advantage is balancing visibility with cleverness so your message is both seen and welcomed.

In short, responsive sticky pop-ups are an essential marketing tool that enhances user interaction and website performance.

The Bottom Line: Responsive sticky pop-ups ensure your message stays visible across all devices, improving engagement and conversions while maintaining a seamless user experience. 

Why Customized Sticky Pop-ups Are Essential For Contact Forms & CTAs

Not all pop-ups are created equal. Generic, one-size-fits-all pop-ups often fall flat because they fail to align with your goals or user behavior. That’s where customized sticky pop-ups come in. They provide complete authority over how, where, and when your messages appear.

The following are the pivotal aspects that make custom sticky pop-ups paramount:

  • Personalized Messaging: You can craft CTAs that match your brand voice and resonate with your target audience.
  • Precise Placement: Thoughtfully place contact forms or CTAs precisely where they’ll be seen – top right, bottom left, or wherever suits your layout.
  • Style Flexibility: Control every detail, including text, background, borders, and even icons to spotlight pop-ups and align them with your wordpress theme.
  • Purpose-Driven Pop-ups: Highlight discounts, gather feedback, or prompt user action without hindering the browsing flow.

Customized sticky pop-ups blend into your design instead of interrupting visitors and stand out to grab user interest. Whether you want to grow your email list, collect inquiries, or propel more sales, a personalized touch gives your pop-ups purpose and power.

Key Takeaway: Custom sticky pop-ups allow you to design targeted, on-brand interactions that boost conversions without harming the user experience. 

Why Ultimate Sticky Popup & Widgets Is A Valuable Add-On

Every website has different goals, whether it’s capturing leads, promoting a seasonal offer, or increasing user interaction. What remains constant is the need for reliable tools that simplify how we present that information. That’s what makes the Ultimate Sticky Popup & Widgets plugin a worthwhile addition to any WordPress setup.

Here’s what makes this plugin distinct:

No Code? No Problem.

It removes technical complexity, making it plain sailing for non-developers to create impactful sticky pop-ups using an intuitive interface.

Flexible Placement Options

Choose from multiple on-screen positions, like bottom right, top left, or even sidebars. It allows your content to stay in the user’s line of sight without being annoying.

Style That Matches Your Brand

With complete customization over background, borders, icons, and text, your pop-up won’t feel like an afterthought. It will feel integrated, intentional, and polished.

Works With Any Content

Whether it’s a contact form, feedback box, promotional banner, or a social share button, you can include it with ease.

Designed With Responsiveness In Mind

It adapts to every screen size, ensuring your content remains clear and accessible whether viewed on desktop, tablet, or mobile.

So, if you’re looking to maximize visibility, minimize hassle, and provide a focused call-to-action, this plugin offers precisely that. Guess what? It won’t bloat your website or hamper user engagement.

The Crux: This plugin gives you comprehensive control over visibility, design, and content, helping your messages stand out while keeping your website sleek and easy to navigate. 

Ultimate Sticky Popup & Widgets

Key Features That Make Ultimate Sticky Popup & Widgets Prominent

When it comes to crafting a smooth, interactive, and goal-focused user experience, the Ultimate Sticky Popup & Widgets plugin gives you everything you need in a few simple clicks. It’s not just about adding pop-ups; it’s about designing captivating displays that stay apparent without being annoying.

Here’s a closer look at the key features that set it apart:

Display Any Content Type

Whether it’s a contact form, feedback form, newsletter signup, HTML snippets, or promotional messages, you can show exactly what matters to your audience. You have the flexibility to use any content for multiple use cases across industries.

Total Control Over Design

Customize everything to match your website’s look and feel. You can change the title text, upload an icon image, or tweak the background, border, and text color. No CSS knowledge is required. Just adjust the settings and see the changes instantly.

Flexible Positioning On Screen

Place your sticky pop-up accurately where you want it. Options include bottom right, bottom left, right side, left side, top left, or top right. This precision ensures it complements your layout rather than disrupting it.

Fully Responsive Design

Your pop-ups will look fascinating on desktops, tablets, and smartphones. The plugin ensures an exceptional user experience across all devices without requiring additional effort from you.

User-Friendly Settings Panel

The plugin comes with a simple, intuitive settings panel inside your WordPress admin. You don’t need to install other tools or worry about compatibility.

Quick Setup Without Coding

You can activate and configure your pop-up within minutes. The plugin is designed for ease, allowing both beginners and experienced WordPress users to get started fast.

Smart Summary: Ultimate Sticky Popup & Widgets empowers you to create attractive, responsive, and fully customizable sticky pop-ups that elevate user experience and boost conversions without technical complications. 

How To Use The Ultimate Sticky Popup & Widgets Plugin: Steps Involved

Setting up sticky pop-ups on your WordPress website should not feel like a developer’s puzzle. The process is smooth, intuitive, and lightning-fast with the Ultimate Sticky Popup & Widgets plugin. Whether you’re new to WordPress or a seasoned pro, the steps are designed to be simple and code-free.

Follow these steps to get started:

Step 1: Install And Activate The Plugin

Go to your WordPress dashboard, head over to Plugins > Add New, and search for “Ultimate Sticky Popup & Widgets.” Click “Install” and then Activate. Within seconds, the plugin will be ready to use.

Step 2: Access Plugin Settings

Once activated, you will find the plugin under your WordPress menu. Click to open the settings panel where you can start creating your sticky pop-up.

Step 3: Add Your Content

Insert the content you want to display. It could be a contact or feedback form, HTML code, or simple promotional text. You can also use the provided shortcode for social sharing if needed.

Step 4: Customize The Appearance

Choose your title text and colors for background, border, and text color. Also, you can optionally add an icon image to enhance visual appeal. Make sure the design aligns with your branding and user flow.

Step 5: Choose Pop-up Position

Select where you want your pop-up to show up. Available positions include bottom left, bottom right, right side, left side, top left, and top right. Pick what works best with your layout and user behavior.

Step 6: Save And Preview

After customizing everything, hit Save. You can preview the changes on your website and make further tweaks if needed.

Step 7: Go Live

Once satisfied, let the pop-up go live. It will appear based on your configured settings and remain fixed on the screen, driving user attention in an unwelcoming way.

In a Nutshell: From installation to live display, the entire setup process takes just a few minutes with no coding required and complete creative freedom. 

How To Enhance User Experience With Fixed And Floating Sticky Pop-ups

Sticky pop-ups are not just about visibility; they’re about timing, relevance, and seamless interaction. Implementing them thoughtfully can subtly guide users toward desired actions without breaking their browsing flow.

Here’s how you can use the Ultimate Sticky Popup & Widgets plugin to enrich the user experience:

Stay In Sight Without Being Intrusive

Sticky popups remain in a fixed position, ensuring your message is always noticeable. Whether it’s a contact form or a limited-time offer, the pop-up stays anchored but never disrupts navigation.

Use Smart Positioning To Match User Intent

Choose a position that corresponds with your content and layout.

For example:

  • Bottom right: Practical for chat widgets or feedback forms
  • Top left: Perfect for urgent announcements or alerts
  • Side positions: Clever for static CTAs or social sharing links

This flexible placement helps the pop-up complement the user journey instead of interrupting it.

Design That Blends With Brand Aesthetics

With total freedom over text, background, borders, and icons, you can ensure your pop-up looks like a natural part of your website. When a pop-up looks native, it feels less like an intervention and more like helpful guidance.

Use It Contextually

Display different sticky widgets on specific pages or sections. For example:

  • Show a newsletter signup pop-up only on blog pages
  • Use a quick inquiry form only on service pages

This relevance boosts interaction without cluttering every corner of your website.

Enhance Accessibility And Mobile Responsiveness

The plugin ensures all sticky pop-ups are responsive, meaning users on tablets or phones will see a version that fits their screen without frustration. No zooming. No misaligned elements. Just a clean, focused interaction.

Knowledge Drop: Sticky pop-ups, when personalized and context-aware, become silent performers that uplift user engagement without shouting for attention.

Real Use Cases Of Ultimate Sticky Popup & Widgets Plugin

The beauty of this plugin lies in its versatility. From marketers to bloggers, small businesses to developers, its real-world use cases are as broad as they are impactful. Let’s walk you through them. 

Use CasePurposeBenefit
Lead Generation FormsCapture leads via sticky, always-visible formsBoosts conversions by maintaining constant visibility
Customer Support WidgetProvide easy access to contact or chat supportEnhances user trust and accessibility
Limited-Time Offer Pop-upsPromote sales or coupon codesEncourages quick action without interrupting browsing
Real-Time Feedback CollectionCollect feedback while users engage with contentImproves user insight and page-level experience
Sticky Social Share IconsPrompt users to share blog contentIncreases reach and post visibility
Floating Legal/Privacy NoticesDisplay compliance messages like cookie consentMeets legal requirements without disrupting user experience

Core Insight: Whether it’s lead generation, support, feedback, or promotions, the Ultimate Sticky Popup & Widgets plugin adapts to your unique needs and enhances engagement, visibility, and functionality without compromising user experience. 

Ultimate Sticky Popup & Widgets

Conclusion

Creating meaningful engagement on your website doesn’t have to feel like wrestling with clunky pop-up builders or interrupting designs. The Ultimate Sticky Popup & Widgets plugin brings simplicity and flexibility into one clever package. 

Whether you’re showcasing a contact form, collecting feedback, highlighting a sales offer, or encouraging social sharing, this plugin ensures your message stays visible without disrupting the user experience.

Throughout this blog, we explored how this plugin empowers you to design responsive, customizable pop-ups that show up precisely where and how you want them. 

With no coding required, effortless setup, and total design freedom, it offers value to developers, marketers, and WordPress website owners alike.

So, if you’re still juggling plugins for forms, pop-ups, and sticky widgets, it’s time to streamline. Start small by customizing a sticky feedback form or CTA, and watch how even subtle visibility boosts interaction.

Download Ultimate Sticky Popup & Widgets today and give your content the attention it deserves. Result: increased interaction, engagement, average session time, and potential leads. 

FAQ

Can I Schedule When The Pop-up Appears On My Website?

The plugin does not have built-in scheduling features. However, you can use it with third-party scheduling or conditional display plugins to control pop-up timing and visibility based on user behavior.

Is It Possible To Track Interactions Or Conversions From The Sticky Pop-ups?

While the plugin does not include native analytics, you can easily integrate it with tools like Google Analytics or Hotjar to track clicks, form submissions, and engagement metrics.

Can I Display Different Sticky Pop-ups On Different Pages Of My Website?

Yes, the plugin supports shortcode-based implementation, so you can manually place different pop-ups on specific pages or posts to customize content based on the user’s intent or the page’s purpose. 

Will Sticky Pop-ups Overlap With Other Floating Elements Like Chat Widgets?

You can adjust the pop-up position to avoid interference. Since the plugin lets you choose from six placement areas, you can ensure it doesn’t clash with live chat boxes or other widgets.

Does The Plugin Require Any External Scripts Or Dependencies To Function?

No, the plugin is self-contained and does not rely on external libraries. It is designed to work independently, ensuring swifter load times and fewer compatibility issues.

Can I Use The Plugin To Add Sticky Pop-ups For Social Media Buttons?

Yes, just use the built-in shortcode [uspaw_social_share] to display social sharing buttons within the sticky pop-up. It is an excellent way to boost engagement across your social platforms. 

Proven Techniques To Improve WordPress Website Speed And Core Web Vitals

Imagine this: a potential customer clicks your website link on Google. They’re interested. They’re ready. But instead of being welcomed by your website, they are greeted with a blank screen, a spinning wheel, or a sluggish, half-loaded page. Within three seconds, they bounce from your site and turn to competitors.

Now, you will feel demoralized, as your product might not be value-driven, or the content lacks a compelling hook. But in reality, it’s the website load time. 

In today’s digital world, speed isn’t just a technical metric; it’s a silent dealmaker. A lightning-fast WordPress website enhances user satisfaction, amplifies search rankings, and helps you win conversions before competitors even get a chance. But here’s the twist: basic speed tips can only take you a few miles ahead.

That’s where this guide comes in.

This isn’t your run-of-the-mill list of caching plugins and image compressors. This blog is for creators, developers, and digital business owners who want to go beyond the surface level and want advanced, battle-tested WordPress speed optimization techniques. Something that meaningfully impacts Core Web Vitals, SEO, and the overall user experience.

If you’re serious about turning your WordPress site into a performance powerhouse, you’re in the right place. Let’s break down what truly works and how to make your website blazing fast. 

Why WordPress Speed Optimization Matters

In today’s ultra-competitive digital world, website speed is no longer a luxury; it’s a necessity. A sluggish website doesn’t just annoy users; it hurts your brand image, affects SEO rankings, and drains potential revenue. Here’s why performance should be at the heart of your WordPress strategy:

User Experience And Retention

Visitors expect a website to load instantly. If it doesn’t, they’re gone before the page finishes loading. You will be surprised to know that:

SEO And Google Rankings

Google considers site speed and Core Web Vitals as critical ranking factors. Pages that are slow to load often fall behind in search results, regardless of their content quality. You’re missing out on organic traffic if your website is not speed-optimized.

The Economic Impact

Speed directly affects your bottom line. A slow site can cost you sales, sign-ups, and leads. A single second of delay can be the difference between a new customer and a missed opportunity. Faster sites typically see:

  • Higher conversion rates
  • Lower abandonment
  • Stronger brand perception

The WordPress Trade-Off

WordPress is illustrious for its flexibility and ecosystem, but its ease of use often comes at a cost. Bulky themes, bloated plugins, and ineffective hosting choices can hamper overall site performance. Without intentional optimization, your website can quickly become sluggish. 

In a Nutshell: Speed isn’t just a technical aspect; it’s a competitive advantage. Optimizing your WordPress site’s performance is pivotal, especially if you care about SEO, user experience, and business growth. 

In the upcoming section, we will share 10 expert-level techniques to supercharge your site and help you stay competitive. 

10 Advanced WordPress Speed Optimization Techniques

Ready to take your WordPress site from sluggish to supersonic? These expert-level techniques go beyond the basics and tap into cutting-edge performance strategies that deliver tangible results. Let’s dive in:

Power Your Site With A High-Performance Hosting Stack

Your hosting provider is the foundation of your website’s speed. Shared hosting may be economical. However, due to limited resources and crowded servers, it can severely inhibit your site’s performance.

What to do:

  • Choose VPS or Dedicated Hosting: Opt for providers like Cloudways, Kinsta, or WP Engine that offer growth-friendly, WordPress-optimized environments.
  • Enable Object Caching (Redis/Memcached): Speeds up database-driven operations by storing frequently accessed data in memory.
  • Consider Edge Hosting: Platforms like Cloudflare Pages or Netlify serve content from locations closest to users, slashing latency.

Pro Tip: Always select a host that supports the latest PHP versions and HTTP/3 protocols for future-proof performance. 

Optimize And Clean Up The WordPress Database

Your WordPress database becomes cluttered over time because of post revisions, transients, unused data, and plugin junk. These factors are significant contributors to the slowdown of queries.

Optimization steps:

  • Automate Cleanup with WP-CLI:

wp transient delete–all

wp post delete $(wp post list –post_type=’revision’ –format=ids)

  • Migrate to InnoDB: If you’re still using MyISAM, it’s time to switch — InnoDB is faster and more reliable for modern workloads.
  • Schedule Regular Optimization: Use tools like WP-Optimize or add mysqlcheck to a cron job for automated maintenance. 

Implement Critical CSS And Defer Non-Critical Assets

First impressions are undoubtedly the last attempt, including your page’s foremost look. Optimize the critical rendering path to load essential content first.

Actionable tips:

  • Generate Critical CSS: Use tools like Critical or services like Bunny Optimizer to inline above-the-fold styles.
  • Defer JavaScript: Add defer or async to script tags that aren’t needed immediately.
  • Async Fonts: Use font-display: swap to prevent Flash of Invisible Text (FOIT) and improve perceived load time.

Plugins to consider: Perfmatters or FlyingPress for granular asset management.

Enable Server-Level GZIP or Brotli Compression

Reduce the size of your files before they even hit the browser, saving bandwidth and accelerating page load.

  • Enable Brotli: Offers superior compression than GZIP for HTML, CSS, and JS.

Example for NGINX:

brotli on;

brotli_comp_level 6;

brotli_types text/plain text/css application/javascript;

For Apache: Use mod_brotli and mod_deflate.

  • Test it: Check with GTmetrix or WebPageTest to confirm whether the compression works correctly. 

Deliver Assets Intelligently With Modern Tools

Serve smooth, purpose-driven files, not megabytes of unused code.

  • Tree-Shake CSS/JS: Tools like PurgeCSS strip out unused styles from bloated themes and frameworks.
  • Code Splitting: With Webpack or Vite, break JS bundles into smaller pieces for more rapid initial loads.
  • Use a CDN: Distribute assets globally via BunnyCDN, Cloudflare, or similar services for lightning-fast delivery.

Bonus Tip: Use your CDN’s image transformation API to serve optimized formats like WebP or AVIF on the fly.

Use Advanced Caching Layers (Edge, Opcode, Fragment)

Caching is critical, but basic page caching isn’t highly effective anymore. Hence, focus on:

  • Edge Caching: Cache your pages on the CDN edge (e.g., Cloudflare, Fastly) for minimal latency.
  • Opcode Caching: Ensure OPcache is enabled in PHP to speed up script execution.
  • Fragment Caching: Perfect for dynamic content. Use plugins like WP Rocket or implement manually using WordPress transients.

Lazy Load Media Strategically

Too much lazy loading is counterproductive. Hence, use it with precision.

  • Images & Iframes: Use the native <img loading=”lazy”> attribute for superior performance.
  • YouTube Embeds: Replace heavy embeds with clickable thumbnails until user interaction.
  • Custom Scenarios: Leverage the IntersectionObserver API to lazily load elements only when they enter the viewport.

Leverage Real User Monitoring (RUM)

Lab tests only go so far. RUM helps you optimize based on real users in the practicality.

  • Use Core Web Vitals: Implement tools like Google’s Web Vitals JS, or platforms like New Relic, Datadog, or Cloudflare Analytics.
  • Diagnose Bottlenecks: Use Lighthouse in DevTools to identify long tasks, layout shifts, and slow scripts in real-time. 

Eliminate Plugin Bloat And Reduce PHP Overhead

Every plugin adds weight, and many are inaccurately coded or redundant.

  • Audit with Query Monitor or New Relic APM: Determine the slowest-performing plugins or scripts.
  • Replace with Lightweight Alternatives:

Elementor → GenerateBlocks

Contact Form 7 → Fluent Forms

Golden Rule: Use as few plugins as necessary, especially on high-traffic sites.

Explore Headless or Hybrid WordPress Architecture

Looking for maximum speed and control? Consider decoupling your frontend.

  • Go Headless: Use frameworks like Next.js, Nuxt, or Gatsby for static or dynamic frontend delivery, pulling content via REST API or GraphQL.
  • Try Static Site Generation: Tools like WP2Static or Strattic can turn your site into fast-loading static HTML.
  • Hybrid Approach: Keep WordPress for admin/backend use and serve quick flat pages to the frontend, often called the best of both worlds. 

The Crux: Advanced speed optimization isn’t optional; it’s essential. These 10 techniques empower you to boost performance, improve SEO, and deliver an exceptional user experience that keeps visitors engaged and returning. 

How To Benchmark Your Current Performance

Before diving in-depth into advanced optimization, you should know where you currently stand. That’s where performance benchmarking comes into the limelight. It reveals your website’s pain points and provides a measurable baseline to evaluate progress.

Imagine fine-tuning a race car without knowing its current lap time. The same applies to your WordPress site.

Use These Core Tools for Effective Benchmarking:

Google PageSpeed Insights (PSI)

This free tool offers actionable insights and breaks down performance into Core Web Vitals, such as Largest Contentful Paint (LCP), Cumulative Layout Shift (CLS), and First Input Delay (FID).

Bonus Tip: Pay special attention to “Opportunities” and “Diagnostics” to uncover unused scripts, render-blocking resources, or delayed server response times.

GTmetrix

GTmetrix provides both PageSpeed and Lighthouse scores along with waterfall charts that visually trace how each asset loads.

Use It For: Detecting slow-loading scripts, large image files, and inaccurately optimized third-party resources.

Lighthouse In Chrome DevTools

Run an audit directly in your browser. It enables you to test mobile or desktop experiences, simulating throttled network conditions to mimic real-world usage.

Ideal For: Pinpointing JavaScript bloat, layout shifts, and performance bottlenecks specific to your theme or plugins.

WebPageTest.org

Advanced users can run multi-step tests, test from various global locations, and capture First Byte Time (TTFB), fully loaded time, and visual progress.

Pro Feature: Use video comparison to see how your website visually stacks up against competitors.

What You Should Know: Benchmarking your WordPress site using tools like PSI, GTmetrix, and WebPageTest provides essential data to identify bottlenecks and track the real impact of your optimization efforts. 

How To Build A Speed-First WordPress Mindset

Speed optimization is a forward-thinking approach to keep your website relevant. The best-performing WordPress sites aren’t just rapid by luck; they’re built and maintained with a mindset that prioritizes performance from day one. We suggest implementing the following tactics: 

Shift From Reactive To Proactive

Instead of messing up to fix slowdowns after they appear, adopt a preventive approach. Performance should be considered every time you install a plugin, write custom code, or upload media.

Design With Speed In Mind

  • Choose lightweight themes: Commence with performance-optimized themes like GeneratePress or Astra.
  • Limit heavy visual effects: Fancy animations, sliders, and video backgrounds may look good, but they often drag speed down.
  • Use SVGs or optimized WebP images: They’re lighter, scalable, and browser-friendly.

Keep Your Stack Lean

  • Install only essential plugins. Every plugin you add is another component in the machine.
  • Host on platforms that value speed. Your server architecture is foundational to your entire performance strategy.

Make Performance A Habit

  • Audit regularly: Schedule monthly checks with tools like GTmetrix or Lighthouse.
  • Monitor changes before pushing live: Use staging environments and test load impacts before deployment.
  • Stay updated: Follow speed-focused blogs, release notes, and optimization trends.

Collaborate With Performance In Mind

Developers, designers, content creators, and marketers should all communicate in the same performance-first language. It reflects team effort.

Key Takeaway: Implanting a performance-first mindset across every aspect of your WordPress site ensures long-term gains and a memorable user experience.

Bonus Tips For Maintaining Long-Term Site Speed

Site speed optimization isn’t a one-time activity; it’s an ongoing commitment. After applying advanced techniques and seeing substantial performance gains, the real challenge begins with maintaining the same accomplishment. Without regular monitoring and upkeep, all your efforts will start falling apart.

Here’s how to ensure your WordPress site remains fast and efficient over time.

Set Up Scheduled Performance Audits

Use automation or reminders to run speed audits monthly or quarterly. This helps catch regressions caused by plugin updates, theme changes, or new content.

Monitor Core Web Vitals Continuously

Implement tools like Google Search Console, Cloudflare Web Analytics, or New Relic to keep tabs on real-user metrics such as LCP and CLS. Real-time alerts let you fix issues before they impact SEO or UX.

Keep Themes, Plugins, And Core Updated

Outdated software often leads to vulnerabilities and poor performance. Hence, always test updates in staging before deploying them live to avoid unexpected slowdowns.

Perform Image And Asset Reviews

Schedule periodic reviews of your media library. Unused or oversized images can crawl back in over time. Tools like ShortPixel or EWWW Image Optimizer can automate this. 

Test Before And After Any Major Site Change

Are you planning a content overhaul or redesign? Benchmark speed before and after. Even minor layout or script changes can affect load time.

Central Idea: Long-term speed requires long-term discipline. Routine audits, proactive monitoring, and smart content management ensure your website stays lightning-fast even as it evolves.

When Should You Consult Experts For WordPress Speed Optimization?

Sometimes, even after your best efforts, your WordPress site just won’t show improvements past mediocre performance. No need to panic because it’s usual. That’s where professionals step in to speed things up and resolve the complex web performance behind the scenes.

So, how do you determine the ideal time to seek specialists’ help? Let’s walk you through the vital signs to watch out for. 

Signs You Need Professional Help

  • You’ve hit a performance plateau. Despite trying out several optimization tactics, Core Web Vitals still indicate red or orange.
  • Your website is breaking after optimization attempts. Conflicts between plugins, themes, and caching strategies often require developer-level debugging.
  • You’re running a high-traffic or enterprise-level website. Such complex infrastructures demand cutting-edge fine-tuning beyond typical plugin fixes.
  • Custom themes or legacy code are involved. Outdated or improperly built themes can affect performance, and diagnosing them requires a trained eye.
  • Your business relies on website speed for revenue. For eCommerce, agencies, or content-heavy publishers, every millisecond counts.

What To Expect From Optimization Experts

  • Code audits & performance debugging
  • Advanced caching and server configuration
  • Custom database query optimization
  • Edge delivery strategies
  • Customized performance roadmaps

Bringing in an expert doesn’t signify failure; it’s a wise business move when DIY solutions can’t deliver professional-grade results.

Essential Insight: If your site’s speed problems persist or you’re managing high-stakes performance standards, don’t hesitate to consult seasoned WordPress optimization experts who can help you attain the desired results. 

Conclusion

Optimizing your WordPress site for speed is more than a technical enhancement; it’s a competitive necessity. 

Throughout this guide, we’ve explored a wide range of advanced performance strategies, from upgrading your hosting environment and leveraging intelligent asset delivery to implementing real user monitoring (RUM) and even considering headless or hybrid architecture.

Each technique serves a distinct purpose. Implementing them harmoniously results in a seamless, lightning-fast experience that delights users and captivates search engines’ attention. 

You also know when it’s wise to bring in professionals, how to benchmark your progress, and how to develop a long-term, speed-first mindset that pays off in scalability and user satisfaction.

Remember, site speed isn’t a one-time task. It’s an ongoing discipline rooted in awareness, proactive maintenance, and an in-depth understanding of how performance shapes experience.

If you’ve made it this far, we thank your time and dedication to mastering these concepts. By applying these advanced techniques, you’re not just optimizing your website but raising the bar for digital experience.

Here’s to faster pages, happier users, and WordPress sites that don’t just load but lead.

Is Your WordPress Site Slowing Down? Here’s How Cron Jobs Might Be Hurting Performance (and How to Fix It)

Have you noticed your WordPress site feeling sluggish lately? Pages taking longer to load? Your hosting provider warning about resource usage? Before you blame your theme or start uninstalling plugins randomly, there’s a hidden culprit you might not have considered: WordPress Cron jobs.

Most WordPress site owners don’t even know what WP-Cron is, let alone that it could be the reason their site feels like it’s running through mud. In this comprehensive guide, we’ll uncover how WordPress handles scheduled tasks, why it can become a performance nightmare, and most importantly how to fix it.

The Hidden Performance Killer: Understanding WP-Cron

WordPress runs scheduled tasks differently than you might expect. Every time someone visits your website, every single visitWordPress checks if there are any scheduled tasks that need to run. This system is called WP-Cron.

What Makes WP-Cron Different (and Problematic)?

Unlike traditional server cron jobs that run at specific times regardless of website traffic, WP-Cron only triggers when someone loads a page on your site. Think of it like a lazy employee who only starts working when the boss walks by.

Here’s what happens behind the scenes:

  1. A visitor lands on your homepage
  2. WordPress loads all its core files
  3. Before displaying the page, it checks: “Are there any cron jobs due?”
  4. If yes, it spawns a background process to run those tasks
  5. Only then does it serve the page to your visitor

This process adds overhead to every single page load. On a high-traffic site, that means thousands of unnecessary checks every hour.

The Technical Reality: Why WordPress Chose This Approach

WordPress was designed to work on any hosting environment, including basic shared hosting where users don’t have access to server-level cron jobs. The WP-Cron system was a clever workaround that made WordPress incredibly portable and easy to install anywhere.

When WordPress was first developed in 2003, most websites were small blogs with minimal traffic. The performance overhead was negligible. Fast forward to today, and WordPress powers 43% of all websites, including massive e-commerce stores, news sites, and enterprise applications. The same system that worked fine for a personal blog now becomes a bottleneck for business-critical applications.

Why This Matters for Your Business

If you’re running an e-commerce store, a membership site, or any business-critical WordPress installation, these milliseconds add up. Studies show that:

  • A 1-second delay in page load time can reduce conversions by 7%
  • 40% of visitors abandon a site that takes more than 3 seconds to load
  • Google considers page speed as a ranking factor for both desktop and mobile search
  • 53% of mobile users leave a site that takes longer than 3 seconds to load

When WP-Cron runs heavy tasks like generating reports, sending bulk emails, or processing data it can delay page rendering for your actual visitors. That’s a direct hit to your revenue and search rankings.

The Anatomy of WP-Cron: What’s Really Happening

To truly understand the performance impact, let’s dive deeper into the mechanics of WP-Cron execution.

The Page Load Sequence

When a typical WordPress page loads with WP-Cron enabled:

Step 1 (0-50ms): Initial HTTP request received
Step 2 (50-200ms): WordPress core loads, database connection established
Step 3 (200-250ms): WP-Cron check initiates – queries database for scheduled events
Step 4 (250-300ms): If cron jobs are due, spawns background HTTP request to itself
Step 5 (300ms+): Page continues rendering while cron jobs execute in parallel

The problem? That “parallel” execution isn’t truly parallel on many hosting environments. On shared hosting or servers with limited resources, the cron execution competes with page rendering for CPU and memory. This creates visible slowdowns.

The Multiplier Effect

Here’s what makes it worse: if five visitors load your site simultaneously, WordPress potentially spawns five separate cron checks. While WordPress has logic to prevent duplicate execution, the checking process itself consumes resources.

On a site receiving 100 visits per hour, that’s 100 database queries checking for scheduled tasks, even if there’s nothing scheduled to run. For a high-traffic site with 10,000 visits per hour, that’s 10,000 unnecessary database queries every single hour.

The Hidden Cron Jobs You Don’t Know About

Most site owners think cron jobs are just for scheduled posts. In reality, WordPress and your plugins create dozens of background tasks:

WordPress Core Tasks:

  • Checking for WordPress updates (twice daily)
  • Checking for plugin updates (twice daily)
  • Checking for theme updates (twice daily)
  • Cleaning up old transients from database (daily)
  • Purging expired comments from trash (daily)
  • Regenerating .htaccess file (weekly on some configurations)

Common Plugin Tasks:

  • Backup plugins: Full site backups, incremental backups, database exports
  • SEO plugins: Sitemap generation, broken link checking, analytics syncing
  • Security plugins: Malware scanning, login attempt monitoring, database hardening
  • Cache plugins: Cache preloading, cache cleanup, optimization routines
  • Email plugins: Queue processing, bounce handling, list cleaning
  • Analytics plugins: Data aggregation, report generation, API syncing
  • Social media plugins: Auto-posting, metrics collection, feed updates
  • E-commerce plugins: Inventory syncing, abandoned cart emails, report generation

We’ve audited sites with over 60 active cron jobs running throughout the day. Each one adds overhead.

The 5 Warning Signs WP-Cron Is Hurting Your Site

How do you know if WP-Cron is causing problems? Look for these telltale signs:

1. Inconsistent Page Load Times

Some pages load quickly, while others take several seconds. This inconsistency often occurs because certain page loads trigger cron jobs while others don’t. Run multiple speed tests at different times if you see load times varying by more than 500ms without traffic changes, WP-Cron interference is likely.

2. Spike in Server Resource Usage

Your hosting provider sends warnings about CPU or memory limits, especially during peak traffic hours. WP-Cron tasks competing with regular traffic can max out your server resources. Check your server logs you’ll often see simultaneous spikes in CPU usage and wp-cron.php execution.

3. Scheduled Posts Publishing Late

You schedule a blog post for 9:00 AM, but it doesn’t go live until 9:47 AM when someone finally visits your site. This unpredictability is classic WP-Cron behavior. For content marketing teams running time-sensitive campaigns, this unreliability is unacceptable.

4. Plugin Tasks Not Running Reliably

Backup plugins, SEO tools, and analytics plugins rely on cron jobs. If your backups are inconsistent or your automated tasks keep failing, WP-Cron might be the culprit. We’ve seen cases where nightly backups failed for weeks because the site received no traffic during the scheduled backup window.

5. Slow Admin Dashboard

The WordPress admin area feels sluggish, especially when checking scheduled posts or viewing plugin settings. This can indicate cron job congestion. The admin dashboard itself can trigger cron checks, making routine tasks frustratingly slow.

The Real Cost of Ignoring This Problem

Beyond just slow loading speeds, poorly configured cron jobs can create cascading problems:

Business Impact:

  • Lost sales from abandoned carts due to slow checkouts (average cart value × abandonment rate = quantifiable loss)
  • Reduced email deliverability if your email queue backs up (marketing ROI suffers)
  • Missed marketing opportunities when scheduled campaigns don’t deploy on time
  • Poor user experience leading to decreased customer retention and lifetime value
  • Damaged brand reputation from a “laggy” website
  • Lower search rankings due to poor Core Web Vitals scores

Technical Debt:

  • Increased server costs as you upgrade hosting to compensate (often $50-300/month more than needed)
  • Plugin conflicts and errors from failed scheduled tasks
  • Database bloat from stuck or failed cron events that pile up over time
  • Difficulty scaling your site as traffic grows
  • Increased complexity troubleshooting other issues when cron problems create false flags

Real-World Financial Impact:

Consider a mid-sized e-commerce site generating $50,000 monthly revenue:

  • 2% conversion rate on 25,000 monthly visitors
  • 40% of mobile users experience slow loads during cron execution
  • Average order value: $100

If page delays from WP-Cron cause just a 10% drop in mobile conversions during affected loads, that’s approximately $2,000 in lost monthly revenue,$24,000 annually. Many site owners throw money at hosting upgrades when a one-time $500-1,500 optimization would solve their performance issues permanently.

The Professional Solution: Disabling WP-Cron the Right Way

The most effective fix is disabling WP-Cron and replacing it with proper server-side cron jobs. However, this isn’t as simple as flipping a switch; it requires careful implementation to avoid breaking your site.

Step 1: Audit Your Current Cron Jobs

Before making changes, you need to know what’s currently scheduled. This discovery phase is critical and often reveals surprises.

Manual Audit Using Plugins:

Install a plugin like “WP Crontrol” or “Advanced Cron Manager” to view all scheduled tasks. Document:

  • Event name (hook)
  • Recurrence interval
  • Next scheduled run time
  • Which plugin/theme created it
  • Arguments passed to the event

You might be surprised to find dozens of jobs you didn’t know existed. We routinely find abandoned cron jobs from deleted plugins still running years later, consuming resources for no reason.

Database-Level Investigation:

For a complete picture, examine the wp_options table directly:

Look for the cron option key. This serialized array contains every scheduled event. Expert developers can parse this to identify problematic patterns like:

  • Jobs scheduled to run every minute (excessive)
  • Multiple duplicate jobs (configuration errors)
  • Jobs with execution times in the past (stuck/failed tasks)

Step 2: Clean Up Before Optimization

Before disabling WP-Cron, clean house:

Remove Unnecessary Jobs:

  • Deactivate unused plugins and verify their cron jobs are removed
  • Disable update checks if you manage updates manually
  • Remove duplicate scheduled events

Optimize Existing Jobs:

  • Consolidate similar tasks to run together
  • Adjust overly frequent schedules (does that task really need to run every 5 minutes?)
  • Stagger resource-intensive tasks to avoid conflicts

This cleanup alone can improve performance by 15-30% without any structural changes.

Step 3: Disable WP-Cron Safely

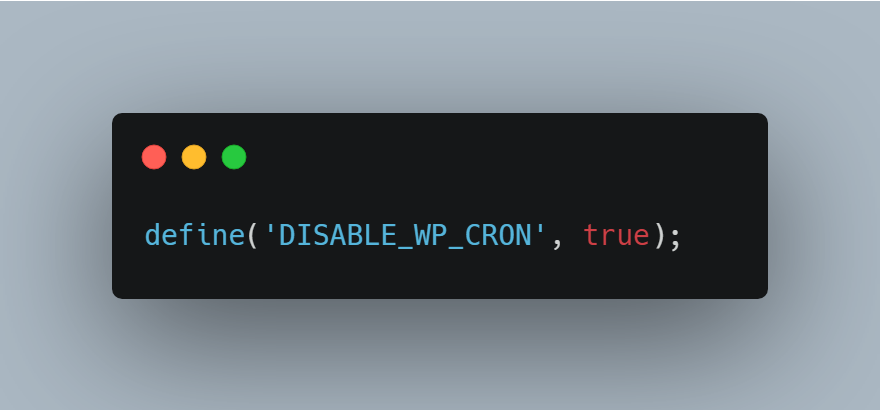
Add this line to your wp-config.php file (above the “/* That’s all, stop editing! */” line):

define('DISABLE_WP_CRON', true);

Critical Warning: Once you disable WP-Cron, your scheduled tasks will stop running completely unless you set up a replacement. Don’t do this unless you’re ready to implement Step 4 immediately.

Best Practice: Implement this during a maintenance window or low-traffic period, and have a rollback plan ready.

Step 4: Configure Server-Level Cron Jobs

This is where things get technical. You need to set up your server to trigger wp-cron.php at regular intervals. The exact method depends on your hosting environment:

For cPanel Hosting:

Navigate to Advanced → Cron Jobs, then add:

*/5 * * * * wget -q -O - https://yoursite.com/wp-cron.php?doing_wp_cron >/dev/null 2>&1

Alternative using curl (faster, if available):

*/5 * * * * curl -s https://yoursite.com/wp-cron.php?doing_wp_cron >/dev/null 2>&1

This runs every 5 minutes. For most sites, this interval works well.

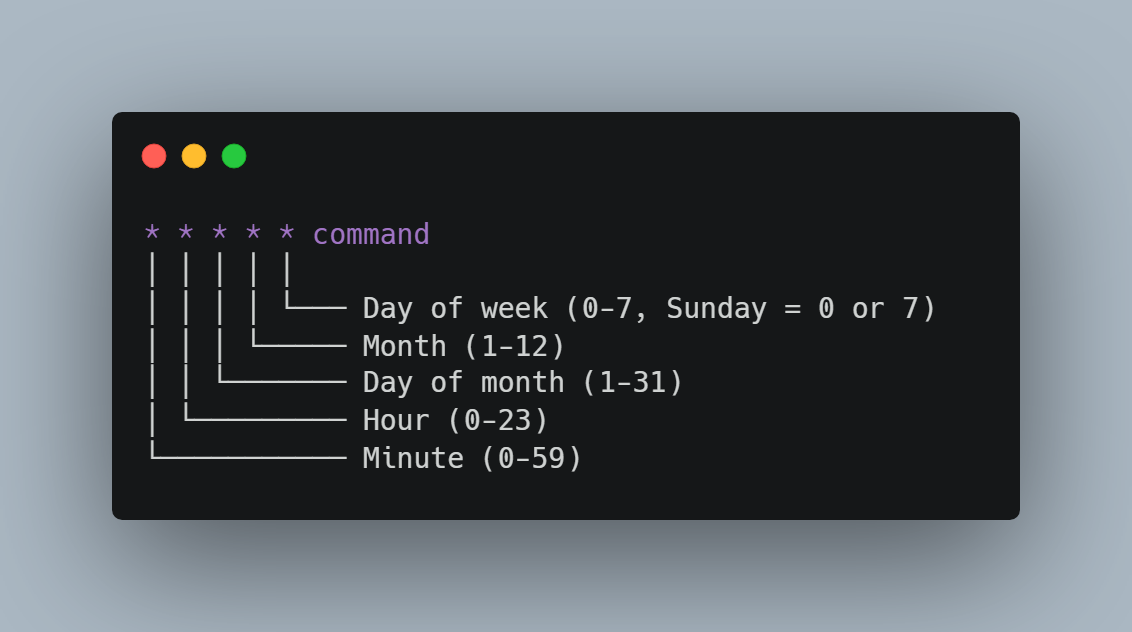
Understanding Cron Syntax:

The timing format follows this pattern:

Understanding Cron Syntax:

Common intervals:

  • */1 * * * * – Every minute (for high-priority sites)
  • */5 * * * * – Every 5 minutes (standard recommendation)
  • */15 * * * * – Every 15 minutes (low-traffic sites)
  • 0 * * * * – Every hour, on the hour

For Managed WordPress Hosting:

Platforms like WP Engine, Kinsta, or Flywheel often have built-in cron management:

  • WP Engine: Supports server cron, contact support to enable
  • Kinsta: Automatic server-level cron, no configuration needed
  • Flywheel: Available on higher plans, contact support

Check their documentation or contact support before making changes.

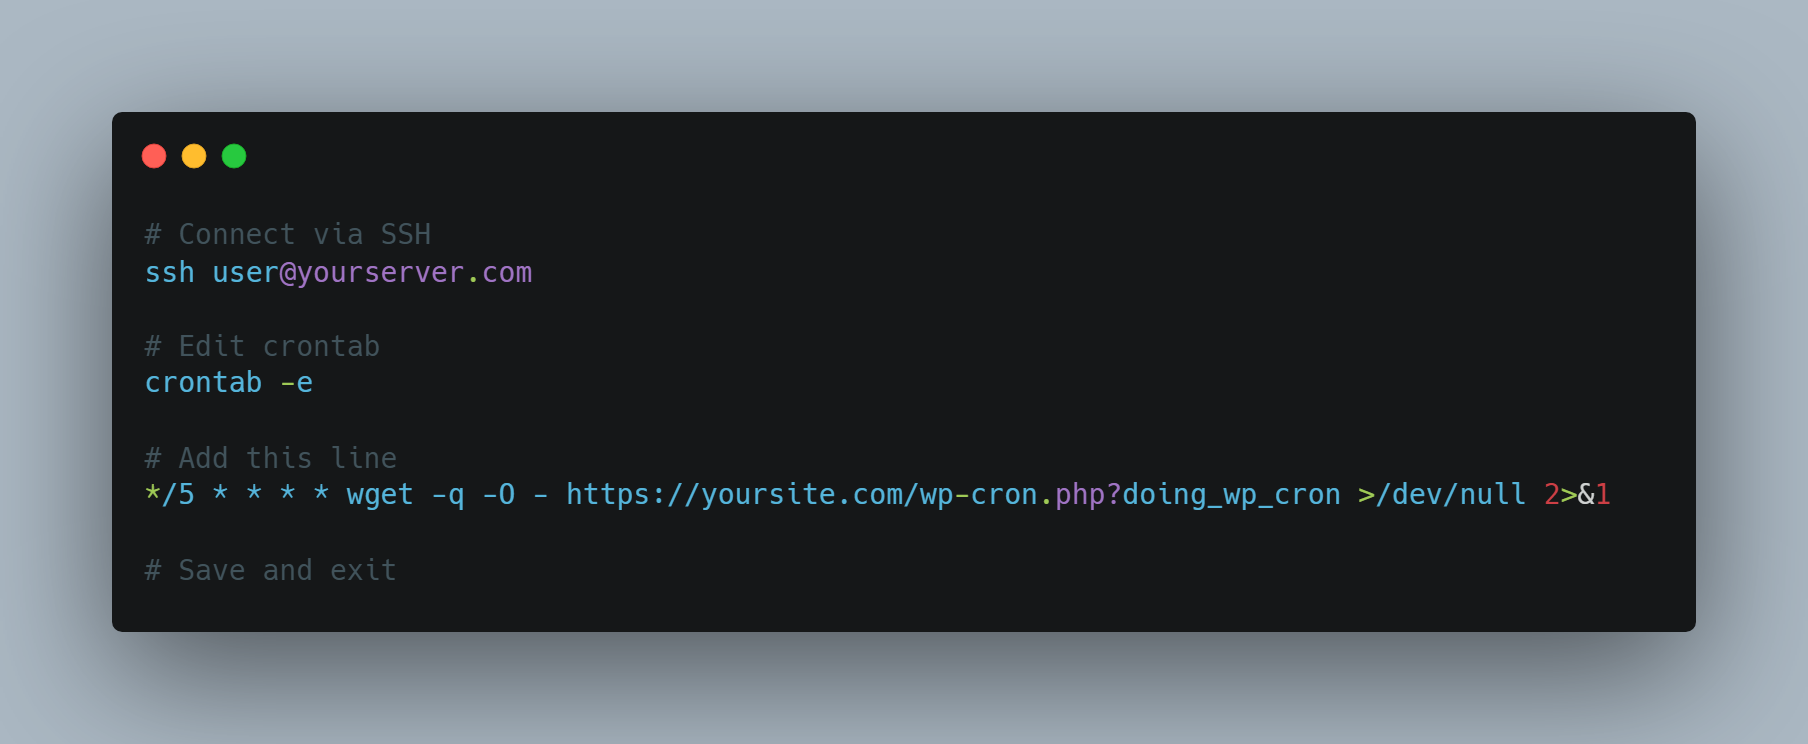
For VPS or Dedicated Servers:

You’ll need SSH access to edit the crontab directly:

Security Consideration:

For public-facing sites, consider adding authentication to wp-cron.php to prevent unauthorized execution. This requires custom configuration and is part of professional optimization services.

Step 5: Verify Everything Still Works

After implementation, monitor your site for 24-48 hours:

Immediate Checks (First Hour):

  • Check that scheduled posts publish on time
  • Verify plugin tasks are completed (backups, emails, etc.)
  • Review error logs for any cron-related failures
  • Test a few critical user workflows (checkout, registration, etc.)

Short-Term Monitoring (24-48 Hours):

  • Monitor server resource usage for improvements using tools like New Relic or server monitoring
  • Test page load speeds using GTmetrix, Pingdom, or Google PageSpeed Insights
  • Check analytics for any anomalies in user behavior
  • Verify all automated emails are sent (order confirmations, password resets, etc.)

Performance Metrics to Track:

  • Average page load time (should decrease 20-40%)
  • Time to First Byte (TTFB) (should improve 15-30%)
  • Server CPU usage (should drop 30-50% during peak hours)
  • Database query time (should decrease noticeably)
  • Bounce rate (should improve if speed was causing exits)

Advanced Optimization: Custom Cron Intervals

Some tasks don’t need to run every 5 minutes. Newsletter processing might only need to run hourly, while critical e-commerce tasks might need to run every minute.

Creating Intelligent Schedules

WordPress defaults to these intervals:

  • hourly (once per hour)
  • twice daily (twice per day)
  • daily (once per day)
  • weekly (once per week)

But your business needs might require custom intervals:

E-Commerce Priority Example:

  • Every 1 minute: Payment gateway synchronization, inventory updates from suppliers
  • Every 5 minutes: Order processing queue, abandoned cart tracking
  • Every 15 minutes: Email queue processing, customer notification batches
  • Hourly: Sales reports generation, analytics aggregation
  • Every 6 hours: Full inventory reconciliation
  • Daily: Database optimization, old order archiving, backup verification

Membership Site Example:

  • Every 5 minutes: New member onboarding emails
  • Every 15 minutes: Access level checking for expired memberships
  • Hourly: Engagement metrics calculation
  • Daily: Member activity reports, content drip releases
  • Weekly: Member retention analysis

The Technical Implementation

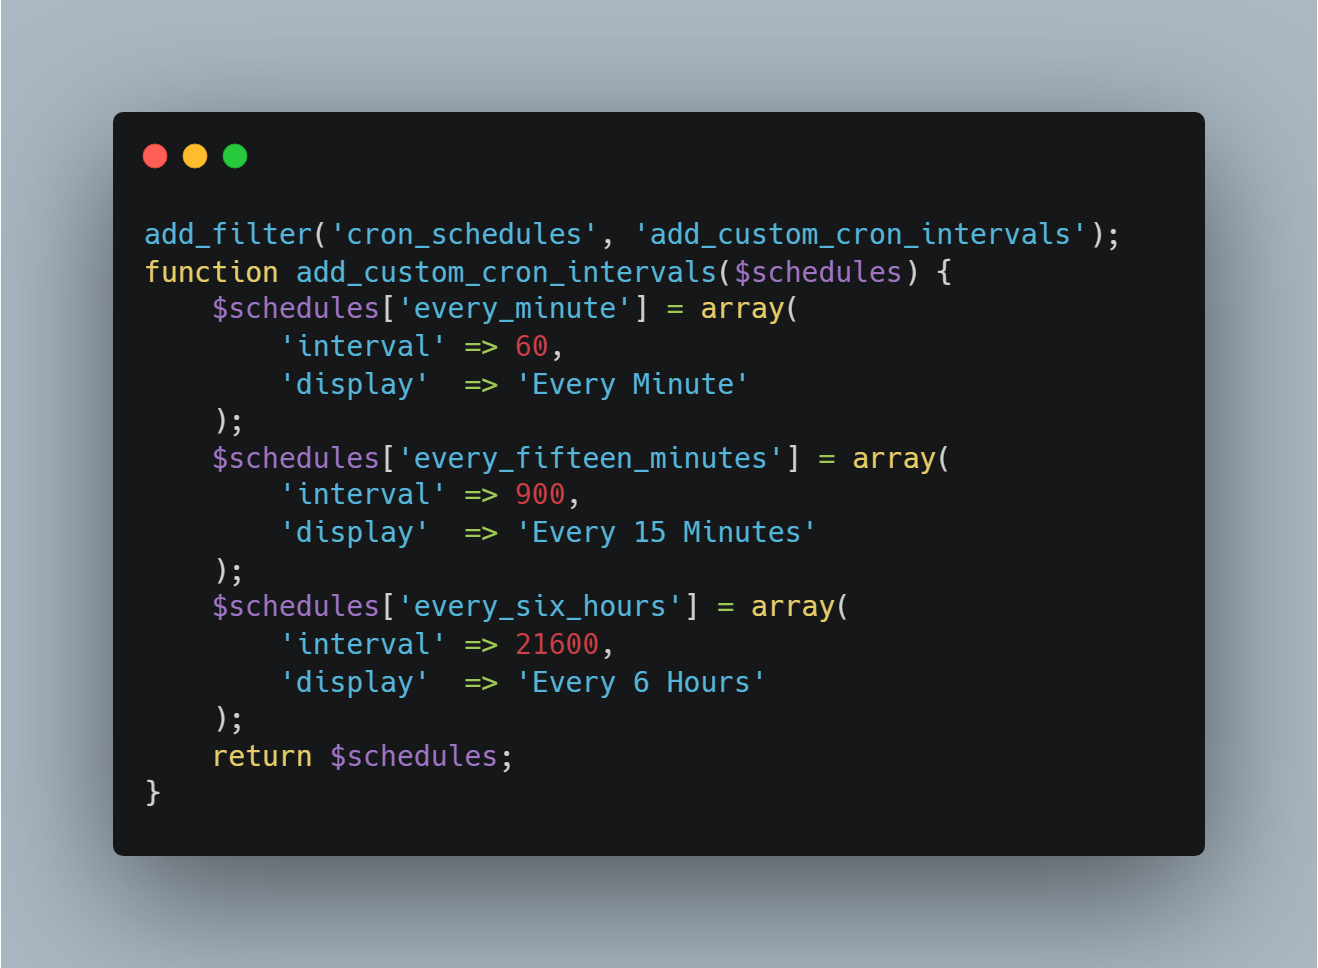
Creating custom intervals requires adding code to your theme’s functions.php or a custom plugin:

Creating custom intervals requires adding code to your theme's functions.php or a custom plugin

This level of customization requires understanding both WordPress internals and your specific business workflows.

Load Distribution Strategies

Professional implementations go further by staggering tasks to prevent resource conflicts:

  • Run heavy database operations during low-traffic hours (typically 2-5 AM local time)
  • Distribute email sending throughout the day rather than one large batch
  • Offset similar tasks by a few minutes to prevent CPU spikes
  • Implement queue systems for tasks that can be processed asynchronously

Why DIY Optimization Often Backfires

We’ve worked with dozens of business owners who tried to implement these fixes themselves. Here’s what typically goes wrong:

Common Mistakes:

  1. Disabling WP-Cron without a replacement – Scheduled posts stop publishing, backups fail, and plugins break silently. Recovery requires identifying every broken workflow manually.
  2. Wrong cron syntax – Tasks run too frequently (overloading the server) or not at all. We’ve seen accidental configurations that triggered wp-cron.php every second, bringing servers to their knees.
  3. Missing error logging – Problems occur silently, and you don’t know until something major breaks. Without proper logging, debugging takes hours instead of minutes.
  4. Incorrect file paths – The cron job can’t find wp-cron.php and fails repeatedly. This is especially common on sites with unusual directory structures or security configurations.
  5. Inadequate testing – Everything seems fine initially but breaks under traffic load. Testing with low traffic doesn’t reveal problems that emerge during peak usage.
  6. Security holes – Leaving wp-cron.php publicly accessible without protection allows potential abuse. Attackers can trigger resource-intensive cron jobs repeatedly.
  7. Missing multisite considerations – Network-wide cron jobs require special handling that differs from single-site implementations.

Real Disaster Stories

Case Study: The E-Commerce Email Catastrophe

One client came to us after their “optimization” caused their WooCommerce store to stop sending order confirmation emails for three days. They lost sales and customer trust because they didn’t realize their fix had broken a critical function. Customers thought orders weren’t processed, leading to chargebacks and angry phone calls. The recovery included:

  • Manually sending 247 order confirmations
  • Offering goodwill discounts to affected customers (cost: $3,700)
  • Emergency reputation management
  • Technical recovery taking 12 hours

Total cost of the DIY mistake: Over $8,000 in lost revenue and recovery expenses.

Case Study: The Membership Site Lockout

A membership site disabled WP-Cron without realizing their access control plugin relied heavily on scheduled checks. When the cron jobs stopped, new members couldn’t access content and renewals didn’t process correctly. They lost 12% of their monthly recurring revenue before discovering the issue five days later.

The Hosting Environment Factor

Not all hosting environments are created equal when it comes to cron optimization.

Shared Hosting Challenges

On shared hosting (GoDaddy, Bluehost, HostGator, etc.):

  • Limited control over server configuration
  • Resource restrictions affect cron execution
  • Other sites on the same server impact performance
  • Cron job frequency limits (often max every 15 minutes)
  • Some hosts block wp-cron.php completely for security

Recommendation: If you’re on shared hosting and experiencing performance issues, cron optimization provides limited relief. Consider upgrading to VPS or managed WordPress hosting for serious business sites.

VPS and Dedicated Server Advantages

Full server control enables:

  • Precise cron timing down to the second
  • Resource allocation specifically for cron jobs
  • Advanced scheduling with job dependencies
  • Complete logging and monitoring
  • Security lockdown of cron execution

Cloud Hosting Considerations (AWS, Google Cloud, Azure)

Cloud environments offer the most flexibility:

  • Separate workers for cron processing
  • Auto-scaling based on job queue depth
  • Geographic distribution for global audiences
  • Advanced queuing systems (AWS SQS, Google Cloud Tasks)
  • Serverless cron alternatives (AWS Lambda, Google Cloud Functions)

However, this complexity requires DevOps expertise to implement correctly.

The Enterprise Approach: Professional Cron Management

Large-scale WordPress sites use sophisticated cron management strategies that go far beyond basic optimization:

Advanced Architecture Patterns

1. Dedicated Cron Server

Separate application server from cron execution:

  • Web servers handle only user requests
  • Dedicated cron server processes all scheduled tasks
  • Eliminates performance impact on user experience
  • Enables resource allocation tuned for batch processing

2. Queue-Based Systems

Replace direct cron execution with job queues:

  • Tasks added to queue instead of immediate execution
  • Worker processes consume queue at controlled rate
  • Automatic retry logic for failed jobs
  • Priority queues for critical tasks
  • Real-time monitoring of queue depth and processing speed

3. Microservices Architecture

Break cron functionality into independent services:

  • Email service handles only email-related cron jobs
  • Payment service processes payment-related tasks
  • Each service scales independently based on load
  • Failure isolation prevents cascading problems

Enterprise Monitoring

Professional implementations include comprehensive monitoring:

Real-Time Dashboards Tracking:

  • Cron job execution frequency and duration
  • Success/failure rates per job type
  • Resource consumption per job
  • Queue depth and processing lag
  • Cost per job execution (important for cloud environments)

Automated Alerting:

  • Instant notification when jobs fail
  • Warnings when jobs exceed normal execution time
  • Alerts for queue backlog building up
  • Capacity warnings before resources max out

Performance Analytics:

  • Historical trends showing optimization effectiveness
  • Correlation analysis between cron timing and user metrics
  • Predictive alerts for potential issues
  • Cost optimization recommendations

Load Balancing Strategies

Time-Based Distribution: Intelligent scheduling spreads load throughout the day rather than clustering jobs at arbitrary intervals. For example, instead of all hourly jobs running at the top of the hour (creating a spike), they’re distributed: some at :05, others at :17, others at :33, etc.

Priority Queuing: Critical tasks (like order processing) run before non-essential tasks (like social media posting). If resources are constrained, low-priority jobs queue until capacity is available.

Geographic Distribution: For global sites, cron jobs run on servers geographically closest to the data they’re processing, reducing latency and improving execution speed.

These enterprise solutions require custom development and ongoing management, but they’re essential for sites processing thousands of transactions daily or serving millions of visitors monthly.

Alternative Solutions: When Full Optimization Isn’t Needed

Not every site requires complete WP-Cron replacement. Sometimes simpler solutions work:

The Hybrid Approach

Keep WP-Cron enabled but optimize how it runs:

  1. Reduce Check Frequency: Modify how often WordPress checks for scheduled events
  2. External Trigger: Use an uptime monitoring service (like UptimeRobot) to ping wp-cron.php regularly
  3. Selective Disabling: Disable only for frontend, keep enabled for admin

This provides 60-70% of the performance benefit with less complexity.

Plugin-Based Solutions

Several plugins offer optimization without code changes:

  • WP Crontrol: Manages existing cron jobs, helps identify problems
  • Disable WP Cron: Simple interface for disabling WP-Cron
  • Advanced Cron Manager: Visual management of all scheduled tasks

However, plugins add another layer of code to maintain and can themselves create performance issues.

When to Keep Default WP-Cron

Some sites work fine with default WP-Cron:

  • Low-traffic personal blogs (under 100 visitors/day)
  • Sites with minimal plugins (less than 10 active)
  • Sites without time-critical scheduled tasks
  • Staging/development environments

If your site isn’t experiencing performance issues, the complexity of optimization may not be worthwhile.

Real-World Results: What Proper Cron Optimization Achieves

When implemented correctly, cron optimization delivers measurable improvements:

Performance Gains:

  • 20-40% reduction in average page load time
  • 50-70% decrease in server resource usage during peak hours
  • Consistent page load speeds regardless of traffic patterns
  • Improved scalability as traffic grows
  • Better Core Web Vitals scores affecting SEO rankings

Reliability Improvements:

  • Scheduled content publishes exactly on time
  • Plugin tasks complete reliably without manual intervention
  • Email queues process smoothly without delays or bounces
  • Backup and maintenance tasks run predictably
  • Zero failed cron jobs from resource exhaustion

Cost Savings:

  • Reduced need for hosting upgrades ($50-300/month savings typical)
  • Lower server resource consumption (20-40% reduction in CPU/memory)
  • Fewer emergency support tickets and crisis management
  • Decreased downtime and maintenance needs
  • Better resource utilization means delayed infrastructure scaling

Business Impact Examples:

E-Commerce Client (Fashion Retailer):

  • Previous state: Cart abandonment 73%, conversion rate 1.8%
  • After optimization: Cart abandonment 61%, conversion rate 2.1%
  • Result: 12% increase in conversion rate translated to $180,000 additional annual revenue
  • Implementation cost: $1,200 one-time

Membership Site (Online Education):

  • Previous state: Member complaints about access delays, content not releasing on schedule
  • After optimization: Zero access issues, perfect content drip execution
  • Result: Churn rate decreased from 8% to 5.5% monthly, retaining $14,400 more in annual recurring revenue
  • Implementation cost: $900 one-time

News Publishing Site:

  • Previous state: Articles publishing 15-45 minutes late, SEO penalties for poor page speed
  • After optimization: Precise publishing, 42% improvement in mobile page speed scores
  • Result: 23% increase in organic search traffic within 90 days
  • Implementation cost: $1,500 one-time

Security Implications of Cron Optimization

An often-overlooked aspect of cron optimization is security. Improperly configured cron systems create vulnerabilities:

Common Security Risks

1. Unauthenticated wp-cron.php Access

By default, anyone can trigger wp-cron.php by visiting the URL. Attackers can exploit this to:

  • Overwhelm your server by repeatedly triggering cron execution
  • Time attacks to coincide with cron execution for maximum disruption
  • Trigger resource-intensive tasks deliberately to cause downtime

2. Information Disclosure

Cron jobs often process sensitive data:

  • Customer emails and personal information
  • Financial transaction details
  • User access credentials
  • Business intelligence and analytics

Poor logging practices can expose this data in plain text log files.

3. Privilege Escalation

Some cron jobs run with elevated privileges. Vulnerabilities in custom cron code can allow attackers to execute unauthorized actions.

Security Best Practices

Implement these protections:

  1. Restrict wp-cron.php Access: Use server configuration to limit access to wp-cron.php to your server’s IP address only
  2. Add Authentication: Require a secret token passed as a parameter to wp-cron.php
  3. Encrypt Sensitive Data: Never log passwords, payment details, or personal information
  4. Use Secure Connections: Always trigger wp-cron.php via HTTPS
  5. Implement Rate Limiting: Prevent abuse by limiting how frequently wp-cron.php can be accessed
  6. Regular Audits: Review cron jobs quarterly for abandoned tasks from deleted plugins

Professional optimization includes these security measures by default.

When to Call in the Experts

While technically inclined site owners can implement basic cron optimization, professional help is recommended when:

High-Stakes Scenarios

  • Your site processes significant revenue (e-commerce, memberships, bookings, SaaS)
    • Any downtime or malfunction directly impacts revenue
    • Cart abandonment from performance issues costs real money
    • Customer trust depends on reliability
  • Time-critical operations (news sites, event platforms, time-sensitive offers)
    • Content must publish at exact times for maximum impact
    • Coordinated campaigns across multiple channels require precise timing
    • Late execution means missed opportunities
  • Complex technical environments (VPS, dedicated, cloud hosting with complex configurations)
    • Multi-server setups require advanced knowledge
    • Load balancers and CDNs add complexity
    • Custom security configurations need careful integration

Technical Complexity Indicators

  • Multiple plugins with interdependent cron jobs
    • Understanding dependencies prevents breaking workflows
    • Optimization must consider the entire ecosystem
    • Plugin conflicts can be subtle and difficult to debug
  • High traffic volumes (1,000+ visitors daily, 10,000+ for optimization necessity)
    • Scale introduces problems that don’t exist on small sites
    • Concurrent cron execution requires advanced handling
    • Resource constraints become critical
  • Previous optimization attempts failed or created problems
    • Recovery often more complex than initial implementation
    • Existing issues may mask underlying problems
    • Professional assessment identifies root causes
  • Custom cron scheduling needed for specific business workflows
    • Off-the-shelf solutions don’t fit unique requirements
    • Business logic requires custom development
    • Integration with third-party systems adds complexity
  • Unique hosting setups (load balanced, multisite networks, enterprise installations)
    • Standard approaches don’t work
    • Network-wide changes affect multiple sites
    • Enterprise compliance and security requirements

The Value Proposition of Professional Service

Professional WordPress developers don’t just disable WP-Cron and set up a basic cron job. They:

  1. Analyze Your Entire Technical Stack
    • Server configuration review
    • Database optimization assessment
    • Plugin efficiency evaluation
    • Theme performance audit
    • Identify bottlenecks beyond just cron
  2. Implement Intelligent Scheduling
    • Custom intervals matched to business needs
    • Load distribution for optimal performance
    • Priority queuing for critical tasks
    • Geographic optimization for global sites
  3. Ensure Reliability
    • Comprehensive testing before deployment
    • Fallback mechanisms for failures
    • Monitoring and alerting systems
    • Documentation for future maintenance
  4. Provide Ongoing Support
    • Performance monitoring post-implementation
    • Optimization as your site grows
    • Emergency support if issues arise
    • Regular audits and recommendations
  5. Deliver Measurable Results
    • Benchmarking before and after
    • Clear metrics showing improvement
    • ROI calculation demonstrating value
    • Ongoing optimization recommendations

The investment in professional optimization typically pays for itself within 1-3 months through improved conversions, reduced hosting costs, or eliminated emergency support needs.

Beyond Cron: The Bigger Performance Picture

Cron optimization is often just one piece of the performance puzzle. A truly fast WordPress site requires addressing multiple factors simultaneously:

Database Optimization

Your database grows over time, becoming sluggish:

  • Post revisions accumulating (thousands of old versions)
  • Transients never cleaned up (expired data lingering)
  • Comment spam in trash but not deleted
  • Orphaned metadata from deleted posts
  • Unused tables from old plugins

Professional database optimization can reduce query time by 40-60%, directly improving every page load.

Caching Strategy

Multi-layered caching provides dramatic improvements:

  • Object Cache (Redis or Memcached): Stores database query results
  • Page Cache: Serves pre-generated HTML for common pages
  • CDN (Content Delivery Network): Distributes static assets globally
  • Browser Cache: Tells browsers to store assets locally
  • Opcode Cache: Caches compiled PHP for faster execution

Proper caching can reduce page load time by 70-90% for repeat visitors.

Image Optimization

Images are often the heaviest page elements:

  • Unnecessary resolution (serving 4K images when 1080p suffices)
  • Uncompressed formats (PNG when JPG would work)
  • Missing next-gen formats (WebP offers 30% smaller files)
  • Loading all images upfront (lazy loading defers offscreen images)

Image optimization typically reduces page weight by 40-70%.

Code-Level Performance

Clean, efficient code matters:

  • Removing unused CSS and JavaScript (often 50%+ of loaded code is unused)
  • Minifying remaining code (reducing file size by 20-40%)
  • Deferring non-critical JavaScript (allowing page to render faster)
  • Optimizing database queries (reducing query count and complexity)
  • Eliminating plugin bloat (each plugin adds overhead)

Server Configuration

Proper server setup makes everything faster:

  • PHP Version: PHP 8.x is 2-3x faster than PHP 7.x
  • HTTP/2 or HTTP/3: Allows parallel resource loading
  • GZIP/Brotli Compression: Reduces transfer size by 60-80%
  • Resource Limits: Adequate memory and CPU allocation
  • Database Configuration: Proper MySQL/MariaDB tuning

The Holistic Approach

Many site owners chase individual fixes without understanding how all these elements interact:

  • Caching without image optimization means caching huge pages
  • Database optimization without caching means repeated slow queries
  • Code optimization without proper server configuration limits gains
  • Cron optimization without addressing plugin bloat provides partial improvement

That’s why a holistic approach analyzing your entire WordPress installation and implementing targeted improvements across all layers delivers the best results. A comprehensive audit identifies the specific bottlenecks affecting your site, rather than applying generic optimizations that may or may not help.

Monitoring and Maintaining Optimized Performance

Optimization isn’t a one-time task. Your site evolves, and performance can degrade over time without proper monitoring:

What to Monitor Regularly

Weekly Checks:

  • Page load speed trends (using GTmetrix or similar)
  • Server resource usage patterns
  • Cron job execution logs for failures
  • Error logs for new issues

Monthly Reviews:

  • New plugins added and their cron jobs
  • Traffic pattern changes affecting resource needs
  • Hosting resource utilization trends
  • User experience metrics (bounce rate, time on site)

Quarterly Audits:

  • Comprehensive performance testing
  • Database cleanup and optimization
  • Plugin necessity review (remove unused)
  • Security vulnerability assessment
  • Cron job efficiency review

Tools for Ongoing Monitoring

Free Tools:

  • Google PageSpeed Insights: Core Web Vitals tracking
  • GTmetrix: Detailed performance analysis
  • Pingdom: Uptime and speed monitoring
  • Query Monitor (WordPress plugin): Database query analysis
  • WP Crontrol: Cron job management and monitoring

Professional Tools:

  • New Relic: Application performance monitoring
  • Datadog: Infrastructure and application metrics
  • Sentry: Error tracking and debugging
  • Cloudflare: CDN with built-in analytics
  • ManageWP: Multi-site monitoring dashboard

Performance Degradation Warning Signs

Watch for these indicators that optimization is degrading:

  1. Gradual Speed Decline: Load times creeping up week over week
  2. Increasing Server Alerts: More frequent resource warnings from host
  3. Cron Job Failures: Tasks missing scheduled execution windows
  4. Growing Database: Significant size increases without content growth
  5. Plugin Conflicts: New errors appearing in logs
  6. User Complaints: Reports of slow loading or timeout errors

Early detection prevents small issues from becoming major problems.

The Migration Advantage: Starting Fresh

Sometimes the most effective optimization happens during a migration:

When Migration Makes Sense

Consider migrating to a new hosting environment or fresh WordPress installation when:

  • Your current host lacks necessary cron configuration options
  • Years of accumulated technical debt make cleanup impractical
  • Moving to managed WordPress hosting with built-in optimizations
  • Scaling up from shared to VPS/dedicated hosting
  • Transitioning to cloud infrastructure for better performance

Migration Best Practices

Pre-Migration Planning:

  • Document all current cron jobs and their purposes
  • Audit plugins and themes for necessity
  • Plan the new architecture with optimization built-in
  • Test the migration process in a staging environment
  • Prepare rollback procedures in case of issues

During Migration:

  • Clean database before transferring (remove old data, optimize tables)
  • Transfer only essential plugins and themes
  • Implement proper caching from day one
  • Configure server-level cron immediately
  • Set up monitoring tools before going live

Post-Migration:

  • Verify all cron jobs executing correctly
  • Test all critical user workflows
  • Monitor performance metrics closely for 72 hours
  • Document the new configuration for future reference
  • Update disaster recovery and backup procedures

A well-executed migration with optimization built-in often provides better results than trying to optimize a site with years of accumulated issues.

Common Myths About WordPress Performance

Let’s dispel some misconceptions that lead site owners astray:

Myth 1: “More RAM/CPU Always Solves Performance Problems”

Reality: Throwing hardware at software problems rarely works. We’ve seen sites on 16GB RAM servers performing worse than optimized sites on 2GB servers. Efficiency matters more than raw power.

Myth 2: “Premium Hosting Automatically Means Fast Sites”

Reality: Expensive hosting provides better infrastructure, but poorly configured WordPress still runs slowly. You need both good hosting AND proper optimization.

Myth 3: “Fewer Plugins Always Means Better Performance”

Reality: One poorly coded plugin can cause more problems than ten well-optimized ones. Quality matters more than quantity. A single plugin that runs 50 database queries per page load does more damage than five plugins that cache intelligently.

Myth 4: “Caching Plugins Solve Everything”

Reality: Caching helps tremendously, but it can’t fix underlying inefficiencies. It’s putting a bandaid on the symptom rather than curing the disease. You need both caching AND optimization for optimal performance.

Myth 5: “Disabling WP-Cron Always Improves Performance”

Reality: Improperly configured server cron can actually perform worse than default WP-Cron in some scenarios. The implementation quality matters more than the approach itself.

Myth 6: “Performance Only Matters for High-Traffic Sites”

Reality: Even small sites benefit from optimization. Better performance means better user experience, improved SEO, lower hosting costs, and professional credibility regardless of traffic volume.

Special Considerations for Different Site Types

Different WordPress applications have unique cron optimization needs:

E-Commerce Sites (WooCommerce, Easy Digital Downloads)

Critical Cron Jobs:

  • Order processing and status updates (every 1-5 minutes)
  • Inventory synchronization with suppliers (every 5-15 minutes)
  • Abandoned cart recovery emails (every 15-30 minutes)
  • Payment gateway reconciliation (hourly)
  • Sales reporting and analytics (hourly/daily)

Optimization Priorities:

  • Never let cron delays impact checkout performance
  • Separate order processing from marketing tasks
  • Implement queue systems for email sending
  • Real-time inventory updates for critical products
  • Monitor closely during high-traffic periods (sales, holidays)

Membership and LMS Sites (LearnDash, MemberPress, Restrict Content Pro)

Critical Cron Jobs:

  • Access control checks and updates (every 5-15 minutes)
  • Content drip scheduling (hourly or daily)
  • Subscription renewal processing (daily)
  • Engagement tracking and analytics (hourly)
  • Email notifications for courses and content (every 15-30 minutes)

Optimization Priorities:

  • Precise timing for content releases
  • Reliable subscription processing (revenue impact)
  • Smooth onboarding experiences for new members
  • Efficient access control without impacting page loads

Content Publishing Sites (News, Blogs, Magazines)

Critical Cron Jobs:

  • Scheduled post publishing (every 1-5 minutes for precise timing)
  • Social media auto-posting (every 15-30 minutes)
  • RSS feed generation (every 15-30 minutes)
  • Related content calculation (hourly)
  • Search index updates (hourly)
  • Analytics aggregation (hourly/daily)

Optimization Priorities:

  • Exact publish timing for news and time-sensitive content
  • Fast RSS updates for subscribers
  • Efficient social media integration
  • Quick search index updates for new content

Service-Based and Local Business Sites

Critical Cron Jobs:

  • Contact form submissions processing (every 5-15 minutes)
  • Appointment reminder emails (hourly/daily)
  • Backup scheduling (daily)
  • Update checks (weekly)

Optimization Priorities:

  • Reliable form processing for lead generation
  • Consistent backup execution
  • Minimal overhead since traffic is typically lower

Each site type benefits from customized cron scheduling aligned with business priorities.

Future-Proofing Your WordPress Performance

Technology evolves, and your optimization strategy should too:

Emerging Trends to Watch

1. Serverless Architecture

Cloud platforms increasingly offer serverless cron alternatives:

  • AWS Lambda for scheduled tasks
  • Google Cloud Functions for event-driven processing
  • Azure Functions for automated workflows

These eliminate traditional server management entirely, automatically scaling based on demand.

2. JAMstack and Headless WordPress

Decoupling WordPress from frontend delivery:

  • WordPress as content management only
  • Static site generation for faster delivery
  • API-driven content updates
  • Scheduled builds triggered by cron jobs

This architecture naturally separates cron execution from user experience.

3. Advanced Caching Technologies

Next-generation caching moving beyond traditional approaches:

  • Edge computing pushing cache closer to users
  • Intelligent cache warming predicting needed content
  • Real-time cache invalidation for instant updates
  • Machine learning optimizing cache strategies

4. HTTP/3 and QUIC Protocol

New protocols improving connection efficiency:

  • Faster initial connections
  • Better handling of packet loss
  • Improved multiplexing
  • Enhanced mobile performance

While not directly related to cron, these technologies complement optimization efforts.

Preparing for WordPress Evolution

WordPress continues evolving, and optimization strategies must adapt:

  • Block Editor Impact: Full Site Editing changes how content renders, affecting performance patterns
  • PHP Requirements: Newer PHP versions offer performance gains but require testing
  • Security Updates: Core updates sometimes change how cron works
  • Plugin Ecosystem: Popular plugins evolve, potentially changing cron requirements

Stay informed about WordPress development to adapt optimization strategies proactively rather than reactively.

Conclusion: Performance as a Competitive Advantage

In today’s digital landscape, website performance isn’t a luxury, it’s a competitive necessity. When two businesses offer similar products or services, the faster website wins. When search engines compare similar content, the faster site ranks higher. And when users have multiple options, the smoother experience captures their attention and trust.

Optimizing WordPress cron jobs is a powerful step toward better performance, but it works best as part of a comprehensive, custom WordPress development strategy. The most successful businesses treat performance not as a one-time fix, but as an ongoing investment continuously refining their website’s speed, reliability, and user experience to stay ahead in the digital race.

WordPress REST API Security: Protect Your Site From Data Leaks

Did you know your WordPress website could be leaking sensitive data right now without you ever realizing it?

In a world where even a single exposed username or leaked metadata can become an open door for hackers, REST API security isn’t just a technical checkbox; it’s your digital frontline. 

WordPress, with its powerful REST API, offers incredible flexibility to developers, from building headless CMS setups to integrating third-party platforms and mobile apps. This convenience sounds like icing on the cake, right? But here’s the catch: This luxury often comes with hidden, underestimated security risks that you must be aware of.

Hence, we have designed for developers, website owners, and tech-savvy WordPress users looking to win users’ trust, strengthens brand’s credibility, and enhance website’s integrity. 

We will discuss the most common REST API vulnerabilities in WordPress that might be unknowingly exposing admin usernames, sensitive custom fields, or user data to hackers.

Moreover, you will get real-world examples of data exposure. Most importantly, practical, code-ready fixes you can implement today.

Let’s turn REST API from a security liability into your fortress.

Understanding The WordPress REST API

The WordPress REST API is a powerful feature that empowers developers to interact with a WordPress website remotely using JSON (JavaScript Object Notation). It allows seamless communication between WordPress and external applications. It can be mobile apps, headless frontends, third-party services, and more, without needing to log into the dashboard.

What Is The REST API In WordPress?

At its core, the REST API exposes WordPress content and functionality as data over HTTP. This means you can programmatically retrieve, create, update, and delete content (like posts, users, comments, and media). Routes such as:

/wp-json/wp/v2/posts  

/wp-json/wp/v2/users

enable developers to build interactive frontends, integrate external services, or create decoupled (“headless”) architectures.

This remarkable flexibility is a boon for custom WordPress solutions, SPAs (single-page applications), or mobile app backends. But with superior access comes significant risk.

Why WordPress REST API Security Matters

Do you know the REST API is public by default?

Yes, that’s right. Unless configured otherwise, unauthenticated visitors (yes, bots included) can access sensitive data like:

  • All registered usernames (including admin).
  • Post metadata that might contain private fields.
  • Exposed endpoints, even if you’re not actively using the API.

This creates a silent vulnerability that most website owners don’t even realize they’ve left the backdoor open.

That’s why REST API security in WordPress is not optional; it’s paramount. It means writing responsible code for developers. For website owners, it means asking: “What is my website sharing with the world… and should it?”

Gear up, as we will share insights to fix these gaps effectively with neat, controlled code.

Common REST API Security Risks And How To Fix Them

The WordPress REST API is a developer’s playground. When left unguarded, it can quietly expose your website to unnecessary risks. Hence, we will share the most common vulnerabilities developers overlook and practical code-based fixes to lock them down. 

Problem 1: Public Exposure Of Usernames

By default, WordPress exposes all registered users (yes, including the admin!) via this endpoint:

bash:
/wp-json/wp/v2/users

Here’s a sample response for an unauthenticated visitor:
JSON:
[

  {

    “id”: 1,

    “name”: “Admin”,

    “slug”: “admin”,

    “link”: “https://example.com/author/admin”

  }

]

That’s all a brute-force bot needs to start guessing your password.

Solution: Restrict Access to the User’s Endpoint

If you want to completely block public access to the /users endpoint, you can do this:

php:

add_filter( ‘rest_endpoints’, function( $endpoints ) {

    if ( isset( $endpoints[‘/wp/v2/users’] ) ) {

        unset( $endpoints[‘/wp/v2/users’] );

    }

    return $endpoints;

});

Or, if you want to allow access only for logged-in users:

add_filter( ‘rest_authentication_errors’, function( $result ) {

    if ( ! is_user_logged_in() ) {

        return new WP_Error( ‘rest_forbidden’, ‘You are not allowed to access REST API.’, [ ‘status’ => 403 ] );

    }

    return $result;

});

Problem 2: REST API Is Open Even When You Don’t Use It

Even if your site doesn’t use the REST API, it’s still publicly available and can expose post titles, slugs, IDs, and more.

Attackers can scrape your site using:

bash:
/wp-json/wp/v2/posts

/wp-json/wp/v2/pages

/wp-json/wp/v2/media

Solution: Disable REST API for Non-Admins

Here’s how to block all REST API requests except for administrators:

php:

add_filter( ‘rest_authentication_errors’, function( $access ) {

    if ( ! is_user_logged_in() || ! current_user_can( ‘administrator’ ) ) {

        return new WP_Error( ‘rest_cannot_access’, ‘REST API access restricted.’, [ ‘status’ => 403 ] );

    }

    return $access;

});

Caution: Some plugins (WooCommerce, Jetpack, LMS, etc.) depend on the REST API. Test this code on a staging site first.

Problem 3: Sensitive Meta Fields Are Exposed

If you use ACF, custom fields, or third-party plugins, sensitive metadata like api_key, billing_email, or phone_number may be exposed via REST API responses.

That’s a serious privacy issue.

Solution: Hide Custom Meta Fields from REST

When registering custom meta fields, always set show_in_rest => false:

php:

register_meta( ‘post’, ‘api_key’, [

    ‘show_in_rest’ => false,

    ‘type’         => ‘string’,

    ‘single’       => true,

    ‘auth_callback’ => ‘__return_false’,

]);

Alternatively, if you want to manipulate or remove fields from the API response:

php:

add_filter( ‘rest_prepare_post’, function( $response, $post, $request ) {

    $data = $response->get_data();

    // Remove unwanted meta

    unset( $data[‘meta’][‘api_key’] );

    $response->set_data( $data );

    return $response;

}, 10, 3 );

This gives you complete control over what data is returned in the API.

Bonus: Disable REST API Using a Plugin

If you want a fast solution across multiple sites, the Disable WP REST API plugin is a one-click option.

But be aware. It’s a blunt tool. Custom code is always king for superior control.

Final Checklist: Locking Down Your WordPress REST API

Before wrapping up, here’s a quick recap of actionable steps to secure your REST API and why they matter:

ActionWhy It Matters
🔒 Block /users endpointPrevents exposure of admin usernames. Becoming your first line of defence against brute force attacks.
🚫 Disable API for guests and non-adminsMinimizes attack surface and ensures only authorized users interact with the API.
🛡️ Hide sensitive custom meta fieldsProtects private data like API keys, emails, or phone numbers from public exposure.
🧪 Test before global disableSome plugins depend on the REST API. Breakage can occur if not tested correctly first.

Remember, a small oversight can lead to serious consequences. This checklist will help you build a proactive, privacy-respecting REST API setup without compromising functionality. 

wordpress rest api security

Conclusion

After reading the web blog, you are equipped with focused, actionable wordpress security practices to lock down your WordPress REST API before someone else exploits its weaknesses.

The WordPress REST API is a powerful feature, but like any open system, it comes with hidden risks. What may seem like a tiny negligence, like exposed usernames or sensitive metadata can become an open invitation for brute-force attacks, data scraping, or serious privacy breaches.

As we have uncovered, these vulnerabilities often hide in plain sight. From exposed user endpoints to unsecured custom fields, the threats are real, but so are the solutions. With a few lines of thoughtful code and proper access controls, you can regain full command over what your website exposes and to whom.

Security must not be an afterthought while developing custom themes, headless front-ends, or plugin-heavy sites. Developers, website owners, and agencies must tighten loose ends before hackers discover them.

Keep your WordPress themes, and plugins up to date. REST API vulnerabilities are frequently exploited alongside outdated software. A healthy habit of regular code audits and testing in a staging environment will save you time, stress, and potential damage in the long run. 

European Accessibility Act (EAA) 2025: A Guide For WordPress Owners

Imagine this: It’s mid-2025, and your WordPress website, though beautifully designed, quietly fails to meet a new legal standard, which is overwhelming businesses and organizations across the European Union. The result? Fines, lost visitors, and a reputation hit you didn’t see coming. Sounds like a nightmare? It is if the necessary actions aren’t implemented. 

Did you know that over 100 million people in the EU live with some form of disability? Yet, many websites still ignore their fundamental right to access digital content without barriers. With the European Accessibility Act 2025 (EAA) just around the corner, this is no longer a nice-to-have feature; it’s mandatory.

So, here’s the big question: Is your WordPress website EAA-compliant, and what’s at stake if it isn’t? No need to panic as this blog has got you covered. 

This guide is built for WordPress site owners, developers, digital agencies, and decision-makers. We’ll walk you through what the EAA is, why it matters, who needs to comply, and how to make your WordPress website meet accessibility standards hassle-free. 

You’ll also discover practical tips, tools, and examples to help you make your website more inclusive, legally compliant, and future-ready – all in a straightforward, easy-to-understand way.

Let’s future-proof your website, not just for compliance but for everyone who visits it. 

Understanding The Importance Of EAA & Accessibility

Accessibility is no longer optional, especially for digital experiences in 2025. It’s a legal, ethical, and practical necessity.

The European Accessibility Act 2025 is built on a simple but powerful principle: everyone deserves equal access to digital services. That includes websites, mobile apps, eCommerce platforms, PDFs, and everything in between. 

Whether someone uses a screen reader or keyboard navigation or requires high contrast to see content clearly, your website must accommodate them.

This shift isn’t just about ticking a compliance box. It’s about creating a web experience that works for everyone without exception.

Why It Matters For WordPress Users

With over 43% of the web powered by WordPress, website owners now carry a greater responsibility to meet accessibility standards. It doesn’t matter if your site is visually stunning. If it lacks WordPress screen reader compatibility, fails basic keyboard navigation, or ignores alt text for images, it is potentially unlawful under the EAA.

That’s why understanding what the law demands and how it applies to WordPress is critical. It’s not about changing your platform. It’s about how you build and maintain your website on that platform with accessibility in mind.

What You Should Know: Accessibility isn’t just a trend. The European Accessibility Act 2025 (EAA) puts it front and center as a must-have legal obligation. WordPress users must rethink how they design and manage their sites to stay compliant, inclusive, and competitive. 

What Is The European Accessibility Act (EAA)?

The European Accessibility Act 2025 is a legislative game-changer. It sets a new standard for how digital products and services must be built and accessible for everyone, regardless of ability.

The Background And Purpose

Passed in 2019, the EAA was introduced to harmonize accessibility rules across EU member states. It aims to remove digital barriers that people with disabilities face when navigating websites, apps, or using everyday digital services.

Its core goal is to make essential digital experiences accessible, inclusive, and consistent across Europe. This isn’t a suggestion. It’s an enforceable law, and businesses within and outside the EU must comply if they serve European users.

What Falls Under Its Scope?

If your service touches users in the EU, the EAA applies. It covers:

  • eCommerce websites and mobile apps
  • Banking services and self-service terminals
  • E-books and e-readers
  • Public transport ticketing and travel info platforms
  • Audio-visual media services
  • Online communication services

WordPress websites offering products, content, or services within the EU fall squarely under this umbrella. That’s where issues like WordPress accessibility testing, accessible forms, and even keyboard navigation start to matter a lot more.

Main Point: The European Accessibility Act 2025 is not just about compliance; it’s about giving all users equal access to digital spaces. If your WordPress website connects with European users, it must follow these new rules.

Who Must Comply With The EAA?

The European Accessibility Act 2025 is not just a call to action for government websites. It applies to a much broader group, especially businesses offering digital products or services across the European Union (EU).

EU-Based And Non-EU Businesses

If your company is based in the EU and provides digital services or products, you must follow the EAA. But here’s the twist: Non-EU businesses that operate online and serve European consumers must also adhere to it.

That means if you run a WordPress eCommerce site from outside the EU, and your audience includes European customers, your website needs to meet accessibility standards like WordPress screen reader compatibility, keyboard navigation, and alt text image support.

Note: If your website is hosted elsewhere, the user experience it offers within the EU matters.

What About Small Businesses And Exceptions?

The EAA provides some flexibility. Microenterprises, businesses with fewer than 10 employees and less than €2 million in annual turnover may be exempt from direct compliance. 

But there’s a catch. If these businesses partner with larger service providers or operate in industries such as banking, telecom, or transport, they could still be indirectly affected. 

Accessibility will often become a baked-in requirement in supply chain contracts and platform guidelines. Hence, it’s wiser for WordPress site owners to stay ahead. 

Future-proofing your website with WordPress accessibility best practices can shield your growth and reputation.

The Bottom Line: Whether you’re in the EU or not, if your WordPress site serves EU users, you may be required to meet the EAA standards. Exemptions exist, but don’t always guarantee immunity as accessibility expectations rise across industries. 

When Does The EAA Take Effect?

The European Accessibility Act 2025 isn’t a future problem; it’s a present priority. With the final compliance deadline approaching rapidly, the clock is ticking for WordPress site owners who must prepare.

Timeline And Compliance Deadline (June 2025)

The EAA was enacted in 2019, but the real impact begins in June 2025, when enforcement officially begins. After that, any new digital products or services made available in the EU must meet accessibility requirements. That includes websites, mobile apps, eBooks, online stores, ticketing systems, and more.

If you’re planning a website redesign or launching a new WordPress build, the time to incorporate accessibility is now. Retroactive updates after 28th June 2025 could be riskier, more expensive, and subject to legal scrutiny.

What Happens If You Miss It?

  • Non-compliance isn’t just a technical issue; it could mean severe consequences. You might face:
  • Fines and legal actions under national enforcement bodies
  • Damaged brand trust from customers who find your website inaccessible
  • Missed market opportunities, especially in public sector contracts or large tenders that demand digital inclusion

For WordPress site owners, using tools like a WordPress accessibility audit checklist or investing in accessibility remediation can help identify and fix issues before they become liabilities.

What This Means For You: June 2025 is a challenging deadline. WordPress sites not aligned with EAA requirements by then could face penalties, reputation damage, or lost opportunities. Starting today gives you time to fix, test, and launch confidently. 

EAA vs WCAG: What’s The Real Difference?

EAA and WCAG are often mentioned in the same breath when it comes to web accessibility. However, they are both different. Though they work together, understanding how they differ (and connect) helps WordPress website owners stay smart and compliant.

Overview Of WCAG 2.1 (AA)

WCAG, or Web Content Accessibility Guidelines, is a global standard created by the W3C. Its goal is simple: make digital content usable for people of all abilities. The current benchmark, WCAG 2.1 Level AA, includes rules on color contrast, keyboard navigation, screen reader compatibility, and more elements.

If you’ve heard about WordPress accessibility best practices, they’re almost always rooted in WCAG.

How WCAG Supports EAA Compliance

Here’s where things link up. While the European Accessibility Act 2025 is a law, WCAG is not. Instead, WCAG 2.1 AA serves as the technical reference to meet the legal requirements set by the EAA.

Think of the EAA as the “why” and WCAG as the “how.”

If your WordPress website follows WCAG 2.1 AA, you’re already on the right path to EAA compliance. It includes:

  • Proper WordPress alt text for images
  • Full WordPress keyboard navigation
  • Adequate color contrast using tools or checkers
  • Use of accessible forms and error notifications
  • Logical heading structure and label associations

Tools like Lighthouse or WAVE can help test whether your WordPress website abides by WCAG and supports your EAA journey by extension.

A Quick Visual Distinction Between EAA And WCAG

AspectEuropean Accessibility Act (EAA)Web Content Accessibility Guidelines (WCAG)
NatureLegislation (Law)Technical Standard (Guidelines)
Issued ByEuropean Union (EU)W3C (World Wide Web Consortium)
PurposeEnforce digital accessibility across the EUProvide best practices for digital accessibility
ApplicabilityMandatory for public & private sector businesses in the EUVoluntary but widely adopted for compliance
Compliance DeadlineJune 28, 2025No deadline, but referenced by laws like EAA
FocusProducts & services (websites, apps, hardware, etc.)Web and digital content accessibility
Technical ReferenceRelies on WCAG (mostly 2.1 Level AA) for implementationDefines specific accessibility success criteria
How Does It Affect WordPress?Requires WordPress sites to meet accessibility standardsProvides the checklist for making WP websites compliant

Smart Summary: The EAA tells you what’s required. WCAG shows you how to get there. Following WCAG 2.1 AA guidelines is the most direct way to meet the EAA’s expectations for your WordPress website. 

Accessibility In Practice: The POUR Principles

The European Accessibility Act 2025 isn’t just a checklist of what to fix. It’s deeply rooted in creating meaningful, barrier-free experiences for everyone. 

At the heart of accessible digital design lies the four POUR principles: Perceivable, Operable, Understandable, and Robust. These principles guide how your WordPress website should behave to support users of all abilities.

Perceivable

Your website must present content in ways that users can notice and interpret. That means screen reader-friendly elements, proper image alt text, and captions on multimedia must be clearly perceivable. Features like WordPress alt text images and keyboard-friendly navigation are your first checkpoints here.

Operable

Users should be able to interact with all elements of your website without hindrances, including those who don’t use a mouse. It is where WordPress keyboard navigation and form accessibility come into play. Ensure menus, buttons, and interactive components are easy to reach and activate.

Understandable

Your content and navigation should be straightforward to grasp. Comprehensible headings, readable fonts, and consistent behavior help users predict what happens next. This principle isn’t just good for accessibility; it also makes your content more user-friendly for everyone.

Robust

Your website must work reliably across different browsers, devices, and assistive technologies. Using WordPress accessibility testing tools like WAVE or Lighthouse ensures your website holds up currently and as technology evolves.

In a Nugget: When your WordPress site is Perceivable, Operable, Understandable, and Robust, you’re not just ticking accessibility boxes;  you’re building trust, improving usability, and future-proofing your business digital presence.

How The EAA Impacts WordPress Site Owners

The European Accessibility Act 2025 isn’t just a legal checkpoint. It’s a wake-up call for WordPress site owners to reshape how their digital content speaks to everyone, including users with disabilities.

From themes and plugins to editors and forms, every corner of your WordPress setup matters.

Custom Themes And Plugin Compatibility

If your website runs on a custom theme or has been heavily customized with third-party plugins, chances are high that some features may not pass accessibility checks. 

Custom-built designs often miss the mark on keyboard access, semantic HTML, or screen reader support. Hence, it’s time to fine-tune your WordPress site like a pro by ensuring your themes and plugins are compatible with accessibility standards.

Gutenberg And Classic Editor Differences

The Gutenberg block editor has come a long way, offering advancements in accessibility structure. But that doesn’t mean your content is automatically compliant. 

In comparison, Classic Editor gives more manual control but requires added effort to make it accessible. Please note: Irrespective of whichever editor you use, put your website’s smart switch to work – test and adapt with intention.

Forms, Mobile Views, And Multilingual Setups

Contact forms, newsletter signups, and feedback tools often become barriers when they lack crystal-clear labels or keyboard navigation. So do mobile menus that trap users or language switchers that don’t speak to screen readers. 

It’s essential to fire up your website’s true power by auditing every interaction and ensuring accessibility across devices and languages.

The Crux: Your WordPress site isn’t just for those who can see, hear, or click with ease. The EAA encourages clearing out clutter and chaos, ensuring your custom builds, editors, and user interfaces offer every visitor equal access and seamless journeys.

Must-Have Accessibility Tools And Resources For WordPress

You don’t need to start from scratch or drown in code to meet the European Accessibility Act 2025 standards. WordPress offers a rich toolkit to help you run flawlessly, systematically, and swiftly with accessibility front and center.

Here are some tools that simplify the process and bring clarity to compliance.

Helpful WordPress Plugins

Some plugins work behind the scenes to patch common accessibility issues. Here are a few worth exploring:

  • WP Accessibility: Adds skip links, outlines focusable elements, and improves form labeling. It is a trustworthy choice to cover basic gaps.
  • One Click Accessibility: Ideal for beginners, this wordpress plugin adds user-friendly features like contrast toggles, text resizers, and keyboard navigation helpers.
  • Accessibility Widget: A handy tool for adding compliance notices and user-facing accessibility features without altering code.

Think of these as your site’s cleanup crew in one plugin. They take care of things you might miss, allowing you to stay focused on content and user experience.

Top Testing Tools To Identify Issues

You need to locate bottlenecks before fixing them. These tools help scan your website for potential trouble spots:

  • WAVE: A browser extension that flags accessibility problems visually and explains them.
  • axe DevTools: Built for developers, this tool runs audits within the browser and provides actionable insights.
  • Google Lighthouse: It runs in Chrome DevTools and offers a quick snapshot of your website’s performance and accessibility score.

Pair these tools with regular testing, and you’ll spot issues before they affect real users or compliance deadlines. 

A Quick Visual Glance

Tool/PluginTypeKey FeaturesBest For
WP AccessibilityPluginSkip links, form labels, outline fixesGeneral compliance basics
One Click AccessibilityPluginText resizer, contrast toggle, keyboard navigationBeginners, non-coders
Accessibility WidgetPluginAdds accessibility tools without code changesInformational accessibility
WAVETesting ToolVisual issue detection, browser extensionQuick scans and flagging issues
axe DevToolsTesting ToolIn-browser audit, developer-focusedDeep diagnostics
Google LighthouseTesting ToolPerformance and accessibility reports in ChromeOverall site health check

Knowledge Drop: Plugins and testing tools are your first responders in the accessibility journey. Use them cleverly to put your site’s smart switch to work, find what’s broken, and fix it quickly without guesswork or headaches. 

How To Make Your Website EAA-Compliant

Getting your WordPress site compliant with the European Accessibility Act 2025 may seem like a daunting task, but it’s straightforward and attainable when broken down into clear, manageable steps. 

Whether you’re a developer, business owner, or content creator, following a smart compliance path can help you avoid risk, welcome more users, and stay ahead of the 2025 deadline.

Step 1: Run An Accessibility Audit

Begin with a WordPress accessibility audit checklist. Use trusted tools like WAVE, Lighthouse, or Axe to identify gaps in your current design and code. These tools scan for issues, such as missing WordPress alt text images, imperfect color contrast, broken keyboard navigation, and screen reader problems.

Step 2: Fix The Most Critical Barriers

Once you have the audit report, fix the most impactful issues first:

  • Work on keyboard navigation for users who don’t use a mouse.
  • Add descriptive alt text to all crucial images.
  • Use a WordPress color contrast checker to ensure readable text.
  • Ensure your forms are WordPress-accessible with proper labels, focus states, and error messages.

Step 3: Choose Accessibility-Friendly Themes And Plugins

If your current setup causes more problems than it solves, switch to a WordPress accessibility-compliant theme and plugins that follow WordPress accessibility best practices. Avoid themes that override browser defaults or use inaccessible JavaScript components.

Check the WordPress accessibility plugins list for tested options like:

  • WP Accessibility
  • One Click Accessibility
  • Accessibility Checker

These tools assist in rectifying code-level issues and maintaining ongoing accessibility.

Step 4: Write And Display An Accessibility Statement

An accessibility statement that WordPress users can find easily on your site is not just good practice; it’s becoming an EAA essential. It shows users what steps you’ve taken, where you stand, and how they can get in touch if they face issues. 

Handy Tip: Use a WordPress accessibility statement generator or draft a custom version customized to your site’s journey.

Step 5: Add A Feedback Form

Give users a simple way to report accessibility problems. This demonstrates you care about continuous advancement and stay legally safe by showing a willingness to correct known problems.

Step 6: Keep Testing And Training

Accessibility is not a one-time fix. Schedule regular scans and engage in WordPress accessibility training to keep your team updated. Enterprise websites can consider professional WordPress accessibility compliance services or audits.

Core Thought: Making your site EAA-compliant doesn’t mean starting over. A structured approach like auditing, fixing, and future-proofing can help you build an accessible, inclusive WordPress experience that’s legally safe and user-friendly.

The Benefits Of Web Accessibility

Complying with the European Accessibility Act 2025 isn’t just about avoiding penalties; it’s about building top-notch, innovative websites that serve everyone. Focusing on accessibility elevates user experience, cultivates trust, and expands your reach to a broader audience.

Better SEO, Better Visibility

Accessibility improvements like semantic HTML, alt text, and uncomplicated navigation also boost your SEO. Search engines value well-structured content that’s easy to crawl. 

Following WordPress accessibility standards makes it more straightforward for people and bots to understand and rank your website.

Improved User Experience For All

Features like keyboard navigation, comprehensible forms, and readable contrast benefit more than just users with disabilities. They make your website more effortless for everyone, including people on mobile devices, older adults, and even users with slow internet connections.

Stronger Brand Reputation

When your website welcomes all visitors, it reflects positively on your brand. It shows responsibility, inclusivity, and care for user needs. It can lead to heightened loyalty, more referrals, and increased customer satisfaction.

Reach A Larger Audience

Approximately 87 million people in the EU live with some form of disability. If your WordPress site isn’t accessible, you’re unfortunately closing the door on millions of potential visitors, customers, or clients. WordPress accessibility refinements help you tap into this overlooked market.

Higher Conversions

Simple design adjustments that follow WordPress accessibility best practices, such as readable fonts, focusable buttons, and a coherent flow of pages, can help reduce bounce rates and amplify conversions. A smoother experience leads to longer sessions, more interactions, and favorable results.

Essential Insight: Accessibility is not a limitation; it’s a necessary upgrade. Building an accessible WordPress website opens doors to peak performance and creates a space that works for everyone. 

CTA Content: Make Every Visitor Feel Seen, Heard, And Clicked

CTA Button: Build A Website Everyone Can Use →

The Risk Of Not Complying With EAA

Ignoring the European Accessibility Act 2025 isn’t just a design oversight; it’s a business liability. If your WordPress site doesn’t meet the legal usability standards outlined in the EAA by June 28, 2025, the consequences could go far beyond a substandard user experience.

Legal And Financial Repercussions

Non-compliance can lead to severe penalties. Regulatory bodies across the EU are empowered to enforce the EAA through fines, warnings, and mandatory corrective actions. If your website is found to create digital barriers, you could face ongoing scrutiny or even legal proceedings.

Reputational Damage

Failing to conform to inclusivity can hamper how people view your brand. Today’s consumers expect companies to value digital equity. A website that excludes users with disabilities can quickly lose public trust and customer loyalty. 

Note: People remember how your website made them feel, and exclusion isn’t forgettable.

Competitive Disadvantage

As more businesses embrace inclusive web guidelines, those lagging may find themselves left out. Government organizations, large-scale enterprises, and even B2B clients now demand that their partners and vendors meet digital inclusivity requirements. 

If your website can’t deliver, it might be overlooked for significant opportunities.

Key Takeaway: Non-adherence to the European Accessibility Act 2025 could result in legal fines, lost trust, and missed partnerships. A website that’s not user-first in design will fall behind. Taking action now is an intelligent move for future-proofing your brand. 

Conclusion

The European Accessibility Act 2025 isn’t just another piece of regulation; it’s a powerful push toward a web that works for everyone. For WordPress website owners, this is your moment to lead with purpose.

Throughout this guide, you’ve explored how the EAA reshapes digital responsibilities, who it applies to, what it demands, and how your WordPress site fits into the picture. We’ve walked through inclusive design principles, explored usability tools, and broken down step-by-step how to build a website that invites every visitor in, and no exceptions.

Whether you’re a solo creator, part of an agency, or managing enterprise-scale websites, adhering to the EAA isn’t just about avoiding fines or ticking off boxes. It’s about showing your users that their experience matters. It’s about creating plain sailing navigation, comprehensible content, and interfaces that feel like home to everyone.

Don’t wait for the deadline to define your direction. Start removing barriers by working on one improvement at a time. 

Remember, a compliant website isn’t just a legal win. It’s a gateway to a faster, friendlier, more future-proof web experience.

We hope this blog serves as your lighting guide in making your website EAA-compliant. 

FAQ

Do WordPress Theme Developers Need To Make Their Themes EAA-Compliant?

Yes. If your themes are sold or distributed within the EU and used by businesses offering services to EU consumers, they must meet EAA standards. Accessibility-ready themes with proper semantic markup, contrast ratios, and keyboard navigation are pivotal for compliance.

Can Third-Party Plugins Break EAA Compliance On My WordPress Site?

Absolutely. Plugins that generate non-accessible forms, pop-ups, or media elements can violate compliance. It’s vital to test third-party plugins for accessibility or use trusted plugins designed with inclusivity in mind.

Is Using An Accessibility Overlay Enough For EAA Compliance?

No. Accessibility overlays are often seen as a temporary fix and can miss profound structural issues. EAA compliance requires thorough development practices, testing, and actual improvements, not just surface-level mending.

How Often Should I Conduct Accessibility Audits On My WordPress Site?

Ideally, audits should be done after significant updates or design changes. Perform a comprehensive accessibility audit at least every 6–12 months to ensure ongoing compliance and to catch new issues beforehand.

What Accessibility Training Options Are Available For WordPress Teams?

Several online platforms offer WordPress-specific accessibility training, including courses from W3C, Deque, and accessibility-focused WordPress communities. Team training ensures consistent development practices and makes compliance more manageable in the long-term. 

Gift Pack For WooCommerce: Turn Every Product Into A Perfect Gift

Picture this: A customer is shopping for the perfect gift, maybe for a birthday, anniversary, or a heartfelt thank you. They find exactly what they’re looking for in your store. But there is no option to gift wrap it, a place to add a message, or a way to make it feel personal. So, they hesitate, or even worse, they leave.

That’s the moment where potential (baked) sales are lost, and loyalty slips through the cracks.

Now, imagine the opposite. Your WooCommerce store offers beautiful gift pack layouts, personalized messages, and easy gift wrapping directly on the product page. Shoppers don’t just buy; they connect, celebrate, and return.

Gift Pack for WooCommerce brings that experience to life. Whether you’re a retailer, a boutique brand, or run a subscription box business, this plugin turns ordinary purchases into memorable gift-worthy moments. 

This blog is your all-in-one guide to understanding how the plugin works, who it’s built for, and why it’s more than just a generic add-on. You’ll learn how it integrates, functions, and personalizes gift experiences. You will also explore its real-world applications and ROI-driven advantages.

Let’s unwrap how this small upgrade can boost store performance, customer joy, and long-term loyalty. 

What Is Gift Pack For WooCommerce?

Gift Pack for WooCommerce is a lightweight yet powerful plugin that lets you transform usual purchases into elegantly packaged, ready-to-gift experiences without disrupting your online store’s flow. 

It empowers buyers to add gift wrapping, select layout designs, and include personalized messages directly from the product page, making every order feel worthwhile and distinct.

Whether you sell handmade goods, luxury products, or curated boxes, this plugin gives you complete control over how gifting is offered across your catalog: globally or product-wise. 

From variable to simple products, it works across the board and sends gift wrap details straight to customer order emails, keeping everything streamlined and crystal clear.

Guess what? It seamlessly integrates with your WooCommerce theme, is easy to set up, and is built for performance. Doesn’t this sound like a clever way to blend customization, convenience, and conversion?

Nonetheless, the Gift Pack for WooCommerce offers personalization options and compatibility with WPML. This ensures it caters to an extensive audience while keeping WooCommerce performance & SEO in check. 

The result is blazing-fast speed, flexibility, and scalability across markets.

Who Should Use The Gift Pack For WooCommerce Plugin?

Gift Pack for WooCommerce is designed for a broad range of store owners looking to elevate their customer experience and generate additional sales through personalization. This WordPress plugin is particularly beneficial for:

  • Retailers and Boutiques: Enhance the shopping journey by offering personalized gift-wrapping options. Perfect for high-touch, luxury, or seasonal items that deserve an extra level of care.
  • Subscription Box Services: It offers visitors the option to wrap their subscription box contents. This makes each delivery feel like an individualized surprise and boosts customer satisfaction and loyalty.
  • Nonprofits and Charitable Organizations: Add a personalization layer to donations or purchases by giving supporters the option to send gifts wrapped with a heartfelt message, creating a more emotional connection to the cause.
  • eCommerce Stores Focused on Gifting: Any store can benefit from offering gift wrapping, whether for holidays, birthdays, or special occasions. It turns a regular purchase into a memorable connection.

The reason these businesses should consider Gift Pack for WooCommerce is apparent – it transforms ordinary transactions into moments of joy and connection. 

It’s not just about adding a gift wrap option. It’s about enhancing the shopping experience, increasing customer satisfaction, and encouraging repeat sales through meaningful interactions.

Quick Recap: The Gift Pack for WooCommerce plugin is the perfect tool to strengthen your brand’s customer loyalty, fuel conversions, and set your store apart. Offer a personalized, engaging shopping journey that goes beyond the typical transaction.

Key Features Of Gift Pack For WooCommerce Stores

This plugin is packed with a variety of features designed to enhance the gift-giving experience for your customers. Let’s take a closer look at each feature and how it can amplify your WooCommerce store offerings.

Add Gift Wrapping To Individual Products From The Product Page

This feature allows visitors to easily select gift wrapping for each product they add to their cart directly from the product page. This convenience ensures that buyers can personalize their orders without navigating through additional steps, increasing the likelihood of completing the purchase.

Set Global Price For Gift Pack For All Products

This feature is ideal for stores looking to simplify their pricing strategy. It allows you to set a standard price for gift wrapping across all products. It’s an efficient way to manage costs and provide a consistent experience for your customers without worrying about individual pricing adjustments.

Add Different Prices For Individual Products

Not all products are equal. Hence, this feature lets you add different gift pack prices for individual items. If you sell premium products or larger items, you can adjust the wrapping price accordingly. You can offer users the flexibility to choose the level of service they desire.

Enable or Disable Gift Wrapping Option For Specific Product Categories

Sometimes, gift wrapping may not be applicable to every category. This feature empowers you to effortlessly disable the gift-wrapping option for specific product categories directly from the settings page. It means you have complete control over which products are eligible for wrapping.

Choose From Multiple Gift Pack Layouts

This feature allows your customers to select from various gift pack layouts, adding a customization touch to each order. This option ensures that the presentation matches the occasion, whether it is a classic or modern look.

Personalize Gift Packs With Custom Greeting Messages

Users can write their own personalized greeting message to go with the gift pack, creating a thoughtful and meaningful addition to their order. This personal touch adds an extra special connection layer between the sender and the recipient.

Works With Both Simple And Variable Products

Gift Pack for WooCommerce works flawlessly with simple and variable products. The gift-wrapping option integrates smoothly across all product types, whether you’re selling a single item or offering options like size, color, or style.

Enable or Disable Gift Pack Notes

Store owners have the flexibility to turn the gift pack notes option on or off. If you prefer to keep things direct, you can easily switch off the ability for shoppers to include personal notes with their gift packs.

Enable or Disable Gift Pack Images

Visual appeal is crucial. Hence, this feature allows you to enable or disable gift pack images, so purchasers can see how accurately their gift wrapping will look. This option adds an extra layer of transparency and trust, which can boost customer confidence.

Add Unlimited Gift Pack Layouts or Images

As a store owner, you can upload unlimited gift pack layouts and images, giving you the freedom to keep your offerings fresh, varied, and bespoke to different occasions. You can keep the experience exciting and unique, whether it is for the holidays, birthdays, or close-to-heart events.

Gift Pack Details In Customer Order Emails

The gift pack details are included in the order confirmation email whenever a user places an order with a gift-wrapping option. This adds clarity and reassurance, ensuring you and your customers are on the same page about the gift-wrapping service.

Easy To Use And Customize

Gift Pack for WooCommerce is designed with user-friendliness in mind. It is quick to install, configure, and customize, making it a practical option for users with minimal technical knowledge. You can make adjustments swiftly through the settings page, allowing you to spend more time focusing on your business.

Fully Compatible With WPML

This plugin is fully compatible with WPML and ideal for multilingual WooCommerce stores. This ensures that shoppers worldwide can access your gift-wrapping options in their preferred language, enhancing the international shopping journey.

Lightbox And Popup For Gift Pack Images

The plugin includes a lightbox and popup feature for gift pack images to create an even more engaging experience. When visitors click on the gift-wrapping image, it opens in a larger view, helping them get a clearer perception of how their gift will look.

Option To Enable or Disable Gift Pack Images

This feature is the cherry on the cake for those preferring a more streamlined, minimalistic approach. It allows you to unplug the gift pack images entirely. You can offer an intuitive, straightforward checkout process for buyers who don’t need visual previews, optimizing for speed and simplicity.

Smart Summary: Gift Pack for WooCommerce offers flexible, personalized gift wrapping features that give customer interaction a whole new look, encourage conversions, and make your store stand out without complicating setup or user experience.

How This Plugin Works On The Front-End: Gift Pack In Action

Imagine this: A shopper is browsing your store, adding products to their cart, and before checking out, they are given the option to personalize their purchase. They can pick from diverse gift wrap designs, write a heartfelt message, and even preview how it will look. Suddenly, that product transforms from a generic item into an expressive gift, ready to delight someone else.

This is exactly how Gift Pack for WooCommerce functions in action.

Personalized Gift Experience

From the moment the user lands on your product page, they are greeted with the gift-wrapping option. It is a seamless, intuitive feature that is easy to find and even more effortless to use. 

With just a few clicks, they can select the perfect gift pack layout and add a personal message to make the gift truly their own. No confusion, no frustration. It’s a smooth, streamlined process that ensures an exceptional shopping journey.

User-Friendly Customization At Checkout

As customers proceed to checkout, the gift-wrapping options are perfectly integrated, appearing alongside the product details. This ensures the gift-wrapping feels like a natural part of their purchase journey rather than an afterthought or complex add-on. 

The user-friendliness encourages more visitors to opt for the gift-wrapping feature, adding to your average order value (AOV) and driving higher conversions.

Visual Appeal And Enhanced Experience

Options like gift wrap image previews and personalized greeting messages transform your store’s checkout process from usual to spectacular. 

Buyers can even see a preview of the gift pack and customize it further before they complete their purchase. This amplifies the overall user experience and deepens customer engagement. 

They are no longer just making a transaction; they are participating in creating something thoughtful and personal.

Order Confirmation And Customer Delight

The customer receives an email confirming their order, complete with all the gift details, after the purchase. It includes the layout selected by the buyer, their personalized message, and a reminder of the gift wrapping. 

This creates a lasting positive impression and reassures them that their special gift is in good hands.

What You Should Know: The Gift Pack for WooCommerce plugin doesn’t just make gifting possible. It redefines the entire shopping interaction, encouraging more purchases and fostering lasting emotional connections that lead to higher customer retention. 

gift pack for woocommerce plugin

How to Set Up Gift Pack for WooCommerce: Step-by-Step Configuration

Setting up this plugin is a walk-in-the-park process as it doesn’t require any technical expertise. You can start offering personalized gift wrapping in just a few minutes. Let’s break down the process step by step:

Step 1: Installation Process

  • First, install the plugin like any other WooCommerce plugin
  • Simply download the plugin from the WordPress repository and upload it to your WooCommerce store. 
  • Activate the plugin, and you’re ready to go. 

The process is designed to be as easy as possible to ensure no hurdles for store owners.

Step 2: Configure General Settings

Once activated, navigate to the plugin settings to customize the gift-wrapping options. 

From this page, you can set up default gift-wrapping prices. Most importantly, determine whether it applies to specific categories or all products and adjust other general settings like gift pack layouts. This customization process allows you to fine-tune the plugin to align perfectly with your store’s offerings.

Step 3: Setting Up Gift Wrapping Options

You can now enable or disable the gift-wrapping option for individual products or entire product categories. Whether you want to make gift wrapping available for high-end items or all your products, you can efficiently manage these options on the settings page.

Step 4: Add Personalized Options

The plugin also lets you add personalized messages and gift pack layouts. You can upload multiple gift wrap designs and offer shoppers a range of creative layouts to pick from. 

Make sure to choose visually appealing layouts that reflect your store’s brand. Additionally, the plugin supports a greeting message feature, giving buyers a chance to add a personal touch to their gifts.

Step 5: Customize Email Notifications

Once everything is set up, the plugin integrates with WooCommerce order confirmation emails. It ensures that your customers receive a detailed breakdown of their gift-wrapping choices. This feature increases transparency and reassures purchasers about the details of their order.

Step 6: Test The Setup

Perform a quick test on your website before making the feature live. Add a product to the cart, select a gift-wrapping option, and go through the checkout process to see how everything functions in real-time. 

Make sure the gift-wrapping options show up as expected and the pricing reflects any changes you made in the settings.

The Bottom Line: Setting up personalized gift wrapping is quick and plain sailing with Gift Pack for WooCommerce. It requires no coding skills and empowers you to customize everything from product options to checkout and email notifications, ensuring a seamless integration. 

How To Customize The Gifting Experience For A Personalized Touch

A gift is more than a product; it’s a feeling wrapped in thoughtfulness. Store owners can turn routine purchases into delightful experiences with this plugin. You can offer a variety of customization options that resonate with gift-givers and recipients. 

Here is how you individualize the gifting experience.

Custom Layouts That Match Your Brand

You can upload unlimited gift pack images and layouts that reflect your brand’s aesthetics or seasonal vibes. Whether it’s festive wrapping for holidays or elegant designs for anniversaries, your store can offer customers a visual way to connect emotionally through gifting.

Personalized Messages That Make An Impact

Let your buyers add heartfelt greeting messages with each gift. This feature adds emotional value and shows recipients that someone cared enough to go beyond the transaction.

Toggle Features Based On Product Type

Easily switch gift-wrapping options on and off for specific product categories. For example, you might want to offer gift packs for apparel and accessories but not for digital products.

Support For Simple And Variable Products

Whether you’re selling a one-size mug or a customizable t-shirt with multiple variations, the plugin works flawlessly. Shoppers can choose gift wrap preferences for any product type without confusion.

Lightbox And Pop-up For Visual Delight

Gift pack layouts are shown in a sleek Lightbox and Pop-up, allowing users to preview wrapping styles before they decide. This visual interaction not only amplifies user engagement but also increases customer confidence during the purchase.

The Crux: Gift Pack for WooCommerce lets you personalize shopping in thoughtful ways. From visual layouts to custom messages, you can turn each order into a memorable unboxing moment.

Creative Ways Stores Are Using Gift Pack For WooCommerce

Gift-wrapping may seem like a small add-on, but when implemented thoughtfully, it becomes a powerful branding and emotional tool. Businesses across industries are using the Gift Pack for WooCommerce plugin not just for aesthetics but to give customer engagement a whole new definition and foster emotional connections. 

Here are some creative ways WooCommerce stores utilize this plugin.

Subscription Box Businesses

Offer curated monthly boxes with gift wrap options that rotate by season or theme. Let customers include messages for birthdays, holidays, or milestone celebrations, making your service feel more individualized.

Fashion & Lifestyle Stores

Let customers choose elegant wrapping paper and add handwritten-style notes during checkout. A custom-wrapped accessory or outfit converts into a ready-to-gift item, enhancing perceived value.

Beauty & Skincare Brands

Bundle skincare products as personalized gift sets. Allow users to select wrapping for holidays like Mother’s Day or Valentine’s Day and include gracious notes, making it perfect for self-care presents.

Bookstores & Educational Products

Wrap books for teachers, students, or bookworms with genre-themed gift paper and include a kind note. It is ideal for gift-givers shopping for birthdays or achievements.

General Retailers

Use gift pack options for customer appreciation presents, giveaways, or loyalty rewards. It creates a feel-good moment that strengthens customer retention and brand perception.

These customizations help brands speak directly to their customers’ emotions while standing out in the competitive eCommerce landscape. 

Central Idea: Gift Pack for WooCommerce empowers stores across industries to creatively personalize gifting experiences, spark emotional engagement, and enhance perceived value. It turns every wrapped product into a lifelong memory and a loyalty-building moment. 

Is This Plugin Built For Harmony: Theme and Plugin Compatibility Explained

A splendid plugin is not just about features; it’s about fitting seamlessly into your existing ecosystem. Gift Pack for WooCommerce is designed with harmony in mind. It functions flawlessly alongside popular WooCommerce themes and essential add-ons, so you never have to compromise design, speed, or store stability.

Seamless Theme Compatibility

Whether you use a lightweight WooCommerce theme or a heavily customized one, this plugin adapts without hiccups. From layout responsiveness to style consistency, it integrates impeccably, so the gifting options look and feel native to your storefront.

Plays Nicely With Other Plugins

Gift Pack for WooCommerce avoids the usual plugin turf wars. It is compatible with most extensively used WooCommerce plugins, including those for multilingual support, product variations, checkout enhancements, and more. 

It also works smoothly in stores that rely on Custom WooCommerce Development, ensuring it remains stable in bespoke setups.

Built With Performance In Mind

Compatibility isn’t just visual. The plugin follows best practices for WooCommerce Performance & SEO, ensuring it doesn’t bloat your pages or slow down your store, an essential factor for user experience and conversions.

No Code Conflicts or Layout Breaks

If you’ve ever worried about installing a plugin and breaking your layout, your stress ends here. The Gift Pack plugin is engineered to avoid common code conflicts, making it practical for stores with complex setups or ongoing WooCommerce Support & Maintenance routines.

This plugin was not created in isolation; it was built for real-world WooCommerce environments, ensuring exceptional performance across a wide range of use cases.

In a Nutshell: Gift Pack for WooCommerce is made for seamless compatibility. It integrates cohesively with most themes and essential plugins while preserving site speed, design consistency, and customization flexibility, making it a safe, future-proof option.

Why This Plugin Pays Off Quickly: Understanding The Real Value

Store owners often ask a common question before investing in a plugin: “Will this actually make a difference?” With Gift Pack for WooCommerce, the answer is yes. Some users experience a faster payoff than expected.

Increased Average Order Value (AOV)

Adding a premium gift wrap option encourages customers to spend more. It’s a small upsell that adds emotional value to their purchase while contributing to your bottom line. Even a modest increase in gift wrap selections can lead to noticeable revenue growth over time.

Better Shopping Experience, Higher Retention

Gift wrapping adds a human touch. It helps buyers feel like they’re not just buying a product but gifting something valuable. That emotional connection keeps people returning, which means stronger customer loyalty and more repeat sales.

Fewer Abandoned Carts

When shoppers don’t find a gift-ready option, they often look elsewhere. Offering built-in gift personalization at the product level helps prevent hesitation and cart abandonment, giving you an edge over stores that don’t provide that extra detail.

A Value-Driven, Scalable Solution

Rather than building a custom gift wrap feature from scratch, this plugin offers a neat, growth-friendly, and reasonable alternative. It saves time, reduces development costs, and avoids future maintenance hassles because it is built with WooCommerce Plugin Development standards in mind.

This plugin delivers more than a feature; it offers a complete value cycle, from emotional engagement to revenue growth. It contributes directly to store performance, customer satisfaction, and long-term brand equity.

Key Takeaway: This plugin boosts average order value, reduces friction, and enhances customer experience while delivering measurable returns without the complexity or cost of custom development.

gift pack for woocommerce plugin

Conclusion

In eCommerce, the smallest touches often create the most lasting impressions. Adding a gift wrap option may seem like a modest upgrade. But in reality, it is a value-driven feature that sparks emotional connection, enhances perceived value, and delights customers from the first click to delivery. Gift Pack for WooCommerce makes all of this effortless.

Throughout this blog, we’ve uncovered how the plugin integrates seamlessly with your existing WooCommerce setup, offers complete flexibility, and enriches the customer journey through personalized gifting experiences. Even better, it maintains performance integrity without disrupting the checkout flow. 

Whether you’re a retailer, boutique brand, or subscription-based business, your everyday products can now double as memorable, gift-ready offerings.

Beyond boosting average order value and improving retention, this plugin delivers a scalable impact. With full theme compatibility, multilingual support, and user-friendly customization, it is built to grow with your store.

Do not let gifting be an afterthought. With the Gift Pack for WooCommerce, add purpose, personality, and joy to your products.

And if you are ready to go further, our team is here to support your journey. From Custom WooCommerce Development to WooCommerce Maintenance and Support, we ensure your store performs brilliantly and evolves with your business goals. 

FAQ

Can I Offer Free Gift Wrapping For Selected Products Only?

Yes, you can set the gift wrap cost to zero for specific products or categories while maintaining pricing for others. This allows you to run promotions or offer exclusive perks for premium items or loyal customers.

Does The Plugin Support Mobile Devices And Touchscreens?

Absolutely. Gift Pack for WooCommerce is fully responsive and optimized for mobile and touchscreen devices. Your customers can select gift options and personalize their messages, irrespective of the screen size or device type.

Will Gift Wrap Details Be Visible In Admin Order Details And Emails?

Yes, all selected gift wrap options, layouts, and messages are visible in buyer confirmation emails and the admin order panel. It also ensures accurate order fulfillment and a seamless experience for store managers.

Can Customers Edit Or Remove Gift Pack Options Before Checkout?

Customers can modify or remove their gift wrap choices directly from the product page or cart before proceeding to checkout. This flexibility ensures they remain in control of their purchase preferences.

Is The Plugin Compatible With Other WooCommerce Extensions Like Subscriptions Or Bookings?

While the plugin works well with standard WooCommerce features, compatibility with premium extensions like Subscriptions or Bookings may vary. It’s recommended to test or seek support from a professional for any advanced integration needs.

Disable Services Manager Plugin: Reinforce Your WordPress Site Speed, Security, And Privacy

When was the last time you scrutinized your WordPress website’s performance? How often do you review the features running in the background and holding your site back? 

You will be surprised that most WordPress sites have extensive built-in features that remain untouched and unnecessary. These features can silently slow down your site, create security gaps, and add unnecessary clutter.

So, what’s the solution to disable some of WordPress’s default features to improve the website’s overall efficiency, enhance privacy, and boost security with minimal effort?

The answer lies in the Disable Services Manager plugin

It is a thoughtfully built tool for developers, digital agencies, and WordPress site owners who care deeply about performance, speed, and security. 

We will discuss how this plugin lets you take control of your website’s hidden processes without touching a single line of code. You will learn how to streamline your site, protect it from unnecessary vulnerabilities, and ultimately create a faster, more secure user experience. 

Don’t let your website feel sluggish or overly exposed. Let’s help you fine-tune your WordPress site by simply switching off what you don’t need.

And the best part? It only takes a few clicks. 

Why Disabling Default WordPress Features Can Be A Game-Changing Move

WordPress is designed to be flexible. It comes with a wide range of features enabled by default to suit as many use cases as possible. But here’s the reality: what works for everyone often works best for no one. These one-size-fits-all defaults can lead to messy, bloated, and even vulnerable websites.

For example, features like XML-RPC and REST API may be helpful in specific cases, but most website owners rarely use them in their daily operations. Leaving them active without a particular purpose can create unwanted security entry points and add unnecessary load to your server.

Simultaneously, automatic emails, outdated widgets, or public comment sections can result in more distractions than benefits, especially for professional business websites, custom builds, or developer-focused environments.

Turning off what you don’t need reduces the surface area for attacks, speeds up your backend operations, and strengthens your website’s overall stability. It also helps you maintain a smooth admin interface, making it more manageable to focus on what truly matters – your content, your users, and your goals.

Remember, disabling default WordPress features is not about limiting functionality. It’s about adjusting your website to meet your requirements precisely: nothing more and nothing less.

What This Means For You: Disabling unused default WordPress features helps reduce clutter, boost speed, and safeguard your website. It’s a wise, simple move for anyone aiming to optimize their digital presence. 

Meet The Disable Services Manager Plugin: Your All-In-One WordPress Optimization Switch

People often look for what they can add to optimize their WordPress site performance. They mostly opt for more plugins, tools, and layers of security. But what if the real magic lies in removing what you don’t actually need?

The Disable Services Manager plugin is built on that exact idea. It’s a lightweight, easy-to-use plugin that gives you complete control over several WordPress features that typically run in the background by default. 

No technical setup. No messy code edits. Just a clean switch to disable functions you may not want or need.

From disabling comments and emails to turning off REST API, XML-RPC, and even WordPress core updates, this plugin lets you take charge of what’s active on your website. With this control comes outstanding speed, improved privacy, and reinforced security.

Whether you’re a developer managing multiple client websites or a website owner who wants a quicker, straightforward setup, this plugin simplifies the process. It brings everything into one interface and puts you in the driver’s seat.

Central Idea: Disable Services Manager empowers you to turn off unwanted WordPress features in just a few clicks. It’s simple, effective, and designed to bolster performance, privacy, and control without writing a single code.

Disable Services Manager Plugin Key Features And What They Do

The Disable Services Manager plugin is built to trim down unnecessary WordPress features and give you an organized, rapid, and more secure website. Here’s a closer look at what each toggle does and how it helps you take control.

Disable Comments

If you don’t use comments on your website, they only create noise and attract spam. This option helps you shut off comments entirely, keeping your site crisp and preventing unwanted interaction on posts or pages.

Disable Emails

WordPress sends automatic emails for various actions, such as password resets, new user alerts, or comment notifications. Disabling these emails can reduce inbox clutter and limit communication flow, especially useful in staging or developer environments.

Disable WordPress Updates

Some websites require controlled environments where auto-updates can disrupt theme or plugin customizations. This feature switches off core updates, so changes happen only when you’re ready.

Disable Widgets

Many default widgets go unused, especially on modern, custom-built sites. Disabling them keeps the backend interface clean and prevents unnecessary elements from loading.

Disable Fatal Error Emails

When a fatal error occurs, WordPress tries to email the admin. This function turns off those alerts. It is ideal if you already monitor errors through other tools or server logs.

Disable Right Click On The Entire Website

Want to prevent users from copying your content or accessing browser inspection tools easily? This feature unplugs right-click actions across your website to add a basic protection layer.

Disable XML-RPC Pingback

Pingbacks can be exploited for DDoS attacks and spam. Disabling them strengthens security by cutting off this often-abused communication method.

Disable REST API

The REST API is helpful for app integrations, but it isn’t necessary for many websites. Disabling it reduces exposure and is valuable for websites not using any external API connections.

Disable XML-RPC

XML-RPC is another legacy protocol that allows remote connections. Unless you use tools like the WordPress mobile app, you probably don’t need it, and disabling it closes off another entry point.

In a Nutshell: Each feature in this plugin serves one primary goal: removing what your WordPress site doesn’t need. The result is swifter load times, fewer vulnerabilities, and a more focused website experience for both you and your visitors.

The Big Wins You Get With The Disable Services Manager Plugin

Installing a plugin should never feel like adding complexity. With Disable Services Manager, it’s all about subtracting the noise, streamlining your site, and creating a more systematic digital experience. Here are the five core benefits that make this plugin a go-to for smart WordPress optimization.

Speed Gains Without Complexity

By unplugging unnecessary services like widgets, comments, and XML-RPC, your website loads fewer scripts and processes in the background. It means more rapid load times without needing advanced caching strategies or expensive performance plugins.

Stronger Site Security With A Few Clicks

Features like REST API, XML-RPC, and pingbacks are common entry points for attacks. Disabling them instantly reduces your exposure and gives you better peace of mind. It is a boon for websites that handle sensitive information.

Lower Server Load, Higher Efficiency

The fewer processes WordPress has to run, the less work your server needs to do. Unplugging unused features reduces server strain and ensures your site remains stable under traffic spikes or multi-user access.

Cleaner Admin UI = Smoother Workflow

Removing features you don’t use also cleans up your dashboard. No more digging through settings you don’t need. It means sharper focus, speedier workflows, and a more enjoyable backend experience for developers and website owners.

Less Exposure To Third-Party Services

Every open connection or feature creates a potential communication point with outside tools. This wordpress plugin helps close those doors, keeping your site’s footprint tight and your data more private.

Quick Recap: This plugin bolsters speed, strengthens security, lowers server load, and simplifies your admin experience. It’s a clever, practical solution for anyone passionate about building a faster, safer WordPress website. 

Who Should Disable These WordPress Features And When To Do It

Not every WordPress site is built the same way. What works fantastically for one might create digital drag for another. That’s why the Disable Services Manager plugin empowers you to flip the switch on clutter and chaos, so you can build a neat, focused, and elegant website.

Here’s when and where using this plugin makes the most sense.

Developers Managing Multiple Sites

If you’re handling several WordPress builds, you know that every second saved counts. This plugin helps you run smoothly, systematically, and fast by trimming the extras like emails, widgets, and the REST API. The result? Polished workflows and fewer maintenance headaches.

Agencies Running Custom WordPress Builds

Digital agencies thrive on control and precision. With this plugin acting as your site’s cleanup crew in one plugin, you can eliminate distractions, streamline the backend, and hand off organized, flawless, and clutter-free projects to clients.

Enterprise-Level Or High-Traffic Sites

Big websites demand big performance. You can give your site a speed makeover and bolt the doors on digital intruders by switching off what you don’t use. Less load, more power, and no compromises.

eCommerce Stores

When you’re selling online, performance and privacy are non-negotiable. This plugin helps you turbocharge your WordPress experience by shutting off features that create latency in checkout or expose your store to unnecessary risk.

Bloggers And Content Creators Who Want A Clean Slate

Some creators don’t want comment sections. Others want to protect their work from copy-paste. This tool lets you fire up your website’s true power by removing what you don’t need and focusing on crucial elements.

Whether you’re launching a fresh build or revamping an old one, knowing when to switch off features could be the groove that moves everything. Use it at the beginning of a project or during a website audit to cut out the blunder and keep only what works.

Key Takeaway: From developers to content creators, Disable Services Manager helps you fine-tune your WordPress website like a pro by disabling the aspects that create lag and loopholes. Tidy, swift, and secure, that’s how a WordPress site should run. 

How To Install And Set Up The Disable Services Manager Plugin In Minutes

You don’t need to be a tech wizard to put your website’s smart switch to work. Installing and configuring the Disable Services Manager plugin is straightforward. You’ll have unnecessary features turned off in just a few minutes, and your website will run smoother than ever.

Step 1: Go To Your WordPress Dashboard

Begin by logging into your WordPress admin panel. Once logged in, click on Plugins from the left-hand menu, then select “Add New.”

Step 2: Search For “Disable Services Manager”

In the search bar at the top right, type in “Disable Services Manager.” When the plugin appears, click on Install Now and then Activate once the installation is completed.

Step 3: Access The Plugin Settings

After activation, you’ll see a new settings page typically found under Tools>Disable Services or within the Settings menu. Click on it to start customizing.

Step 4: Disable What You Don’t Need

You’ll see a checklist of built-in WordPress services you can plug off. These include:

  • Comments
  • Automatic emails
  • WordPress core updates
  • Widgets
  • XML-RPC and pingbacks
  • REST API
  • Right-click on the site
  • Fatal error notifications

Simply tick the options you want to disable. No coding. No confusion. Just point, click, and done!

Step 5: Save Changes And Test

Once you’ve made your selections, hit Save Changes. It’s always a good idea to test your website after setup to ensure everything is running as intended.

The Bottom Line: With just a few clicks, you can fire up your WordPress site’s true power by disabling what you don’t need. No code, no clutter; just an organized, speedier, more secure WordPress experience. 

WPeople’s Developer Perspective: Why We Recommend It For Custom WordPress Builds

At WPeople, we don’t just make websites; we craft memorable digital experiences. Over the years, our wordpress development team has worked on countless WordPress projects, from sleek startup websites to complex enterprise builds. However, one plugin continues to stand out in our toolbox: Disable Services Manager.

Why should you trust it? Because it delivers precisely what it promises and does it with zero complications.

When we build or manage a custom WordPress site, we begin by asking: What features actually serve the user? Anything that doesn’t contribute to performance, privacy, or usability doesn’t make the final list. That’s where this plugin steps in to transform your WordPress site like a pro.

  • This plugin facilitates backend cleanup for our developers. 
  • No need to write custom functions to block XML-RPC or REST API access. 
  • No extra scripts to switch off comments or widgets. 

It’s all right there, ready to toggle in seconds.

It’s a game-changer for our clients, especially those who want a polished, no-hassle admin experience. They get a streamlined dashboard, fewer distractions, and stronger security without coding knowledge.

What we appreciate most is the plugin’s alignment with our philosophy: build smart, stay secure, and always prioritize user experience. Whether it’s a brand-new project or a website refresh, we routinely recommend Disable Services Manager as a foundational step in the setup process.

When your WordPress site runs flawlessly, it aids in fulfilling your business goals.

The Crux: WPeople recommends Disable Services Manager because it helps us turbocharge your WordPress experience while keeping site builds uncluttered, shielded, and client-friendly from the start. 

Additional Tips For Hardening And Optimizing Your WordPress Site

Disabling unused features is just an initial step. To turbocharge your WordPress experience even further, consider these extra strategies that WPeople experts rely on for top-tier performance and security.

Implement Caching Solutions

A good caching plugin stores static versions of your pages so the server doesn’t have to rebuild them on every visit. This approach can give your website a speed makeover by reducing load times for repeat visitors.

Leverage A Content Delivery Network (CDN)

A CDN distributes your site’s assets across multiple global servers. When a visitor accesses your website, content is delivered from the nearest server, which runs impeccably, rapidly, and systematically. It results in quicker page loads and a better user experience worldwide.

Regular Security Audits

Schedule periodic scans and audits using tools like Wordfence or Sucuri. These checks help you bolt the doors on digital intruders by identifying vulnerabilities before they escalate.

Optimize Images And Media

Large images can slow down page rendering. Use image optimization plugins or services to compress files without losing quality. This simple step helps turbocharge your WordPress experience and keeps pages loading swiftly.

Keep Plugins And Themes Updated

Outdated code can introduce security risks. While you might withdraw from auto-updates with the Disable Services Manager plugin, make it a habit to update themes, plugins, and core manually on a regular schedule. This practice ensures you put your website’s smart switch to work and stay safeguarded.

Limit Plugin Use

Each plugin adds code and potential overhead. Review your active plugins frequently and deactivate or uninstall anything that isn’t essential. Fewer plugins mean a cleaner admin UI and excellent stability.

What You Should Know: Combining feature disablement with caching, CDN integration, security audits, and media optimization helps you fire up your site’s true power for a fast, secure, and smooth WordPress experience. 

disable service manager plugin

Conclusion

Your WordPress site should be working for you, not quietly working against you. Hidden features, unused services, and background processes may seem harmless, but they’re often the silent culprits behind the sluggish speed, growing security concerns, and unnecessary complexity.

Throughout the blog, we’ve explored why the Disable Services Manager plugin is an innovative way to take control of your site’s behavior and tweak what runs and what doesn’t, all without coding knowledge. 

You also learned what each toggle does, when it makes sense to use it, and how WPeople integrates it into custom WordPress builds to fire up site performance without blunders. We also walked you through additional hardening tips that keep your website running smoothly and securely. 

Now, the next step is yours. If you want your WordPress site to feel lighter, load lightning-fast, and function with purpose, now is the time to act.

Download the Disable Services Manager plugin today and let your visitors thank you for an exceptional experience. 

FAQ

Will Disabling WordPress Features Affect My Site’s Core Functionality?

No, the plugin only targets non-essential features. Your core WordPress functions, like content publishing and theme behavior, remain unaffected. Still, it’s wise to test changes on a staging website if you’re unsure which features are safe to switch off.

How Do I Know Which Features I Should Disable On My Site?

It depends on your website’s purpose. For instance, brochure websites may not need comments or the REST API, while dynamic platforms might. Start by disabling what you don’t use and monitor your site’s performance afterward. 

Can I Selectively Re-Enable Features After Disabling Them?

Absolutely. All changes made by the plugin are fully reversible. You can revert anytime and toggle features back on without affecting other plugin settings or breaking your website. 

Does This Plugin Work With Multisite WordPress Installations?

Yes, the Disable Services Manager plugin supports WordPress Multisite. However, settings must be configured individually according to the site to avoid conflicts and ensure granular control.

Will Disabling The REST API Or XML-RPC Break Any Plugins Or Themes?

Some plugins or themes rely on the REST API or XML-RPC to function. Before disabling these features, test your website’s functionality to ensure nothing critical is affected. Always review plugin requirements beforehand. 

Connect WPForm to Any API: Send WPForm Submissions To Any CRM Or API Instantly

Imagine this: A potential lead just submitted your WPForm, and they’re ready to convert. But instead of being routed instantly to your CRM or emailing list, their info is sitting idle in your WordPress dashboard, waiting for manual action. Meanwhile, your competitor is running full-throttle automation and just cashed in another customer.

So here’s the question: What if you could connect WPForms directly to any external API without any middlemen, coding, and chaos?

That’s the promise of Connect WPForm to Any API. A valuable plugin that solves it all by walking you through its real-world use cases and how to troubleshoot common integration headaches.

Whether you’re a small business owner looking to send WPForm submissions straight to HubSpot, a marketer syncing new subscribers to Mailchimp, or a developer needing custom API workflows with JSON formatting and secure authentication, this blog is specifically curated for you. 

You’ll walk away with a solution that turns your WordPress forms into fully automated, API-powered workflow machines.

Let’s get started!

Why You Might Need To Connect WPForms To External APIs

Imagine this: you’re collecting form submissions on your WordPress site and manually copying that data into your CRM, email marketing tool, support system, or spreadsheet every single time. Sounds like a nightmare? That’s the reality for many. 

Every second counts when you’re managing leads, nurturing prospects, or syncing vital data across platforms like CRMs, email marketing tools, helpdesks, or custom apps. And yet, many WordPress users still count on complex workarounds or expensive third-party automation tools that drain both time and budget. 

Manual workflows are the silent killer of productivity. Delayed lead follow-ups? Missed email signups? Disconnected data? They all cost you potential revenue. 

That’s where connecting WPForms to external APIs emerges as a protagonist. By setting up direct API connections, you can:

  • Automatically send form data to your favorite CRM like HubSpot, Salesforce, or Zoho.
  • Trigger support tickets in your help desk tool instantly when a form is submitted.
  • Add subscribers to a mailing list without lifting a finger.
  • Pipe data into Google Sheets, Airtable, or even custom applications for real-time analysis. 

The magic lies in automation. When WPForms becomes the trigger that instantly activates a chain of connected apps and workflows, you’re no longer managing data; you’re orchestrating it.

What Is the ‘Connect WPForm To Any API’ Plugin?

Imagine having the power to make your WordPress forms talk directly to virtually any service or app you rely on that too, without writing complex code or jumping through integration hoops. That’s precisely what the ‘Connect WPForm to Any API’ plugin does.

At its core, this plugin is a no-nonsense API connector for WPForms. Its primary goal is to bridge the gap between your form submissions and any external API, from CRMs and support platforms to spreadsheets, marketing tools, and custom-built applications.

Whether you’re a:

  • Marketer automating lead capture and nurturing,
  • Developer building flexible, custom workflows,
  • Business owners looking to streamline operations,

This WordPress plugin is focused on saving time, reducing errors, and ensuring every submission goes accurately where it should.

Unlike limited integrations or rigid solutions, this plugin puts the power back in your hands and gives complete control over how, where, and in what format your data gets sent. POST or GET, JSON or URL-encoded, authenticated or not – it’s all possible.

What makes it even more impressive? It’s lightweight, extensible, and designed with real-world API challenges in mind. This means you won’t combat plugin limitations when your use case gets a little technical.

In essence, this plugin doesn’t just connect your forms. It connects your form data to action.

Central Idea: The ‘Connect WPForm to Any API’ plugin empowers WordPress users to automate data workflows by seamlessly linking form submissions to virtually any external service without writing code or relying on limited third-party tools.

Powerful Features That Set This Plugin Apart

Flexibility and control are pivotal, especially when integrating WordPress forms with external APIs. This plugin delivers both in spades. Whether you’re sending leads to CRMs or triggering complex automation, Connect WPForm to Any API gives powerful capabilities at your fingertips.

Send WPForm Leads To Remote APIs (POST/GET)

You can instantly send WPForm data to any remote API using either POST or GET methods. From marketing platforms to custom endpoints, your form entries can flow wherever they’re needed without manual exports.

Create Unlimited Connections With Any API

Why settle for one integration? This plugin lets you create unlimited API connections to route different WPForms to various APIs based on purpose or project.

Supports Simple & Fixed Format Of JSON

It supports common data formats like simple and fixed JSON, making it more straightforward to connect to most APIs out of the box, especially for basic to moderately complex integrations.

Supports Basic Auth

Many APIs still use traditional Basic Authentication. The plugin offers built-in support, ensuring you can connect securely and effortlessly with services that use this protocol.

Supports Bearer Auth

Need to include an access token in headers? This plugin supports Bearer Authentication, making it compatible with modern REST APIs that use secure token-based access.

API Logs Management With Submitted Data And Response

Debugging API calls can be tricky, but this plugin includes a log management system. You can view submitted data, API responses, and status codes for each request, making troubleshooting seamless.

Paid Plugin Customization: Multi-Level or Any JSON Format

Need more complex JSON structures? The paid customization allows integration with nested or deeply structured JSON payloads, expanding the scope for advanced API integrations.

Paid Plugin Customization: JWT Token Integration

JWT (JSON Web Tokens) are extensively used for API authentication. The plugin can support JWT-based authorization through customization, making it perfect for connecting to contemporary platforms requiring secure access.

Paid Plugin Customization: OAuth 2.0 Integration

Want to connect to enterprise-level APIs like Google, Microsoft, or HubSpot? Custom development can enable OAuth 2.0 integration, making this plugin a growth-friendly solution even for advanced users. 

The Bottom Line: The Connect WPForm to Any API is a powerhouse integration tool. With support for multiple auth types, flexible JSON formatting, unlimited API endpoints, and detailed logs, this plugin equips you to automate, scale, and accelerate workflows without writing a single code line.

Step-By-Step Guide: How To Connect WPForms To Any External API

You don’t need to be a developer or write intricate code to set up powerful automations. With the Connect WPForm to Any API plugin, integrating WPForms with third-party services becomes a smooth, guided process. Here’s how you can do it in minutes:

Step 1: Install And Activate The Plugin

Head over to your WordPress dashboard. After that: 

  • Navigate to Plugins > “Add New” 
  • Search for “Connect WPForm to Any API”, install it, and click “Activate.” 
  • Once active, you’ll find the plugin options under WPForms > Settings > Connect to API.

Step 2: Create A New API Connection

Click “Add New Connection” to begin.

Here, you’ll:

  • Name your connection for easy management.
  • Select the WPForm you want to link with the API.
  • Enter the API endpoint URL of the service (e.g., HubSpot, Google Sheets, or any REST API).

Step 3: Configure Headers & Authentication

Depending on your API’s requirements, you can:

  • Set GET or POST request type.
  • Define Content-Type (commonly application/json).
  • Choose Basic Auth or Bearer Token and enter your credentials.

If you’re using premium customization,  JWT or OAuth 2.0 options will also appear.

Step 4: Map WPForm Fields To API Parameters

Use the intuitive interface to map your WPForm fields (name, email, message, etc.) to the correct JSON keys or query parameters expected by the API. The plugin supports:

  • Simple key-value JSON structure.
  • Fixed and custom formats.
  • Conditional logic (advanced setups via custom dev support).

Step 5: Send A Test Request

Once configured, send a test submission to check your API integration. You’ll see:

  • Submitted form data
  • API response
  • Success/failure indicators

The built-in API Logs feature enables you to debug issues with detailed request/response data.

Step 6: Embed Your WPForm

Place your WPForm anywhere on your website using the Gutenberg block, shortcode, or widget. Your form is now live, and every submission will trigger the API call automatically.

What You Should Know: Setting up external API integrations with WPForms is no longer a developer’s only task. This plugin democratizes automation by turning complex configurations into a few guided clicks. This can be sending leads to CRMs, syncing with spreadsheets, or triggering support tickets in real-time. 

Real-World Use Cases You Can Set Up In Minutes

Let us bring this plugin’s potency to life. Below are practical, real-world use cases showcasing how quickly you can set up with zero coding knowledge. These aren’t hypothetical ideas; they’re high-impact workflows that many users depend on daily.

Send Leads Directly To Your CRM

Automatically push WPForm submissions to CRMs like HubSpot, Zoho, or Salesforce. Say goodbye to manual data entry and hello to instant, accurate lead capture.

Connect To Google Sheets or Airtable

Need a lightweight, visual database for storing submissions? Send form data straight to a Google Sheet or Airtable base with custom headers and formatting that suit your workflow.

Automate Help Desk Tickets

Using tools like Freshdesk or Zendesk? Use WPForms to instantly create support tickets with all the user’s info and issue details sent to the right place.

Add Subscribers To Email Platforms

Grow your email list by sending new entries to Mailchimp, Brevo (formerly Sendinblue), or ConvertKit. Use tags, lists, and segments to keep campaigns organized and personalized.

Trigger Webhooks For Custom Automation

Trigger Zapier, Integromat, or Make.com webhooks to kick off powerful multi-step automation. It involves spreadsheets, databases, messaging tools, and more, all from one form.

What This Means For You: Irrespective of whether you’re managing leads, tracking support requests, or building automated marketing workflows, the Connect WPForm to Any API plugin is your gateway to integrating WordPress with all essential tools in just a few clicks. 

Common API Integration Challenges And How This Plugin Solves Them

Connecting WPForms to external APIs can be frustrating, especially when you hit roadblocks that feel more technical than they should be. Let’s break down some of the most common issues users face and how the Connect WPForm to Any API plugin removes those obstacles with savvy solutions.

Authentication Complexities

Different APIs use various authentication methods, from Basic Auth to Bearer Tokens to more advanced protocols like OAuth 2.0. Without careful handling, your connection attempts will fall flat.

How This Plugin Helps: Connect WPForm to Any API that supports Basic and Bearer authentication by default. Customization support is available for more advanced needs, such as OAuth 2.0 or JWT tokens to handle the complexity seamlessly.

Failed Requests And Timeouts

Nothing is more frustrating than a lead form submission that goes nowhere due to an untracked failure. These blind spots can cost you valuable data and opportunities.

How This Plugin Helps: The built-in API log tracks both the form submission data and the response from the API. You’ll always know what went wrong and where.

Data Formatting Issues

APIs expect a precise structure in the data you send. A minuscule error in formatting or nesting can cause the request to break.

How This Plugin Helps: It handles simple and fixed JSON structures efficiently. Custom support is available for nested or more complex JSON formats to meet specific formatting requirements.

Custom Headers And Tokens

Manual configuration can get tricky and error-prone, especially when an API needs specific headers or dynamic access tokens.

How This Plugin Helps: It allows you to define headers directly within its interface. No coding or external configuration is needed. 

Common ChallengeExplanationHow the Plugin Solves It
Authentication ComplexitiesAPIs may require Basic Auth, Bearer Tokens, or OAuth 2.0Built-in support for Basic and Bearer Auth; paid customization for JWT and OAuth 2.0
Failed Requests And TimeoutsAPI calls might silently fail, leading to lost form dataLogs every request and response to help troubleshoot and debug with ease
Data Formatting IssuesAPIs often expect structured JSON or specific nestingSupports simple/fixed JSON by default; offers customization for complex formats
Custom Headers And TokensAPIs may require dynamic tokens or specific headersLet users define custom headers directly in the plugin’s UI, no coding required

Key Takeaway: Connect WPForm to Any API tackles the real-world technical challenges of authentication, data formatting, and troubleshooting, providing a dependable and user-friendly bridge between your WordPress forms and any API. 

How This Plugin Compares To Other WPForm Integration Tools

The typical routes to connect WPForms to external APIs involve using platforms like Zapier and Make (Integromat) or hiring a developer to write custom integration code. Though these methods work, their trade-offs are often cost, flexibility, or ease of use.

No Monthly Subscription Fees

Connect WPForm to Any API plugin is a one-time solution, unlike automation tools like Zapier or Make, which often charge based on tasks or operations. You install it, configure it, and you’re all set. There are no recurring costs or usage limits.

Complete Flexibility Without Coding

Custom development can get bespoke results but demands ongoing maintenance and developer dependency. However, you get complete control with this plugin over API endpoints, headers, field mappings, and more without writing a single line of code.

Performance-Oriented & Lightweight

While third-party platforms bank on webhooks and can introduce latency, this plugin runs natively within WordPress. This means speedier execution and fewer external dependencies.

Built Specifically For WPForms

Many generic API tools support WPForms indirectly (via webhooks or intermediary services). In contrast, Connect WPForm to Any API is designed exclusively to work with WPForms, ensuring seamless compatibility and an exceptional experience.

Advanced Authentication & Format Handling

Where most alternatives struggle with handling complex JSON structures or cutting-edge authentication methods (like JWT or OAuth 2.0), this plugin either natively supports them or provides customization support, giving you enterprise-grade flexibility. 

Connect WPForm to Any API vs. Alternatives: A Quick Comparison

Feature / ToolConnect WPForm to Any API PluginZapier / Make (Integromat)Custom Code
PricingOne-time / Free & Paid OptionsRecurring / Task-based feesHigh upfront & maintenance costs
Ease of UseBeginner-Friendly InterfaceModerateDeveloper Only
WPForms CompatibilityDirect & Native SupportIndirect (via Webhooks)Fully Custom
Supports Advanced Auth (JWT, OAuth, etc.)Yes (with customization)LimitedYes
Custom JSON & HeadersFully SupportedLimitedYes
PerformanceFast & Runs Natively in WPExternal API Delay PossibleVaries by Implementation
ScalabilityUnlimited API ConnectionsLimited by PlanDepends on Code Quality

In a Nugget: Unlike third-party automation tools or custom coding, the Connect WPForm to Any API plugin offers a native, budget-friendly, and flexible solution. It is built specifically for WPForms users, empowering them to integrate virtually with any API effortlessly.

Tips For Securing And Optimizing Your API Connections

Connecting WPForms to external APIs opens the door to powerful automation. However, with great flexibility comes great responsibility. Ensuring secure and efficient API communication is crucial to protect your data, maintain performance, and prevent system failures.

Here are some vital tips to help you make the most of your API integrations.

Use Environment Variables For Credentials

Never hardcode API keys, tokens, or passwords directly into plugin settings or theme files. Instead, store them securely using environment variables within your wp-config.php file. This adds an extra protection layer, especially when working with sensitive third-party services.

Test Endpoints Thoroughly Before Going Live

Before launching an integration, always test your API endpoint responses with dummy submissions. This helps catch errors, validate the structure of data being sent, and ensure successful communication with the external service.

Monitor API Logs Regularly

Take advantage of the plugin’s built-in logging feature to track request responses and troubleshoot issues proactively. Reviewing logs regularly helps spot inconsistencies, failed connections, or unexpected behavior before they impact your users or leads.

Use Rate Limiting And Timeout Handling

Ensure the external API you’re connecting to has clearly defined rate limits. Respect these caps by avoiding excessive requests in short periods. In case of timeouts or slow responses, implement ‘retry logic’ where necessary or alert your team for manual checks.

Secure Your Site With SSL

Always ensure your WordPress site is running over HTTPS. Secure Socket Layer encryption protects the data sent between your website and the external API, which is paramount when transmitting personal or financial information.

Core Insight: A well-integrated API connection is only as strong as its weakest link. By securing credentials, monitoring activity, and following best practices, you will not only safeguard your website but also ensure that your automations run reliably and without interruption. 

Connect WPForm to Any API

Conclusion

Throughout this blog, you’ve uncovered how the Connect WPForm to Any API plugin quietly fixes the chaos behind the scenes, from broken workflows and integration headaches to hours lost and manual tasks. 

You’re no longer limited to static data sitting idle in your WordPress dashboard. With this plugin, every WPForm submission becomes an active engine – sending leads to CRMs, adding users to email lists, creating tickets, updating spreadsheets, and more. 

No complex coding. No pricey automation tools. Just a clean, powerful integration made for real-world needs.

Whether you’re a solopreneur, developer, or run a digital agency, Connect WPForm to Any API doesn’t just streamline functionality; it gives you the freedom to build smarter, faster, and with confidence. 

Let this quiet powerhouse bridge the gap between your website and business goals.

Turn passive forms into powerful workflows. Install the plugin today, connect your APIs, and make your data work for you.

FAQ

Is It Possible To Trigger Multiple Actions From A Single WPForm Submission?

Absolutely. You can configure the plugin to send the same WPForm data to different APIs by setting up multiple connections. This is useful for syncing leads to CRMs, sending notifications, and updating databases – all at once.

Does This Plugin Work With WPForms Lite?

Yes, it works with both WPForms Lite and Pro. However, some advanced features like conditional logic or payment integrations may only be available in WPForms Pro.

Can I Schedule API Submissions Instead Of Sending Them Instantly?

By default, the plugin sends data instantly upon form submission. You’d need to implement custom hooks or use external cron jobs for scheduling or batching through plugin customization. 

Will My API Data Be Secure During Transmission?

Yes. The plugin supports HTTPS endpoints and secure authentication methods like Basic Auth, Bearer tokens, and custom headers. It’s recommended to avoid exposing sensitive credentials directly in plugin settings.

Can I Connect One WPForm To Multiple APIs Simultaneously?

Currently, each connection is mapped according to the form. However, you can create multiple API connections and trigger them using conditional logic or by duplicating forms for different endpoints. 

Any CPT Listing Block Plugin For WP: Showcase Any Posts Like A Pro

Did you know that most WordPress users rely on complicated shortcodes or heavy, bloated plugins to display custom post types? 

Have you ever wished there was a more organized and rapid way to showcase any kind of post, such as a portfolio, testimonials, case studies, or events, within the block editor? If yes, and searching for the solution, this blog has the answers. 

Introducing the Any CPT Listing Block Plugin for WordPress. It is a single, lightweight plugin that empowers you to gracefully list any content type on any page. Guess what? No coding, complexity, or compromises. 

Whether you run a multi-author blogging site, a digital agency, or a portfolio website, this plugin provides an innovative way to present your content like a pro using the power of Gutenberg blocks.

This blog will take you behind the scenes of the plugin, from its features and purpose to using it to bring your content to life. Continue reading, as the upcoming insights will completely change how you think about custom post type presentations on WordPress. 

Understanding the Any CPT Listing Block

Before diving straight into the details, let us give you a walkthrough of Any CPT Listing Block and its importance. 

What Is Any CPT Listing Block?

The Any CPT Listing Block is a minimalist yet powerful WordPress plugin designed to list any registered custom post type (CPT) directly within the Gutenberg editor. The best part is that there are no custom queries, shortcodes, or dependencies on third-party page builders.

Display any content anywhere with just a few clicks. That’s the promise of the plugin. It is ideal to showcase blog posts, portfolios, case studies, testimonials, team members, services, or any custom post type. You can access Any CPT Listing Block built-in layout options for elegant, mobile-ready results. 

In short, it lets you transform raw post types into polished, user-friendly content blocks.

Why The Any CPT Listing Block Matters

Here is why this plugin deserves a spot in your stack:

Visual, No-Code Setup: Select post types, configure views, and publish without a developer’s need. 

Gutenberg Native: Works out of the box with WordPress core editor for a seamless UX.

Performance First: Swift-loading, minimal footprint, no frontend clutter.

Better UX & SEO: Highlighting key content types improves navigation and crawlability.

Flexible For All Roles: Whether you’re a website owner, marketer, or developer, it saves time and evolves with your workflow.

With the Any CPT Listing Block, you don’t just list content; you craft dynamic, discoverable experiences for modern WordPress users who value flexibility and performance.

Powerful Features Packed In A Lightweight Plugin

Simplify how you display content without giving up on flexibility. The Any CPT Listing Block Plugin is designed for creators, developers, and website owners who want full control over how custom post types are exhibited. Let’s walk you through the powerful features of this valuable plugin. 

Gutenberg Native Support – Built For The WordPress Editor

No need for additional page builders or external tools. This plugin integrates natively with the Gutenberg editor, so you can add and customize post listings directly from the editor you already use.

Custom Post Type Support – Showcase Any Post Type

You can display portfolio items and product listings to job posts and testimonials, provided the content is a custom post type. It works seamlessly with both default and custom CPTs.

Grid or List View Options – Choose The Right Layout

Switch effortlessly between grid and list formats based on your page design. Whether it’s a clean portfolio or a structured news feed, the plugin adapts to your layout goals.

Limit The Number Of Posts Displayed – Control The Focus

Only want to show your latest three posts or highlight just a few case studies? You can quickly set a post count limit according to the block to guide attention where needed.

Responsive and Mobile-Friendly – Looks Flawless On All Devices

No need to worry about display issues across devices. The plugin’s output is fully responsive, ensuring every layout looks sharp on phones, tablets, and desktops.

Unlimited Blocks Per Page – Scale As You Grow

Add multiple blocks to a single page, each showing different post types or categories. There is no cap, so you can create flexible content sections as needed.

Lightweight And Fast – Built For Performance

The plugin loads only what’s necessary-no extra scripts, no unnecessary styles. It keeps your website swift while doing precisely what it promises.

Multi-Site Compatible – Ready For Multi-Site Installations

If you manage a WordPress network, this plugin works across all websites, making it more straightforward to maintain consistent layouts across a multi-site setup.

Key Takeaway: The Any CPT Listing Block Plugin gives you precise control over how custom content appears on your website without adding complexity. It’s a neat, efficient way to deliver rich content experiences, even at scale.

How To Get Started With Any CPT Listing Block

Whether you are a WordPress beginner or a seasoned developer, setting up the Any CPT Listing Block Plugin is quick and uncomplicated. Follow these simple steps to display custom post types accurately as you want them.

Step 1: Install The Plugin

  • Go to your WordPress Dashboard.
  • Navigate to Plugins → Add New.
  • Search for “Any CPT Listing Block.”
  • Click Install and then Activate.

Or install it directly from the WordPress Plugin Directory.

Step 2: Add The Block

  • Open a page or post in the Gutenberg editor.
  • Click the “+” icon to add a new block.
  • Search for “CPT Listing” or scroll to the plugin blocks.
  • Select the Any CPT Listing Block.

Step 3: Configure The Settings

  • Choose the Post Type you want to display.
  • Select between Grid or List View.
  • Set the number of posts to show.
  • Customize sorting and layout as needed.

Step 4: Preview And Publish

Click preview to check how your block looks, and publish your page when you’re happy with the design. 

The Bottom Line: You don’t need a developer to start demonstrating your custom post types. Any CPT Listing Block lets you turn your content into structured, visually pleasing, and user-friendly layouts with just a few clicks. 

any CPT listing block plugin

What Makes Any CPT Listing Block Plugin Value-For-Money

The primary purpose when purchasing a plugin shouldn’t only be about what it does, but what value it delivers to you. This Any CPT Listing Block plugin is built for those who want neat, reliable functionality without paying for over-the-top multipurpose tools or dealing with custom development every time they need to list custom post types.

Here’s why investing in the Any CPT Listing Block Plugin pays off:

Zero Development Overhead

There is no need to write custom queries or templates. It replaces the need for theme-level tweaks or hiring developers for minor listing changes.

Focused Feature Set, No Fluff

It is built to do one job- list CPTs and does that excellently. No unnecessary features or upsell traps, just pure utility.

Gutenberg-First Approach

It is designed specifically for the WordPress block editor, which means better compatibility, future-proofing, and zero dependence on outdated shortcodes.

One-Time Purchase, Long-Term Use

No monthly lock-ins. A single payment gives you a tool you can reuse across projects, with multi-site support and wide compatibility.

Time-Saver For Agencies & Freelancers

Speeds up client delivery timelines and reduces maintenance overhead. It is ideal for professionals who build and hand-off multiple WP sites.

Why It Matters: This isn’t just another listing plugin; it’s a strategic tool. Whether you’re saving hours in development or simplifying client workflows, the value compounds quickly.

Who Should Purchase Any CPT Listing Block Plugin

If you’re dealing with Custom Post Types, this plugin is probably already solving a problem you didn’t know you had. Here’s a quick guide to who benefits most and why: 

Who It’s ForWhat They NeedHow This Plugin Helps
Freelance WordPress DevelopersFast, reusable CPT display solutions across multiple projectsNo-code CPT listing, Gutenberg-ready, saves build hours
Agencies & WP StudiosGrowth-Friendly plugin that works well with client websitesReduces reliance on developers. Easy-to-train non-tech team members
Content Creators & BloggersA simple way to showcase podcast episodes, reviews, or portfoliosAdd new content types without touching templates
eCommerce Store BuildersDisplay custom product types, catalogs, or bundlesCreate organized listings with grid or list layouts
Non-Tech WordPress UsersA user-friendly way to display content without hiring helpIntuitive block UI, no code or PHP knowledge needed

Final Thought: Whether you’re building for clients or creating your own content, this plugin bridges the gap between technical complexity and visual control right inside Gutenberg. 

Real-World Use Cases Of Any CPT Listing Block Plugin

Grasping the theory is nice as it gives you clarity. However, seeing how others use the tool turns that clarity into assurance. Below are potent ways Any CPT Listing Block Plugin can be deployed on real websites:

Portfolio Demonstration For Creative Professionals

Display projects, case studies, or visual work using a custom post type. Designers, photographers, and agencies love the grid layout to flaunt visual credibility.

Product Catalogs Without WooCommerce

Need to showcase products or packages without a full-fledged eCommerce setup? Use custom post types like “Products” or “Bundles” and list them systematically using this plugin.

Podcast & Video Episode Archives

Podcasters can create a CPT for “Episodes” and use the plugin to auto-display their newest uploads in a list view to keep it sorted, filtered, and branded.

Online Course or Lesson Libraries

Educational sites can exhibit lessons, courses, or modules as CPTs. The plugin makes it effortless to update and list them dynamically with no template edits.

Custom News, Reviews, or Event Feeds

Media publishers or bloggers can build dedicated CPTs for Reviews, Events, or Updates and present them neatly on different website sections using unlimited blocks.

Insight To Act On: If your website has unique content types beyond standard posts and pages, this plugin lets you demonstrate them with precision, ease, and complete creative control right where you write. 

5 Challenges That Any CPT Listing Block Plugin Overcomes

Even seasoned WordPress users stumble when it comes to neatly showcasing Custom Post Types. Hence, we will share real hurdles and how Any CPT Listing Block smoothly steers the path.

No Native CPT Display In Gutenberg

Gutenberg doesn’t offer a block to display CPTs like “Portfolio,” “Events,” or “Testimonials.” This plugin fills that gap. You don’t need coding or theme hacking.

Theme Limitations & Rigid Templates

Most themes restrict how and where CPTs can be rendered. Any CPT Listing Block Plugin unshackles you from hardcoded layouts and empowers flexible display directly in the editor.

Overkill Plugins That Slow Down Websites

Many CPT listing solutions are stacked with unnecessary features. This plugin stays lightweight, purpose-built, and optimized for speed without compromising functionality.

Displaying Multiple CPTs On One Page

What if you want to list Projects and Events on the same page without conflicts or cluttered shortcodes? This plugin supports unlimited blocks, even mixing CPTs per page.

Lack Of Visibility Into Custom Content

Custom post types often live behind the scenes without front-end exposure. This plugin brings them to light in just a few clicks. You can organize and style it to match your branding elements. 

The Crux: This plugin removes the usual obstacles of working with CPTs by bridging the gap between custom data and clean, user-facing presentation in a few clicks. 

any CPT listing block plugin

Flexibility In Just One Download

You can use Any CPT Listing Block Plugin alongside Custom Post Type UI to create and display fully custom content sections like:

  • Event listings
  • Recipes
  • FAQs
  • Case Studies

Moreover, you can make your content stand out and appear at the forefront of the audience by using this Gutenberg-friendly, performance-optimized, and beginner & developer-friendly plugin.

Make it yours today, and enjoy a dynamic, future-ready plugin to showcase your posts. 

Download Any CPT Listing Block Here

Conclusion

In a world where digital content is your brand’s voice, how you present it makes all the difference. The Any CPT Listing Block Plugin for WordPress doesn’t just simplify the presentation of your website posts. It redefines what flexibility and functionality can look like when they work harmoniously.

Throughout the blog, we’ve explored how this plugin supports any custom post type, fits seamlessly into the Gutenberg editor, and adapts exceptionally across layouts and devices. 

Beyond the features, it’s the plugin’s philosophy that truly stands out. It’s built for creators who want freedom without complexity and results without compromise. Though it is a lightweight build, this powerful upgrade won’t slow you down. In fact, it will elevate your website functionality and overall appeal.

Say Goodbye to Cheap Alternatives, and give your website the right tool to work more creatively and make your content shine.

We hope this guide brought clarity and inspiration, and sparks the next chapter of your content strategy. 

FAQ

Will The Any CPT Listing Block Plugin Work With My Current WordPress Theme?

Yes, the plugin is built to work seamlessly with any theme that supports the Gutenberg editor. You don’t need a specific setup to start using it.

Can It Display WooCommerce Products Or Other Custom Post Types?

Definitely. The plugin is fully compatible with all registered custom post types in your WordPress environment, whether testimonials, portfolios, services, or products.

Do I Need Technical Knowledge Or Coding Skills To Use This Plugin?

No coding is required. The plugin offers an intuitive, user-friendly interface that lets you manage content visually within the Gutenberg editor.

Will It Affect The Performance Or Loading Speed Of My Website?

The plugin is lightweight and performance-optimized. It’s designed to deliver results without adding unnecessary load or complexity.

How Is This Plugin Different From Other Post Grid Or Listing Tools?

This plugin focuses on clarity, ease of use, and flexibility. It avoids over-complication and gives you the essential tools to display your content in the way that suits your website best.