
Introduction
WordPress powers over 40% of websites globally, making it a cornerstone of the online world. Its flexibility, user-friendly interface, and extensive plugin ecosystem make it a top choice for businesses and individuals alike. However, even the best systems are not immune to challenges. Common WordPress errors can disrupt your site’s functionality, reduce performance, and hinder the user experience.
Imagine this: your website goes down during a product launch, or pages load so slowly that visitors leave before exploring. These issues can stem from seemingly minor errors that escalate if left unaddressed. While these problems are frustrating, they’re often solvable with the right knowledge and tools.
Why a Smooth WordPress Experience Matters
A well-functioning WordPress site isn’t just a technical achievement—it’s a necessity for business success. Whether you’re running an e-commerce platform, a personal blog, or a corporate website, every second of downtime or lag could mean lost revenue, reduced user engagement, and diminished trust. Addressing common errors proactively ensures your site remains fast, secure, and user-friendly.
Common Errors: The Hidden Roadblocks to Efficiency
Many WordPress errors, like database connection failures or plugin conflicts, may seem like minor hiccups. However, these issues can snowball, leading to poor SEO rankings, security vulnerabilities, or even a complete site crash. By identifying the root causes and implementing best practices, you can minimize disruptions and maintain a high-performing site.
Who This Guide Is For
Whether you’re a WordPress beginner trying to understand the basics or a seasoned site administrator looking to refine your troubleshooting skills, this guide is tailored for you. Each section offers step-by-step instructions, real-world examples, and recommendations for tools or professional assistance when needed.
Let’s dive into the most common WordPress errors, how to fix them, and how to future-proof your site for optimal efficiency.
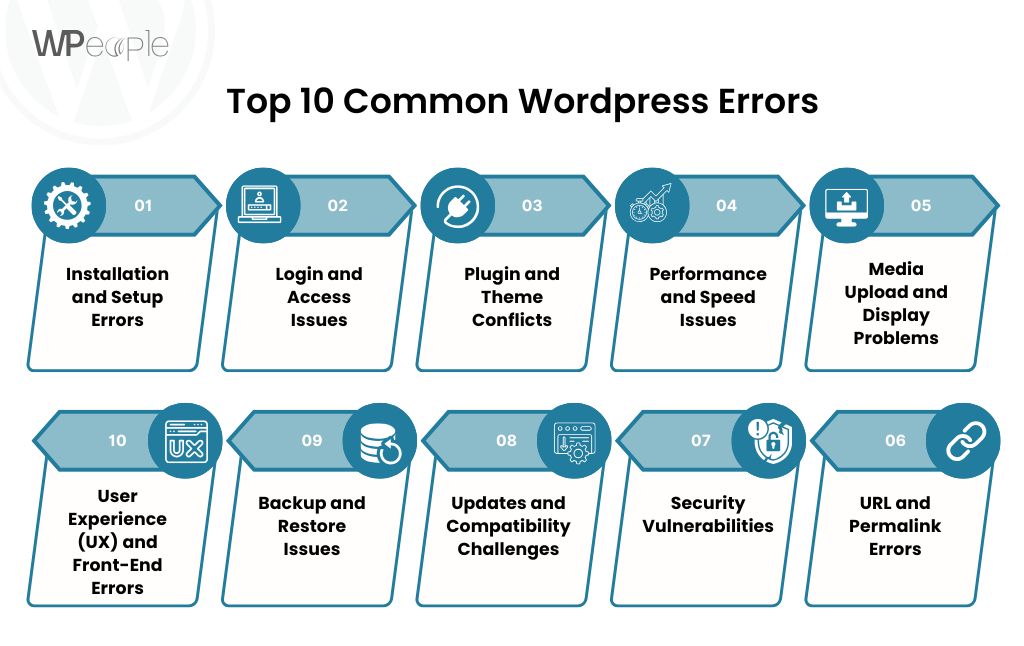
1. Installation and Setup Errors
Setting up WordPress should be a seamless process, but errors during installation can disrupt your workflow. These issues are often caused by server misconfigurations, incorrect settings, or overlooked prerequisites. Below, we’ll address three common setup errors and guide you through resolving them.
1.1. “Error Establishing a Database Connection”
This error occurs when WordPress fails to connect to the database, halting your site’s functionality entirely. It’s one of the most common issues during installation or migrations.
Causes:
- Incorrect database credentials in the wp-config.php file.
- Database server issues or downtime.
- Corrupted database files.
Step-by-Step Solutions:
- Check Database Credentials:
- Access the wp-config.php file in your site’s root directory.
- Verify the following credentials:
- DB_NAME (database name)
- DB_USER (database username)
- DB_PASSWORD (database password)
- DB_HOST (usually localhost or a specific host address provided by your hosting provider).
- Correct any discrepancies and save the file.
- Test Database Connectivity:
- Use a tool like phpMyAdmin to log in to the database with the credentials in wp-config.php.
- If login fails, update the username and password in your hosting control panel or contact your hosting provider.
- Repair the Database:
Add the following line to wp-config.php:
define(‘WP_ALLOW_REPAIR’, true);
- Visit http://yoursite.com/wp-admin/maint/repair.php and follow the on-screen instructions to repair the database.
- Remove the repair line from wp-config.php after completion.
- Contact Hosting Support:
If the issue persists, your hosting provider may be experiencing server problems. Provide them with the error details for resolution.
1.2. Missing wp-config.php File
Without the wp-config.php file, WordPress cannot communicate with your database, halting the installation process.
How to Generate and Configure a New File:
- Generate the File:
- Use the sample configuration file included in WordPress. Rename wp-config-sample.php to wp-config.php.
- Edit Configuration:
Open the file in a text editor and update the database credentials:
define(‘DB_NAME’, ‘your_database_name’);
define(‘DB_USER’, ‘your_database_user’);
define(‘DB_PASSWORD’, ‘your_database_password’);
define(‘DB_HOST’, ‘localhost’); // Or your host’s address
- Upload the File:
- Save and upload wp-config.php to the root directory of your WordPress installation.
Preventative Measures:
- Always back up the wp-config.php file before making changes.
- Use strong database passwords to prevent unauthorized access.
1.3. Memory Limit Exhaustion
This error often manifests as a white screen or an error message stating, “Allowed memory size of X bytes exhausted.”
Signs Your Site Has Reached Its Memory Limit:
- Intermittent crashes or failure to load certain pages.
- Plugins or themes failing to install or update.
How to Increase PHP Memory:
- Edit the wp-config.php File:
Add the following line:
define(‘WP_MEMORY_LIMIT’, ‘256M’);
- Update the .htaccess File:
Add this code to increase memory:
php_value memory_limit 256M
- Modify the php.ini File (If Accessible):
Locate the php.ini file and increase the memory limit:
memory_limit = 256M
- Contact Your Host:
If these steps don’t work, ask your hosting provider to increase the PHP memory limit for your account.
Each of these errors can feel overwhelming, especially for beginners. If troubleshooting doesn’t resolve the issue or feels too technical, consider hiring a professional WordPress developer. A skilled developer can not only fix errors efficiently but also set up preventative measures to avoid future issues.
2. Login and Access Issues
Being locked out of your WordPress site is a frustrating experience that can disrupt workflows and prevent critical updates. These login problems often arise due to forgotten credentials, misconfigured settings, or conflicts with plugins. Below, we’ll address common login issues and their resolutions.
2.1. Locked Out of Admin Dashboard
This issue can occur for several reasons, such as forgotten passwords, incorrect user roles, or plugin conflicts.
Reasons:
- Forgotten password or username.
- Plugins causing access restrictions.
- User role changes or account deletion.
Solutions:
- Reset Password via Email:
- Go to your WordPress login page and click “Lost your password?”.
- Enter your username or email address and follow the email instructions to reset your password.
- If you don’t receive the email, check your spam folder or proceed to the next steps.
- Manually Reset Password via phpMyAdmin:
- Log in to your hosting control panel and access phpMyAdmin.
- Navigate to the database associated with your WordPress site.
- Locate the wp_users table and find your username.
Edit the row and update the user_pass field using the MD5 encryption method:
NewPassword123
- Save the changes and log in with the new password.
- Deactivate Problematic Plugins via File Manager:
- Access your site’s files using FTP or your hosting control panel’s File Manager.
- Navigate to wp-content/plugins/.
- Rename the suspected plugin folder (e.g., from plugin-name to plugin-name_disabled).
- Check if you can log in. If successful, deactivate or update the conflicting plugin.
- Restore User Account via SQL Query:
If your admin account is missing, use an SQL query in phpMyAdmin to restore it:
INSERT INTO `wp_users` (`ID`, `user_login`, `user_pass`, `user_nicename`, `user_email`, `user_status`)
VALUES (‘1’, ‘admin’, MD5(‘NewPassword123’), ‘admin’, ’email@example.com’, ‘0’);
INSERT INTO `wp_usermeta` (`umeta_id`, `user_id`, `meta_key`, `meta_value`)
VALUES (NULL, ‘1’, ‘wp_capabilities’, ‘a:1:{s:13:”administrator”;b:1;}’),
(NULL, ‘1’, ‘wp_user_level’, ’10’);
2.2. “Too Many Redirects” Error
This error results in an infinite loop of redirections, typically caused by URL misconfigurations or HTTPS conflicts.
Diagnosing the Problem:
- Incorrect settings in WordPress or .htaccess files.
- HTTPS conflicts due to mismatched site URLs in settings.
Quick Fixes:
- Check WordPress URL Settings:
- Log in to your hosting control panel or use FTP to access your wp-config.php file.
Add the following lines to hardcode your site URLs:
define(‘WP_HOME’, ‘https://yourdomain.com’);
define(‘WP_SITEURL’, ‘https://yourdomain.com’);
- Ensure the URLs match your actual domain setup (with or without “www” or HTTPS).
- Clear Browser and Site Caches:
- Clear your browser cache or try accessing the site in incognito mode.
- If you use caching plugins (e.g., WP Rocket or W3 Total Cache), clear the plugin’s cache via FTP by deleting cached files in wp-content/cache/.
- Reset .htaccess File:
- Rename the .htaccess file in your site’s root directory to .htaccess_backup.
- Log in to your WordPress dashboard (if accessible) and navigate to Settings > Permalinks.
- Save the permalinks settings to generate a new .htaccess file.
- Verify SSL/HTTPS Configuration:
- Use a plugin like Really Simple SSL to handle HTTPS configurations and redirect issues.
- Ensure your SSL certificate is properly installed.
These login and access solutions are designed to get you back into your WordPress dashboard as quickly as possible. For complex issues or persistent errors, hiring a WordPress developer can save you time and prevent accidental data loss during troubleshooting.
3. Plugin and Theme Conflicts
Plugins and themes are the backbone of WordPress’s flexibility, but they can also introduce conflicts that disrupt your site. These conflicts often lead to errors, broken functionality, or even complete site crashes. Below, we’ll explore two common issues: the infamous “White Screen of Death” and problems caused by incompatible plugin or theme updates.
3.1. The “White Screen of Death”
The “White Screen of Death” (WSOD) is a blank page with no error messages, leaving users without any immediate clues about the problem.
Causes:
- Conflicting plugins or themes.
- Exhausted memory limit.
- Corrupted WordPress core files.
Steps to Identify and Fix the Issue:
- Enable Debugging Mode:
Edit your wp-config.php file and enable debugging by adding:
define(‘WP_DEBUG’, true);
define(‘WP_DEBUG_LOG’, true);
define(‘WP_DEBUG_DISPLAY’, false);
- Check the debug log in wp-content/debug.log for detailed error messages.
- Deactivate All Plugins:
- Use FTP or your hosting control panel to rename the wp-content/plugins/ folder to plugins_disabled.
- Refresh your site to check if the issue is resolved.
- If it works, reactivate plugins one by one to identify the culprit.
- Switch to a Default Theme:
- Temporarily replace your active theme with a default WordPress theme (e.g., Twenty Twenty-Three):
- Rename your current theme folder in wp-content/themes/.
- Activate the default theme from your dashboard or by manually uploading its files.
- Temporarily replace your active theme with a default WordPress theme (e.g., Twenty Twenty-Three):
- Increase PHP Memory Limit:
- Follow the steps from Section 1.3 to increase the memory limit in your wp-config.php file.
- Restore Corrupted Core Files:
- Download a fresh copy of WordPress from WordPress.org.
- Replace the wp-admin and wp-includes folders on your server with the new versions.
- Be careful not to overwrite your wp-content folder or wp-config.php file.
3.2. Incompatible Plugin or Theme Updates
Sometimes, updating a plugin or theme introduces compatibility issues with your WordPress version or other installed components.

Signs of Incompatibility:
- Site errors immediately after an update.
- Features stop functioning correctly.
- Dashboard becomes inaccessible.
How to Safely Update Plugins and Themes:
- Backup Your Site First:
- Use plugins like UpdraftPlus or BackupBuddy to create a full backup before applying updates.
- Test Updates in a Staging Environment:
- Create a staging site using your hosting provider’s tools or plugins like WP Staging.
- Test all updates in the staging environment to identify potential issues.
- Use Compatibility Tools:
- Check plugin compatibility reports in the WordPress repository.
- Use tools like WP Rollback to revert to a previous version of a problematic plugin or theme.
Rolling Back Updates:
- Install and activate WP Rollback.
- Navigate to the plugin or theme in your dashboard and click the “Rollback” option.
- Select the version you want to restore and follow the instructions.
Preventative Measures:
- Avoid bulk updates; update plugins and themes one at a time.
- Regularly update WordPress core to ensure compatibility with the latest plugins and themes.
- Choose well-maintained plugins and themes with high ratings and frequent updates.
Plugin and theme conflicts can be tricky to resolve, but a structured troubleshooting approach can save you time and prevent site downtime. If resolving these issues becomes overwhelming, a professional WordPress developer can diagnose and fix conflicts efficiently.
4. Performance and Speed Issues
Website performance is crucial for user experience, search engine rankings, and overall site success. Slow loading times or high resource usage can deter visitors and even lead to server crashes. Below, we address two common performance challenges: slow page load times and high CPU usage.
4.1. Slow Page Load Times
A sluggish site can frustrate users, increase bounce rates, and hurt SEO rankings.
Common Causes:
- Inadequate hosting resources.
- Large images or unoptimized media files.
- Absence of caching mechanisms.
- Excessive HTTP requests.
Optimization Techniques:
- Choose Reliable Hosting:
- Invest in quality hosting providers like SiteGround, Kinsta, or WP Engine, which offer managed WordPress hosting optimized for performance.
- Optimize Images and Media:
- Use tools like Smush or ShortPixel to compress images without sacrificing quality.
- Convert images to modern formats like WebP using plugins such as Imagify.
- Implement Caching:
- Use caching plugins like WP Rocket, W3 Total Cache, or LiteSpeed Cache to store static versions of your pages.
- Enable browser caching to reduce load times for returning visitors.
- Minify CSS, JavaScript, and HTML:
- Use plugins like Autoptimize or Asset CleanUp to minify and combine CSS and JS files, reducing their size and load time.
- Reduce HTTP Requests:
- Remove unnecessary plugins and scripts.
- Use a content delivery network (CDN) like Cloudflare or StackPath to deliver static resources from servers closer to your users.
- Run Performance Tests:
- Regularly test your site’s speed using tools like Google PageSpeed Insights, GTmetrix, or Pingdom Tools.
4.2. High CPU Usage
Excessive CPU usage can slow down or crash your website, especially during traffic spikes.
Common Culprits:
- Bots and spam traffic overwhelming server resources.
- Poorly coded or outdated plugins.
- Lack of resource optimization.
Steps to Resolve Server Overload:
- Block Malicious Bots:
- Install security plugins like Wordfence or Sucuri to block bots and reduce unnecessary traffic.
- Use a CDN with built-in bot protection, like Cloudflare.
- Optimize Plugins and Themes:
- Audit installed plugins and deactivate those not in use.
- Replace resource-heavy plugins with lightweight alternatives (e.g., replace Jetpack with more specific tools for analytics or social sharing).
- Enable Database Optimization:
- Use plugins like WP-Optimize to clean up your database by removing old revisions, spam comments, and transient data.
- Monitor Resource Usage:
- Use hosting tools or plugins like Query Monitor to identify resource-heavy plugins or scripts.
- Upgrade your hosting plan if traffic consistently exceeds server capabilities.
- Schedule Cron Jobs Efficiently:
- Use a plugin like WP Crontrol to manage WordPress cron jobs and avoid resource-heavy tasks running simultaneously.
- Upgrade Server Resources:
- If high CPU usage persists, upgrade to a higher-tier hosting plan or switch to a VPS (Virtual Private Server) or dedicated server for more resources.
By addressing performance and speed issues, you can ensure a faster, more reliable website for your visitors. Remember, regular monitoring and proactive maintenance are essential to sustaining optimal performance.
5. Media Upload and Display Problems
Media is a vital component of any WordPress site, enhancing user engagement and visual appeal. However, issues like upload errors or broken image links can disrupt the user experience and affect site performance. Below, we’ll examine two common media-related issues and their solutions.
5.1. Image Upload Errors
Sometimes, uploading images in WordPress results in errors such as “HTTP Error” or failed uploads.
Common Causes:
- Server-side restrictions or timeouts.
- Incorrect file permissions.
- Memory or storage limits.
Solutions:
- Check File Permissions:
- Use FTP or your hosting control panel to verify the permissions for the wp-content/uploads folder.
- Set folder permissions to 755 and file permissions to 644.
- Increase PHP Memory Limit:
Add the following to your wp-config.php file to increase the memory limit:
define(‘WP_MEMORY_LIMIT’, ‘256M’);
- Change PHP Settings in .htaccess:
Add these lines to your .htaccess file to extend upload limits and execution time:
php_value upload_max_filesize 64M
php_value post_max_size 64M
php_value max_execution_time 300
php_value max_input_time 300
- Rename Image Files:
- Avoid using special characters or spaces in file names. Use underscores or dashes instead. For example: my-image-2024.jpg.
- Use a Plugin for Upload Management:
- If issues persist, install plugins like Enable Media Replace to troubleshoot or re-upload images without conflicts.
5.2. Broken Image Links
Broken image links can occur after migrating a site, changing domains, or due to file path errors.
Common Causes:
- Images not properly migrated to the new server.
- Incorrect file paths in the database.
- File deletions from the media library.
Fixing Broken Image Links:
- Regenerate Image Thumbnails:
- Install the Regenerate Thumbnails plugin to recreate missing image sizes based on your theme’s requirements.
- Verify and Correct File Paths:
- Use tools like Better Search Replace to update URLs in the database:
- Search for the old domain (e.g., http://oldsite.com) and replace it with the new domain (e.g., https://newsite.com).
- Back up your database before performing this action.
- Use tools like Better Search Replace to update URLs in the database:
- Check .htaccess Rules:
- Ensure there are no misconfigured rules in the .htaccess file that block media access.
- Restore Missing Files:
- If images were accidentally deleted, re-upload them via FTP to the wp-content/uploads folder while maintaining the original folder structure.
- Use Plugins for Automated Fixes:
- Install Media File Renamer to correct file names and paths automatically.
- Use Broken Link Checker to identify and fix broken image links across your site.
Preventative Measures for Media Issues:
- Regularly back up your site, including media files, to avoid data loss.
- Use a CDN like Cloudflare or Jetpack’s Site Accelerator to serve images faster and reduce server load.
- Optimize images during upload with plugins like Smush or EWWW Image Optimizer.
Media-related issues can significantly impact your site’s usability and aesthetics. If problems persist after trying these solutions, a WordPress developer can offer in-depth troubleshooting and support.
6. URL and Permalink Errors
URLs and permalinks are critical for navigation, SEO, and user experience. Misconfigured permalinks or broken URLs can lead to frustrating errors such as 404 Not Found pages or SEO penalties. Below, we’ll address two common issues: 404 errors and canonical URL misconfigurations, along with their solutions.
6.1. 404 Errors on Pages
A 404 Error occurs when users try to access a page that doesn’t exist or has a broken link. This can happen after changes to your site structure, permalink settings, or content deletions.
Common Causes:
- Changes to permalink settings.
- Deleted or moved pages/posts.
- Incorrect redirections.
How to Fix 404 Errors:
- Flush Permalink Settings:
- Log in to your WordPress dashboard and navigate to:
Settings > Permalinks - Without making changes, click Save Changes to regenerate your .htaccess file and flush permalink settings.
- Log in to your WordPress dashboard and navigate to:
- Check and Update URLs:
- Identify broken links using plugins like Broken Link Checker.
- Update or remove outdated URLs from your pages, menus, and widgets.
- Create Redirects:
- Use a redirection plugin like Redirection to map old URLs to the correct pages.
- For example, redirect http://yourdomain.com/old-page to http://yourdomain.com/new-page.
- Restore Deleted Content:
- If a page was deleted unintentionally, check the Trash in Pages or Posts to restore it.
- Verify File and Folder Structure:
- Ensure the required files exist in the wp-content/uploads folder and haven’t been moved or renamed.
6.2. Canonical URL Misconfigurations
Canonical URLs signal to search engines the preferred version of a webpage. Misconfigured canonical tags can lead to duplicate content issues or indexing problems.
Impact of Canonical Errors:
- Search engines might index incorrect pages, harming SEO rankings.
- Users could land on unintended or outdated pages.
Steps to Fix Canonical URL Issues:
- Verify Canonical Tags:
- Use a tool like Screaming Frog SEO Spider or Ahrefs to crawl your site and identify incorrect canonical tags.
- Manually Edit Canonical Tags:
- For individual pages, edit the canonical URL in your SEO plugin settings:
- If using Yoast SEO, go to the page’s settings and update the canonical URL under the Advanced tab.
- If using Rank Math, update the canonical field in the Advanced SEO settings.
- For individual pages, edit the canonical URL in your SEO plugin settings:
- Ensure HTTPS Consistency:
- Ensure all canonical URLs use the correct protocol (https://) and domain version (with or without “www”).
Update your wp-config.php file to enforce consistent site URLs:
define(‘WP_HOME’, ‘https://yourdomain.com’);
define(‘WP_SITEURL’, ‘https://yourdomain.com’);
- Resolve Duplicate URLs:
Redirect non-canonical versions of URLs to their canonical counterparts using a plugin like Redirection or server-level redirects in .htaccess:
RewriteEngine On
RewriteCond %{HTTP_HOST} ^www.yourdomain.com [NC]
RewriteRule ^(.*)$ https://yourdomain.com/$1 [L,R=301]
- Test Canonical Settings:
- Use Google Search Console to check the indexing status of your pages and ensure the correct canonical versions are indexed.
Preventative Measures for URL and Permalink Errors:
- Regularly monitor and fix broken links using SEO tools.
- Avoid changing permalink structures unless absolutely necessary.
- Use a staging site to test permalink changes before applying them to the live site.
URL and permalink errors, if left unresolved, can harm both user experience and search engine rankings. For advanced configurations or persistent problems, consider consulting a WordPress developer to ensure your site remains optimized and error-free.
7. Security Vulnerabilities
Security vulnerabilities pose serious risks to your WordPress site, from data breaches to malware infections. A compromised site can lead to lost trust, SEO penalties, or even legal consequences. In this section, we’ll cover two significant security challenges: hacked websites and malware suspicious redirects, and provide actionable steps to safeguard your site.
7.1. Hacked WordPress Site
A hacked site often displays symptoms like unexpected content, unfamiliar user accounts, or being flagged by search engines.
Signs of a Hacked Site:
- Defaced homepage or unexpected changes to content.
- Unusual admin activity or new user accounts.
- Spammy redirects or pop-ups.
- Alerts from tools like Google Search Console or web hosting providers.
Steps to Clean and Secure Your Site:
- Take Your Site Offline:
- Use a maintenance mode plugin like WP Maintenance Mode to protect visitors and prevent further damage during cleanup.
- Scan for Malware:
- Use a security plugin like Wordfence, Sucuri Security, or MalCare to scan for malicious code.
- Check core files, plugins, themes, and database for unauthorized modifications.
- Remove Infected Files:
- Identify and delete infected files manually via FTP or cPanel. Be cautious not to delete critical WordPress files.
- Replace core WordPress files with fresh versions from WordPress.org.
- Change All Passwords:
- Reset passwords for your WordPress admin, FTP, database, and hosting accounts. Use strong, unique passwords with a generator like LastPass or 1Password.
- Restore from Backup:
- If the damage is extensive, restore your site from a clean backup using plugins like UpdraftPlus or BackupBuddy.
- Harden Site Security:
- Update WordPress core, plugins, and themes to the latest versions.
- Implement two-factor authentication (2FA) using plugins like Google Authenticator or Duo Security.
- Limit login attempts with plugins such as Limit Login Attempts Reloaded.
7.2. Malware and Suspicious Redirects
Malware and redirects can silently harm your visitors and your SEO rankings by spreading spam or phishing links.
Signs of Malware or Redirects:
- Users redirected to unrelated or spammy websites.
- Alerts from browsers or antivirus software labeling your site as unsafe.
- Reduced site performance or resource spikes.
How to Detect and Remove Malware:
- Scan Your Site:
- Use plugins like Wordfence, MalCare, or Sucuri Scanner to detect malicious scripts.
- Remove Malicious Code:
- Locate infected files using the scan results and clean them manually.
- Check theme and plugin files for unusual PHP scripts or <iframe> tags.
- Update .htaccess and wp-config.php:
- Ensure your .htaccess and wp-config.php files don’t contain malicious redirects or code.
- Replace them with default versions if compromised.
- Install a Firewall:
- Use plugins like Sucuri Firewall or Wordfence to block suspicious IPs and unauthorized access.
- Request a Site Review:
- If flagged by Google, use Google Search Console to request a review after cleanup to remove warnings from search results.
Recommended Security Plugins:
- Wordfence Security: Comprehensive malware scanning, firewall, and live traffic monitoring.
- Sucuri Security: Malware detection, blacklist monitoring, and post-hack cleanup services.
- iThemes Security: Features include brute force protection and scheduled malware scans.
Preventative Measures for Site Security:
- Regularly update WordPress core, plugins, and themes.
- Only install plugins and themes from trusted sources.
- Set up regular automated backups with plugins like UpdraftPlus.
- Enforce strict user roles and permissions to limit admin access.
Addressing security vulnerabilities promptly is critical to protecting your site, data, and reputation. For ongoing protection or advanced cleanup, hiring a WordPress security expert is often the best course of action.
8. Updates and Compatibility Challenges
WordPress, like all software, requires regular updates to maintain security, compatibility, and performance. However, issues can arise when core updates, themes, or plugins fail to update properly. In this section, we’ll address common challenges related to updates and compatibility and provide solutions to keep your site running smoothly.
8.1. Failed WordPress Core Updates
Sometimes, WordPress core updates fail due to server-related issues, plugin conflicts, or file permission errors.
Common Causes:
- Insufficient disk space on the server.
- Server timeouts during the update process.
- Conflicts with active plugins or themes.
How to Fix Failed Core Updates:
- Check Disk Space:
- Ensure your hosting server has enough disk space to accommodate the update. Contact your hosting provider if necessary to increase space.
- Manually Update WordPress:
- If the automatic update fails, manually update WordPress by downloading the latest version from WordPress.org.
- Upload the extracted files to your server via FTP, replacing the existing WordPress files (excluding the wp-content folder and wp-config.php file).
- Deactivate Plugins and Themes:
- Temporarily deactivate all plugins and switch to a default WordPress theme (like Twenty Twenty-Three). This eliminates conflicts that could block updates.
- After the update, reactivate plugins and themes one by one to identify the culprit if the update succeeds.
- Check PHP Version Compatibility:
- Ensure your PHP version is compatible with the latest WordPress release. WordPress recommends PHP 7.4 or higher. Update PHP via your hosting provider’s control panel or contact their support.
- Use WP-CLI (Command Line Interface):
If you are comfortable with the command line, you can use WP-CLI to manually update WordPress. Simply run the command:
wp core update
8.2. PHP Version Compatibility
PHP is the programming language WordPress is built on. Keeping PHP up to date is essential for site performance, security, and compatibility with newer versions of WordPress and plugins.
Why Updating PHP is Critical:
- Newer PHP versions provide faster performance and enhanced security.
- PHP 5.6 or older is no longer supported by WordPress and many plugins, leading to compatibility issues.
- PHP 7.4 or higher is recommended for optimal WordPress performance.
How to Test and Switch PHP Versions:
- Check Your Current PHP Version:
- You can check your PHP version in the WordPress dashboard by going to Tools > Site Health under the Info tab.
- Alternatively, you can check via your hosting control panel (cPanel or Plesk).
- Test Compatibility Before Updating PHP:
- Before upgrading PHP, test the compatibility of your site with the latest version.
- Use the PHP Compatibility Checker plugin to identify potential issues with your themes or plugins.
- Update PHP Version via Hosting Provider:
- Most hosting providers allow you to change PHP versions via their control panel. For example, in cPanel:
- Go to Select PHP Version and choose the latest supported version (preferably PHP 7.4 or PHP 8.x).
- Click Set as Current.
- Most hosting providers allow you to change PHP versions via their control panel. For example, in cPanel:
- Test Site After PHP Update:
- After switching PHP versions, test your site thoroughly for functionality and performance.
- Look for any issues such as broken plugins or features and update or replace outdated plugins if necessary.
Preventative Measures for Updates and Compatibility:
- Regularly Update WordPress Core, Themes, and Plugins:
Enable automatic updates for minor WordPress releases in the wp-config.php file by adding the following line:
define(‘WP_AUTO_UPDATE_CORE’, true);
- Keep plugins and themes updated for security and compatibility with WordPress core.
- Backup Your Site Before Updates:
- Always back up your site before performing updates using tools like UpdraftPlus or BackupBuddy.
- Use a Staging Environment:
- Test updates on a staging site before applying them to the live site. This ensures no conflicts occur with themes or plugins.
- Ensure Compatibility with Hosting Provider:
- Work with a hosting provider that offers PHP updates and WordPress optimization to ensure smooth updates and compatibility.
By regularly updating WordPress, themes, and plugins, and ensuring PHP compatibility, you can reduce the risk of encountering update-related issues. If you’re unsure about making these updates yourself, consider hiring a WordPress developer to manage your site’s technical aspects.
9. Backup and Restore Issues
Having reliable backups is essential for WordPress site management. They ensure you can recover your site after a crash, hack, or accidental data loss. However, issues can arise when backups are incomplete, corrupted, or fail to restore properly. In this section, we’ll cover common backup and restore problems and provide solutions to ensure your site is always protected.
9.1. Incomplete or Corrupted Backups
An incomplete or corrupted backup can lead to data loss or failure to restore your site properly when needed.
Common Causes:
- Server timeouts during the backup process.
- Disk space limitations on the hosting server.
- Errors or interruptions while backing up large databases or files.
How to Ensure Reliable Backups:
- Use Reliable Backup Plugins:
- Opt for well-established backup plugins like UpdraftPlus, BackupBuddy, or VaultPress. These plugins offer scheduled backups, cloud storage integration, and the ability to back up your entire site, including themes, plugins, and database.
- Test Backups Regularly:
- Don’t just rely on your backup plugin to confirm success; regularly test your backups by restoring them to a staging or local environment.
- If a backup doesn’t restore correctly, troubleshoot or switch to a different plugin that offers better reliability.
- Ensure Sufficient Storage Space:
- Check that you have enough disk space for backups, especially if you’re storing them on your server. Consider using external cloud storage options like Google Drive, Dropbox, or Amazon S3 to avoid running out of space.
- Schedule Regular Backups:
- Set up daily, weekly, or monthly backups, depending on how frequently you update your site.
- Use UpdraftPlus or similar plugins to automate the process and save backups to remote storage.
- Monitor Backup Logs:
- Many backup plugins generate logs that can help diagnose issues. Regularly check these logs to ensure backups are running smoothly.
9.2. Error During Restore Process
Restoring a backup is the last line of defense against issues like site crashes or hacking. However, problems can arise during the restore process that may leave your site in a broken or incomplete state.
Common Causes:
- Incorrect backup file format or incomplete backup.
- Plugin or theme conflicts during the restoration process.
- PHP memory limits or timeout issues while restoring large backups.
How to Troubleshoot and Successfully Restore a Site:
- Check Backup Integrity:
- Before starting the restore, ensure your backup file is not corrupted.
- If using a plugin like UpdraftPlus, verify that the backup was completed fully by reviewing its log files.
- Increase PHP Memory Limits:
Restoring large backups may require more PHP memory than the default limit. Increase your PHP memory limit in the wp-config.php file:
define(‘WP_MEMORY_LIMIT’, ‘256M’);
- If restoring via cPanel, increase the memory limit in the PHP settings.
- Restore Step-by-Step:
- If restoring a large site, break it down into smaller parts. Start with the database, then restore the files (themes, plugins, media, etc.).
- For UpdraftPlus or BackupBuddy, follow the step-by-step restore process to avoid skipping any important files.
- Resolve Plugin or Theme Conflicts:
- Deactivate all plugins and switch to the default Twenty Twenty-Three theme before starting the restore process.
- After restoration, reactivate plugins and themes one by one to check for conflicts.
- Use a Staging Site:
- Before restoring to your live site, perform the restore on a staging environment first. This helps identify any issues or conflicts that might arise and ensures your live site remains unaffected.
- Restore via FTP or cPanel if Needed:
- If your backup plugin fails, you can manually restore the files by uploading them via FTP or using the cPanel file manager.
- To restore the database, use phpMyAdmin to import the .sql file from the backup.
Best Practices for Backup and Restore:
- Always Backup Before Major Changes:
- Back up your site before updating WordPress core, themes, plugins, or adding new content.
- Use automated backups to save time and ensure consistency.
- Store Backups Off-Site:
- Store backups in multiple locations, including cloud services like Google Drive, Amazon S3, or Dropbox. This ensures that even if your server fails, you have an external copy of your site.
- Monitor Backup Schedules:
- Check your backup plugin regularly to ensure that backups are occurring as scheduled.
- Use a monitoring service to alert you in case a backup fails or is incomplete.
Backups are your safety net, but they can only help if they are complete and functional. Regularly testing and managing your backups is key to ensuring that you can quickly recover from any issue. If you encounter ongoing problems, it may be worth consulting a WordPress developer or system administrator for more advanced solutions.
10. User Experience (UX) and Front-End Errors
User experience (UX) is crucial for the success of any website, and WordPress sites are no exception. Front-end errors can frustrate visitors, increase bounce rates, and affect conversion rates. Common front-end issues like missing CSS, broken design, or mobile responsiveness problems can be resolved with the right approach. In this section, we’ll tackle these problems and suggest solutions for improving UX and site performance.
10.1. Missing CSS or Broken Design
CSS (Cascading Style Sheets) is responsible for styling your WordPress site, from layout to colors and fonts. Missing or broken CSS can result in a page that looks unstyled, broken, or hard to navigate.
Common Causes:
- Incorrect file paths or URLs for CSS files.
- Caching issues causing outdated stylesheets to load.
- Plugin or theme conflicts that disable CSS files.
How to Debug Missing CSS or Broken Design:
- Clear Browser Cache and Site Cache:
- If the site appears unstyled on your end, clear your browser cache to ensure you’re loading the most recent version of the site.
- Clear any caching plugins (like W3 Total Cache or WP Super Cache) to eliminate outdated cached CSS files.
- Check File Paths and URLs:
- Inspect the source code of the page (right-click > “Inspect” or press F12 in most browsers) and look for 404 errors related to CSS files.
- Verify that the paths to the CSS files are correct, especially after a site migration or theme update.
- Disable Plugins or Switch to Default Theme:
- A plugin or theme conflict could be preventing the CSS file from loading. Disable all plugins and switch to a default WordPress theme (like Twenty Twenty-Three).
- If the CSS loads correctly after deactivating plugins, reactivate them one by one to pinpoint the cause.
- Re-upload the CSS File:
- If the CSS file is missing, re-upload it via FTP to the correct directory. For example, ensure that style.css is located in the /wp-content/themes/your-theme/ directory.
- Check for Inline CSS Errors:
- Review any custom CSS added through the theme’s customizer or a plugin like Simple Custom CSS. Incorrect CSS rules or syntax errors can prevent the design from displaying correctly.
10.2. Mobile Responsiveness Problems
With the increasing use of smartphones and tablets to browse the web, mobile responsiveness is more important than ever. WordPress sites that aren’t optimized for mobile devices may show distorted layouts or content that’s hard to read or navigate.
Common Causes:
- Unresponsive themes or outdated theme versions.
- Fixed-width elements that do not scale properly on smaller screens.
- Lack of mobile-specific settings or media queries in CSS.
How to Test and Fix Mobile Responsiveness Issues:
- Use Responsive Design Tools:
- Test your site’s mobile responsiveness using built-in tools in browsers like Chrome or Firefox (right-click > “Inspect” > toggle device toolbar).
- Alternatively, use online tools like Google’s Mobile-Friendly Test to check for responsiveness issues.
- Switch to a Mobile-Optimized Theme:
- Choose a theme that is built to be responsive, such as themes from the WordPress Theme Directory or popular premium themes like Astra or GeneratePress.
- If your current theme isn’t mobile-friendly, consider updating it or switching to a more modern theme.
- Use Media Queries in CSS:
If you’re comfortable with CSS, use media queries to adjust styles based on screen size. For example:
@media only screen and (max-width: 768px) {
/* Add mobile-specific CSS here */
}
- This ensures your site layout adapts properly on smaller screens, adjusting elements like fonts, images, and columns.
- Optimize Images for Mobile:
- Large image files can significantly impact load times, especially on mobile devices.
- Use responsive image attributes like srcset to serve different sizes for different screen resolutions.
- Compress images using plugins like Smush or ShortPixel to reduce their file size.
- Test and Optimize Plugins for Mobile:
- Some plugins may not be mobile-friendly, leading to broken layouts or functionality issues.
- Disable plugins one by one and test to see if any cause mobile display issues.
Tools for Mobile Optimization:
- Google Mobile-Friendly Test: A tool to quickly check if your site is optimized for mobile.
- Browser Developer Tools: Chrome and Firefox allow you to test how your site looks on different devices.
- WPtouch: A plugin that helps optimize your WordPress site for mobile devices.
Best Practices for Improving UX and Front-End Performance:
- Responsive Design is Key:
- Ensure your WordPress theme is responsive, meaning it automatically adjusts to different screen sizes.
- Use AMP (Accelerated Mobile Pages) to improve mobile page speed and responsiveness.
- Prioritize Load Speed:
- Page speed impacts UX, especially on mobile. Use caching plugins (like W3 Total Cache or WP Rocket) and minimize scripts and stylesheets for faster loading.
- Use Lazy Load for images to improve page performance, especially on mobile devices.
- Regularly Test Your Site:
- Perform regular checks on your site’s appearance and functionality, particularly after updates or new plugin installations.
- User-Centered Design:
- Keep the user’s needs in mind. Make sure navigation is intuitive, content is easily readable, and buttons and links are clickable on all devices.
UX and front-end errors can significantly affect how visitors interact with your site. Regular testing, updating themes and plugins, and optimizing for mobile are essential steps in ensuring a smooth and professional user experience. If you face recurring issues, consulting a WordPress developer for a custom solution may be worthwhile.
Summary
In this guide, we’ve covered a wide range of common WordPress errors that can affect your site’s efficiency, user experience, and overall performance. From installation and setup issues to security vulnerabilities, it’s clear that regular maintenance and proactive troubleshooting are essential for keeping your site running smoothly.
Key Takeaways for Troubleshooting:
- Installation and Setup Errors:
Errors like “Error Establishing a Database Connection” or missing files can disrupt your site from the very beginning. Always ensure correct configurations and check server settings when issues arise. - Login and Access Issues:
Problems such as being locked out of the admin dashboard or facing too many redirects often stem from password issues or misconfigured URLs. Resetting passwords or adjusting URL settings can resolve most login issues. - Plugin and Theme Conflicts:
The “White Screen of Death” and issues with incompatible updates are common challenges in WordPress. Deactivating plugins, checking for theme compatibility, and rolling back updates can help fix these problems. - Performance and Speed Issues:
Slow loading times and high CPU usage can stem from a variety of factors, including poorly optimized plugins and large files. Caching, image optimization, and proper hosting choices are crucial for improving site performance. - Backup and Restore Challenges:
Ensuring that your backups are reliable and complete is critical. Regularly testing backups and having a solid plan for restoration can prevent major headaches in case of emergencies. - User Experience (UX) and Front-End Errors:
Issues like broken design or lack of mobile responsiveness can impact user engagement and retention. Always test your site on different devices, optimize images, and ensure your design adapts to various screen sizes.
The Role of Proactive Maintenance:
- Regular Backups: Always keep up-to-date backups to safeguard against data loss.
- Plugin and Theme Updates: Keep plugins and themes updated to avoid security risks and compatibility issues.
- Security Measures: Use reliable security plugins and monitor your site for vulnerabilities to protect it from hackers and malware.
- Mobile Optimization: Ensure your site is mobile-friendly, as more users access websites from mobile devices than ever before.
Maintaining a WordPress site requires vigilance and ongoing effort, but with the right tools and troubleshooting strategies, you can avoid the most common errors and ensure your site runs efficiently. Whether you’re managing a personal blog or a business website, taking the time to address issues proactively can improve performance, enhance the user experience, and secure your site’s long-term success.
12. FAQs
Here are some frequently asked questions (FAQs) to help clarify common concerns related to WordPress errors and troubleshooting:
Q1: What should I do if my site crashes completely?
If your WordPress site crashes completely, follow these steps:
- Check for Server Issues: Start by confirming if there are any server-side issues with your hosting provider.
- Disable Plugins and Themes: Access your site via FTP or File Manager and disable all plugins by renaming the /wp-content/plugins/ folder. Also, switch to a default WordPress theme like Twenty Twenty-Three.
- Check for PHP Errors: Look for PHP error logs in your hosting control panel and identify the source of the issue.
- Restore from Backup: If you have a recent backup, restore your site using your backup tool or manually via FTP and phpMyAdmin.
- Contact Your Hosting Provider or Developer: If the issue persists, reach out to your hosting provider or hire a WordPress developer for further assistance.
Q2: How often should I back up my WordPress site?
The frequency of backups depends on how often you update your site:
- For active sites with frequent updates: Daily or weekly backups are recommended.
- For sites with fewer updates: Weekly or monthly backups should be sufficient.
Use reliable plugins like UpdraftPlus, BackupBuddy, or VaultPress to automate backups. Always store backups off-site to ensure protection in case of server failure.
Q3: Can I prevent most errors with a managed hosting plan?
Yes, managed WordPress hosting plans can help prevent many common errors.
- Managed Hosting Advantages:
- Automatic updates and backups.
- Optimized performance and caching.
- Security features like malware scanning and protection.
- Expert support to troubleshoot issues.
While managed hosting offers significant benefits, it’s still important to monitor your site, test for performance, and handle specific issues proactively.
Q4: What are the best tools for monitoring site performance?
Monitoring your WordPress site’s performance helps you catch issues early. Some of the best tools include:
- Google PageSpeed Insights: A tool for measuring page load speed and providing optimization suggestions.
- GTmetrix: Offers detailed performance reports with suggestions to improve speed.
- Pingdom: Monitors uptime and performance across multiple locations.
- New Relic: Advanced site performance monitoring and debugging tools for developers.
Using these tools, you can track loading times, identify bottlenecks, and optimize your site for better performance.
Q5: How do I know if a plugin or theme is well-coded?
To assess the quality of a plugin or theme, consider these factors:
- Check Ratings and Reviews: Look for plugins or themes with positive feedback from users, particularly those that mention reliability and security.
- Update History: Well-coded plugins/themes are updated regularly to fix bugs, improve performance, and stay compatible with the latest version of WordPress.
- Code Quality: If you have development skills, review the plugin or theme’s code for best practices. Look for clean, well-commented code with no security vulnerabilities.
- Compatibility with WordPress Core: Ensure the plugin/theme is compatible with the latest version of WordPress. Reputable developers will update their products in line with WordPress releases.
If you’re unsure about a plugin or theme’s quality, consider asking a WordPress developer to review it for you.

Consult with Our WordPress Experts On:
- WooCommerce Store
- Plugin Development
- Support & maintenance


