Different businesses, different use cases. WordPress is used by businesses functioning in various industrial verticals. And all of them might have different needs when it comes to WordPress post creation. However, WordPress has a solution to satisfy the diversified needs of WordPress users. It provides users with a WordPress custom post type that allows users to manage posts in the way they want. In this article, we will discuss in-depth WordPress custom posts, and how to create custom post type using plugins and codes respectively. This article will show you how to integrate creating a new custom post easily.
What Is WordPress Custom Post Type?
A WordPress Custom Post Type (CPT) is a type of content that may be created and managed separately from the regular posts and pages. Creating new custom post types is necessary to develop custom WordPress sites.
Custom Post Types help you to organize and display a variety of information on your WordPress site, including portfolios, testimonials, goods, and any other content that meets your exact requirements. You can create as many custom posts as you want and there is no limit to it. For example, if you wish to create “Portfolio” post types, you can create a dedicated section and create posts under the name,
Custom Post Typess allow you to extend the functionality of your website and personalize it to your specific content needs.
You may wonder how the custom post type is different from the default post type, well let’s know more about the differences.
| Custom Post Types | Default Post Types | |
| Purpose and Usage | It is suitable for niche content development. For example, news, portfolios, etc. | It is suitable for general content development. |
| Fields and Structure | Gives maximum flexibility to arrange content in whichever way you want | It comes with some pre-built fields like tags, categories, content and title |
| Taxonomies | You can have your own taxonomies | You need to make use of built-in taxonomies. |
| Availability | Available upon Installation | It comes with some pre-built fields like tags, categories, content, and title |
That being said, custom post type in WordPress offers several benefits, such as:
- Helps in creating structured content, especially useful when multiple users are working on it;
- You can customize each post to add features like review scores,
- Helps in search engine ranking;
- Gives a better visualization of websites, as everything seems to be in place.
- Custom post types improve content management and retrieval by enabling organized content organization suited to particular requirements.
How to create a custom post type in WordPress?
You can create custom post type in WordPress in multiple ways given below.
- Utilizing a Plugin
- Adding Code in functions.php
- Developing a Custom Plugin
- Employing the WordPress REST API
- Using Theme or Plugin Builders
Let’s discuss custom post type using plugins step by step.
Creating Custom Post Types Using Plugin
Several plugins are available for creating custom post types in WordPress. Here are some of the popular custom post type plugins that you can use to quickly generate and manage custom post types
1 Custom Post Type UI Plugin
This plugin offers an easy-to-use interface for creating and managing custom post types and taxonomies. It simplifies the procedure without the need to write any code.
Plugin URL: https://wordpress.org/plugins/custom-post-type-ui
2 Pods – Custom Content Types and Fields Plugin
Custom post types, taxonomies, and custom fields can all be created using pods. It’s a versatile and powerful tool that can handle a wide range of content management tasks.
Plugin URL: https://wordpress.org/plugins/pods/
3 Advanced Custom Fields (ACF) PLugin
Registering post types and taxonomies is now possible directly in the ACF UI, which speeds up the content modeling workflow and eliminates the need to touch code or utilize another plugin.
Plugin URL: https://wordpress.org/plugins/advanced-custom-fields/
How to Install and Activate the Plugin?
The initial step involves installing and enabling the plugin on your WordPress site. I’ll walk you through the procedure using the Advanced Custom Fields (ACF) plugin.
Step 1: Install and Activate the Plugin
- Navigate to your WordPress Dashboard.
- Click on Plugins, then select Add New.
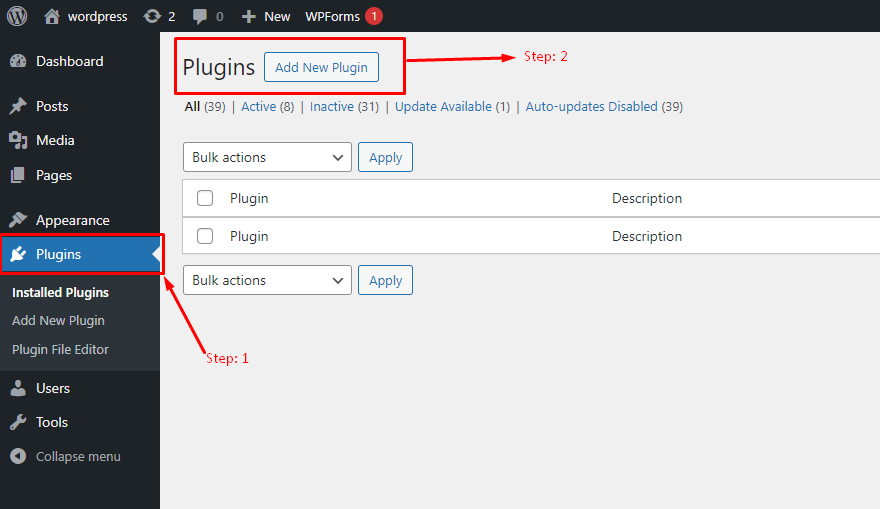
- In the search bar, type ‘Custom Post Type’.
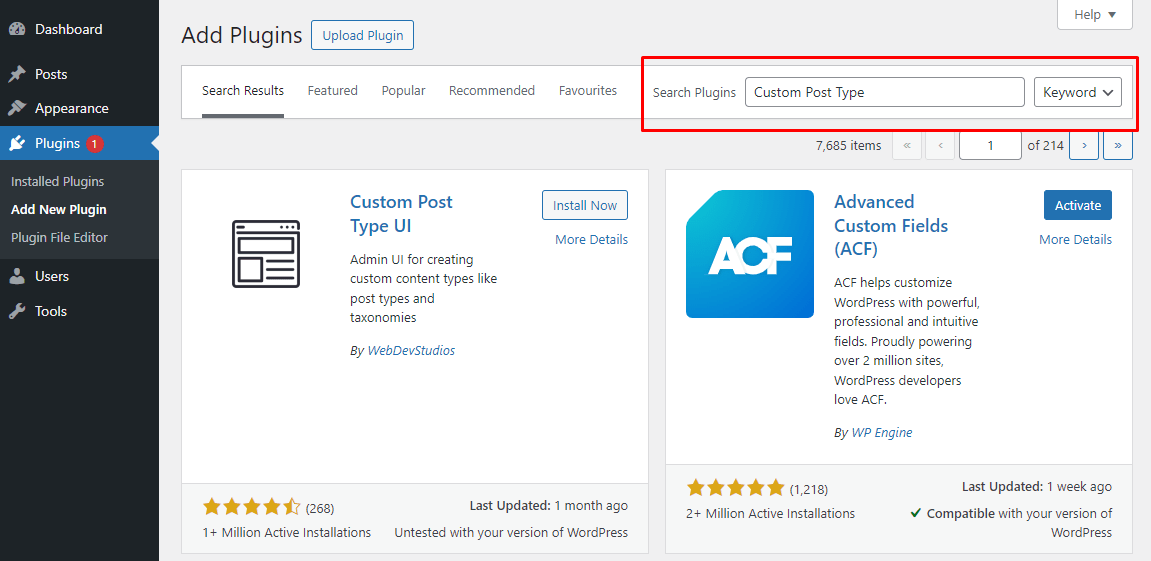
- Find the plugin in the search results, then click Install Now.
- Once the installation is complete, click Activate to enable the plugin.
Step 2: Set up and Configure the Plugin
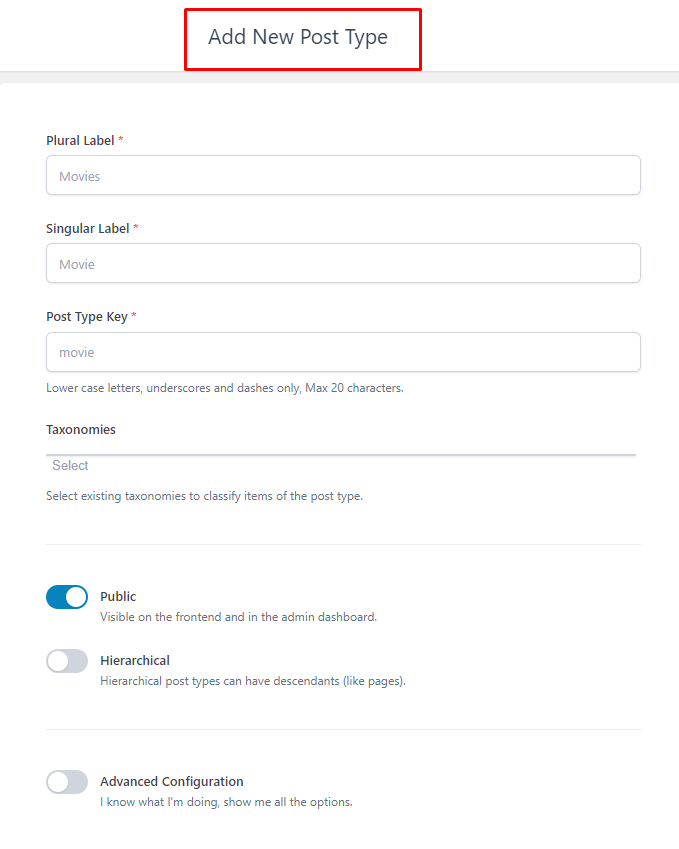
Once enabled, Advanced Custom Fields (ACF) will appear as a new menu option in the dashboard.
With this Screenshot, creating a custom CPT is made simple.
Creating Custom Post Types Using Code
Creating a custom post type in WordPress using code involves adding some PHP to your theme’s functions.php.
The register_post_type() function will accept the arguments for creating custom post types, and the hook in add_action() must utilize init.
Open your theme’s functions.php file and add the following code to register a custom post type
  add_action('init', 'create_custom_post_type_function');
  function create_custom_post_type_function() {
     $labels = array(
         'name'               => _x('Books', 'post type general name', 'textdomain'),
         'singular_name'      => _x('Book', 'post type singular name', 'textdomain'),
        'menu_name'          => _x('Books', 'admin menu', 'textdomain'),
        'name_admin_bar'     => _x('Book', 'add new on admin bar', 'textdomain'),
        'add_new'            => _x('Add New', 'book', 'textdomain'),
        'add_new_item'       => __('Add New Book', 'textdomain'),
        'new_item'           => __('New Book', 'textdomain'),
        'edit_item'          => __('Edit Book', 'textdomain'),
        'view_item'          => __('View Book', 'textdomain'),
        'all_items'          => __('All Books', 'textdomain'),
        'search_items'       => __('Search Books', 'textdomain'),
        'parent_item_colon'  => __('Parent Books:', 'textdomain'),
        'not_found'          => __('No books found.', 'textdomain'),
        'not_found_in_trash' => __('No books found in Trash.', 'textdomain')
    );


    $args = array(
        'labels'             => $labels,
        'public'             => true,
        'publicly_queryable' => true,
        'show_ui'            => true,
        'show_in_menu'       => true,
        'query_var'          => true,
        'rewrite'            => array('slug' => 'book'),
        'capability_type'    => 'post',
        'has_archive'        => true,
        'hierarchical'       => false,
        'menu_position'      => null,
        'supports'           => array('title', 'editor', 'author', 'thumbnail', 'excerpt', 'comments')
    );
    register_post_type('book', $args);
}
Explanation:
$labels: An array defining the various labels for the post type.
$args: An array of arguments to define the behavior of the post type.
register_post_type: Registers the post type with the provided labels and arguments.
After adding the code, you may need to refresh your permalinks to prevent 404 errors. Go to Settings > Permalinks in your WordPress dashboard and click Save Changes without making any changes.
Extending Custom Post Types with Taxonomies
In WordPress, taxonomies are used to group and categorize content. The default taxonomies are “Categories” and “Tags”. However, sometimes these default taxonomies are not enough for the specific needs of your website. This is where custom taxonomies come in. Custom taxonomies allow you to create your groupings and classifications for your custom post types, providing more flexibility in organizing your content.
Use the register_taxonomy function to create a custom taxonomy. Here’s an example of how to create a custom taxonomy called “Categories” for a custom post type named ‘movies”.
function create_custom_taxonomy_function() {
    // Labels for the taxonomy
    $labels = array(
        'name'              => _x( 'Categories', 'taxonomy general name' ),
        'singular_name'     => _x( 'Category', 'taxonomy singular name' ),
        'search_items'      => __( 'Search Categories' ),
        'all_items'         => __( 'All Categories' ),
        'parent_item'       => __( 'Parent Category' ),
        'parent_item_colon' => __( 'Parent Category:' ),
        'edit_item'         => __( 'Edit Category' ),
        'update_item'       => __( 'Update Category' ),
        'add_new_item'      => __( 'Add New Category' ),
        'new_item_name'     => __( 'New Category Name' ),
        'menu_name'         => __( 'Category' ),
    );


     $args = array(
        'hierarchical'      => true,
        'labels'            => $labels,
        'show_ui'           => true,
        'show_admin_column' => true,
        'query_var'         => true,
        'rewrite'           => array( 'slug' => 'movie_category' ),
    );


    // Register the taxonomy
    register_taxonomy( 'movie_category', 'movies', $args );
}
add_action( 'init', 'create_custom_taxonomy_function', 0 );
Why Use Custom Taxonomies?
- Enhanced Organization: Custom taxonomies help in organizing content more effectively by grouping related posts.
- Improved Navigation: They improve site navigation by allowing users to find related content easily.
- Better SEO: Custom taxonomies can help in creating keyword-rich URLs, improving your site’s SEO.
Enhancing Functionality with Custom Meta Boxes
Custom Meta Boxes are a feature in WordPress that allows developers to add custom fields to the post or page edit screens. These fields can be used to store additional metadata about the post or page, such as a summary, keywords, or other custom data.
Creating custom meta boxes involves using WordPress hooks and functions to add them to the post-editing screens. Here’s a basic example of how to create a custom meta box:
Use the add_meta_box function to add a custom meta box. This function should be hooked into the add_meta_boxes action
Step 1 Add the Meta Box
add_action( 'add_meta_boxes', 'add_custom_meta_box' );
function add_custom_meta_box() {
    add_meta_box(
        'custom_meta_box_id',       // Unique ID for the meta box
        'Custom Meta Box Title',    // Meta box title
        'custom_meta_box_callback', // Callback function to display the meta box content
        'post',                     // Post type (e.g., 'post', 'page', 'custom_post_type')
        'normal',                   // Context ('normal', 'side', 'advanced')
        'high'                      // Priority ('high', 'core', 'default', 'low')
    );
}

function custom_meta_box_callback( $post ) {
    // Add a nonce field for security
    wp_nonce_field( 'save_custom_meta_box_data', 'custom_meta_box_nonce' );
    // Retrieve existing value from the post meta
    $value = get_post_meta( $post->ID, '_custom_meta_key', true );
    // Display the form field
    echo '<label for="custom_meta_field">Custom Field:</label>';
    echo '<input type="text" id="custom_meta_field" name="custom_meta_field" value="' . esc_attr( $value ) . '" />';
}
Step 2: Save the Meta Box Data
        add_action( 'save_post', 'save_custom_meta_box_data' );
        function save_custom_meta_box_data( $post_id ) {
    // Check nonce for security
if ( ! isset( $_POST['custom_meta_box_nonce'] ) || ! wp_verify_nonce(
$_POST['custom_meta_box_nonce'], 'save_custom_meta_box_data' ) ) {
        	return;
    }
    // Check if the user has permission to save the data
    if ( ! current_user_can( 'edit_post', $post_id ) ) {
        return;
    }
    // Check if the custom meta field is set and sanitize the data
    if ( isset( $_POST['custom_meta_field'] ) ) {
        $data = sanitize_text_field( $_POST['custom_meta_field'] );
        update_post_meta( $post_id, '_custom_meta_key', $data );
    }
}
Note that the above code is just an example and you should adjust it to fit your specific needs.
Optimizing Custom Post Types for SEO
To create a custom post type, use the register_post_type function. Include SEO-friendly labels and rewrite rules to improve URL structures. Ensure the permalinks are optimized for SEO by using descriptive, keyword-rich slugs.
Ensure the permalinks are SEO-friendly by using descriptive and keyword-rich slugs.
‘rewrite’ => array( ‘slug’ => ‘book’)
Additionally, leverage SEO plugins like Yoast SEO or All in One SEO Pack to optimize your custom post types. These plugins offer tools to set meta titles, descriptions, and other SEO settings specific to your custom post types.
Conclusion:
Now that you know the advantages of using a custom post type, why wait? You can reach out to our WordPress experts who can help you install one. Try custom post types in WordPress and have a faster and more efficient website for your business.
Consult with Our WordPress Experts On:
- WooCommerce Store
- Plugin Development
- Support & maintenance


